Understand OpenID authentication through examples
2023.12.25
In the article "Understanding OAuth2 through Examples[1]", we explained the working principle of the OAuth2 authorization code mode (Authorization Code) mode with examples. After the photo printing service in the example is authorized by the user (tonybai), it uses the code provided by the user (actually assigned by the authorization server and redirected to the photo printing service through the user's browser) to the authorization server in exchange for an access token, and Finally, the access token was used to read the user's photo information from the cloud disk system.
However, the photo printing service that has obtained the access token does not know which user on the cloud disk service the access token represents. If the cloud disk service did not return the user name (tonybai) in the photo list interface, the photo printing service would still need to Creates a temporary user ID for the user authorized to it. When tonybai users access the photo printing service again a week later, the photo printing service needs to go through the OAuth2 authorization process again, which is not good for the user experience.
From the perspective of photo printing services, it hopes to obtain the user's identity information when the user first uses the service and authorizes it, adds the user to its own user system, and uses a similar session-based identity authentication mechanism [2] Automatically identify and authenticate the user's identity when the user subsequently uses the service. In this way, users can avoid the poor experience of registering an additional separate account, and avoid the cumbersome authorization process the next time the user uses the service.
However, although OAuth 2.0 is a security protocol that requires user interaction, it is not an identity authentication protocol after all. However, many applications such as photo printing services also have a strong demand for user identity authentication through large-scale applications such as cloud disk systems, so many manufacturers have developed their own dedicated standards, such as Facebook, Twitter, LinkedIn and GitHub. etc., but these are specialized protocols and lack standardization, so developers must develop and adapt them one by one.
Therefore, the OpenID Foundation [3] developed an open identity authentication protocol standard such as OpenID Connect (referred to as OIDC) [4] based on OAuth2.0, which can be used universally among different manufacturers.
In this article, we will introduce the principle of identity authentication based on OpenID. With the previous article OAuth2 as a foreshadowing, OIDC is very easy to understand.
1. Introduction to OpenID Connect (OIDC)
OpenID Connect is an open standard released by the OpenID Foundation in February 2014. It defines an interoperable way to perform user authentication using OAuth 2.0. Because the protocol is designed to be interoperable, an OpenID client application can interact with different identity providers using the same protocol language without the need to implement a slightly different protocol for each identity provider. OpenID Connect is built directly on OAuth 2.0 and maintains OAuth2.0 compatibility. In the real world, in most cases, OIDC will be deployed together with the OAuth infrastructure that protects other APIs.
When we studied OAuth 2.0 [5], we first learned about several entities involved in the protocol, such as Client, Authorization Server, Resource Server, Resource owner, Protected resouce, etc., as well as their interaction processes. Once you know this, you will master the core of OAuth2. Taking this as a guide, when we study the OIDC protocol, we also start by understanding which entities participate in the protocol interaction and their specific interaction processes.
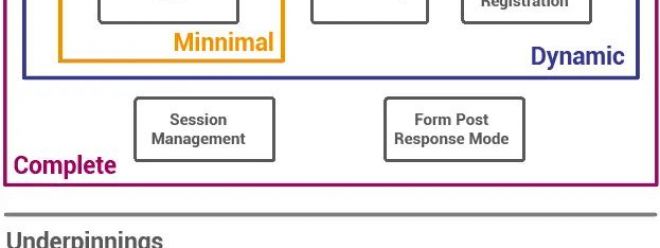
OpenID Connect is a protocol suite (OpenID Connect Protocol Suite [6]), involving Core, Discovery, Dynamic Client Registration, etc.:
 picture
However, here we only focus on the core 1.0 protocol specification of OpenID Connect [7].
Just like OAuth2.0 supports four authorization modes, OIDC integrates three identity authentication types based on these four modes:
- Authentication using the Authorization Code Flow
- Authentication using the Implicit Flow
- Authentication using the Hybrid Flow
Among them, Authentication using the Authorization Code Flow, an identity authentication scheme based on the OAuth2 authorization code process, should be the most widely used. This article will also understand OIDC based on this process and give examples.
1.1 Entities and interaction flow chart in OIDC protocol
The following is a general identity authentication flow chart given in the OIDC specification. This diagram is highly abstract and suitable for the above three flows:
 picture
Through this diagram, let us first understand the three entities involved in the OIDC process:
- RP(Relying Party)
The far left end of the figure is an entity called RP. If it corresponds to the example in the OAuth2.0 article, this RP corresponds to the photo printing service in the example, which is the Client in OAuth2.0, which requires the user (EU ) authorized entity.
- OP(OpenID Provider)
OP corresponds to the Authorization Server+Resource Server in OAuth2.0. The difference is that in the special scenario of OIDC, the resource stored in the Resource Server is the user's identity information.
- EU(End User)
EU, as the name suggests, is the user who uses the RP service, which corresponds to the Resource Owner in OAuth2.0.
Combining these entities, the abstract flow chart above, and the interaction diagram of the OAuth2 authorization code mode, I will draw an interaction diagram between entities that OIDC uses for identity authentication based on the authorization code mode. Here we still take users using photo printing services as an example:
 picture
The picture above is an OIDC protocol process based on the authorization code process. Is it almost exactly the same as the authorization code mode process in OAuth 2.0?
The only difference is that the authorization server (OP) returns an additional ID_TOKEN while returning access_token. We call this ID_TOKEN an ID token. This token is the key to OIDC identity authentication.
1.2 Composition of ID_TOKEN
From the picture above, we see that ID_TOKEN is provided to Client (RP) together with ordinary OAuth access_token. Unlike access_token, RP needs to parse ID_TOKEN. So what exactly is this ID_TOKEN? In the OIDC protocol, ID_TOKEN is a signed JWT[8],
The OIDC protocol specification stipulates the field information that the jwt should contain, including required (REQUIRED) and optional (OPTIONAL). Here we can understand the following required field information:
- iss
The issuer of the token, its value is the URL of the identity authentication service (OP), for example: http://open.my-yunpan.com:8081/oauth/token, query parameters that do not include question marks as prefixes, etc.
- sub
The subject identifier of the token, whose value is the end-user's (EU) unique and never-reassigned identifier within the authentication service (OP).
- aud
The target audience of the token, whose value is the identity of the Client (RP), must contain the OAuth 2.0 client ID (client_id) of the RP, and may also contain identifiers of other audiences.
- exp
Expiration time, ID_TOKEN will become invalid after expiration. Its value is a JSON number representing the number of seconds from 1970-01-01T0:0:0Z (measured in UTC) to the expiration date/time.
- iat
Authentication time, that is, the time of version ID_TOKEN, its value is a JSON number, indicating the number of seconds starting from 1970-01-01T0:0:0Z (measured in UTC) to the authentication date/time.
Note: If the client (RP) has registered a public key with the identity authentication server (OP), the client public key can be used to perform asymmetric signature verification on the JWT, or the client key can be used to symmetrically sign the JWT . This approach improves the client's security level by avoiding the need to pass keys over the network.
In the process of using access_token to obtain user_info in the figure above, RP can use the sub (EU unique identifier) in ID_TOKEN to the userinfo endpoint of the authorization server in exchange for the user's basic information. In this way, when the EU identification is displayed on the RP's own page, You can't use a unique identifier (sub) like 9XDF-AABB-001ACFE, but use an understandable string like TonyBai.
Note: OpenID Connect uses a special permission scope value openid to control access to the UserInfo endpoint. OpenID Connect defines a set of standardized OAuth permission scopes, corresponding to a subset of user attributes, such as profile, email, phone, address, etc.
After understanding the identity authentication process of OIDC and the composition of ID_TOKEN, we have an intuitive understanding of OIDC. Next, we use an example to deepen our understanding of OIDC identity authentication.
2. OIDC instance
If you understand the examples in the article "Understanding OAuth2 through Examples[9]", then it will be easy to understand the OIDC examples in this article. As mentioned before, OIDC is built on OAuth2 and is compatible with OAuth2. Therefore, the OIDC example here is also modified from the example in the OAuth2 article.
Compared with the example in the OAuth2 article, the cloud disk service (my-yunpan) is removed from the OIDC example, and only the following structure is retained:
$tree -L 2 -F oidc-examples
oidc-examples
├── my-photo-print/
│   ├── go.mod
│   ├── go.sum
│   ├── home.html
│   ├── main.go
│   └── profile.html
└── open-my-yunpan/
    ├── go.mod
    ├── go.sum
    ├── main.go
└── portal.html- 1.
- 2.
- 3.
- 4.
- 5.
- 6.
- 7.
- 8.
- 9.
- 10.
- 11.
- 12.
- 13.
Among them, my-photo-print is a photo printing service and is also the RP entity in the oidc instance, while open-my-yunpan plays the role of cloud disk authorization service and is the OP entity in the oidc instance. Before writing and running the service, we also need to modify the /etc/hosts file of the local machine (MacOS or Linux):
127.0.0.1 my-photo-print.com
127.0.0.1 open.my-yunpan.com- 1.
- 2.
Note: Before demonstrating the following steps, please first enter the two directories of oidc-examples and start each service program through go run main.go (one terminal window for each program).
2.1 User uses my-photo-print.com photo printing service
According to the process, the user first opens the homepage of the photo printing service through the browser: http://my-photo-print.com:8080, as shown below:
 picture
This is no different from the example in the OAuth2 article. This page is also provided by the homeHandler in my-photo-print/main.go, and its home.html rendering template is basically unchanged, so I won’t go into details here.
When the user selects and clicks "Log in with a cloud disk account", the browser will open the homepage of the cloud disk authorization service (OP) (http://open.my-yunpan.com:8081/oauth/portal).
2.2 Use open.my-yunpan.com for authorization, including openid permissions
The homepage of the cloud disk authorization service is still the same as before. The only difference is that the requested permission includes an openid (brought over by my-photo-print’s home.html):
 picture
This page is also provided by the portalHandler of open.my-yunpan.com. Its logic has not changed compared with the oauth2 instance. Its code is also listed here.
When the user (EU) fills in the user name and password and clicks "Authorize", the browser will initiate a post request to "/oauth/authorize" of the cloud disk authorization service to obtain the code. The authorizeHandler responsible for the "/oauth/authorize" endpoint will After authenticating the user, it will assign a code and return a redirected response to the browser. The redirected address is the callback address of the photo printing service: http://my-photo-print.com:8080/cb ?code=xxx&state=yyy.
2.3 Obtain the access token and id_token, and use the user's unique identifier to obtain the user's basic information (profile)
This redirection is equivalent to the user's browser making a request to http://my-photo-print.com:8080/cb?code=xxx&state=yyy to provide code for the photo printing service. This request is handled by the oauthCallbackHandler of my-photo-print. deal with:
// oidc-examples/my-photo-print/main.go

// callback handler,用户(EU)拿到code后调用该handler
func oauthCallbackHandler(w http.ResponseWriter, r *http.Request) {
 fmt.Println("oauthCallbackHandler:", *r)

 code := r.FormValue("code")
 state := r.FormValue("state")

 // check state
 mu.Lock()
 _, ok := stateCache[state]
 if !ok {
  mu.Unlock()
  fmt.Println("not found state:", state)
  w.WriteHeader(http.StatusBadRequest)
  return
 }
 delete(stateCache, state)
 mu.Unlock()

 // fetch access_token and id_token with code
 accessToken, idToken, err := fetchAccessTokenAndIDToken(code)
 if err != nil {
  fmt.Println("fetch access_token error:", err)
  return
 }
 fmt.Println("fetch access_token ok:", accessToken)

 // parse id_token
 mySigningKey := []byte("iamtonybai")
 claims := jwt.RegisteredClaims{}
 _, err = jwt.ParseWithClaims(idToken, &claims, func(token *jwt.Token) (interface{}, error) {
  return mySigningKey, nil
 })
 if err != nil {
  fmt.Println("parse id_token error:", err)
  return
 }

 // use access_token and userID to get user info
 up, err := getUserInfo(accessToken, claims.Subject)
 if err != nil {
  fmt.Println("get user info error:", err)
  return
 }
 fmt.Println("get user info ok:", up)

 mu.Lock()
 userProfile[claims.Subject] = up
 mu.Unlock()

 // 设置cookie
 cookie := http.Cookie{
  Name:   "my-photo-print.com-session",
  Value:  claims.Subject,
  Domain: "my-photo-print.com",
  Path:   "/profile",
 }
 http.SetCookie(w, &cookie)
 w.Header().Add("Location", "/profile")
 w.WriteHeader(http.StatusFound) // redirect to /profile
}- 1.
- 2.
- 3.
- 4.
- 5.
- 6.
- 7.
- 8.
- 9.
- 10.
- 11.
- 12.
- 13.
- 14.
- 15.
- 16.
- 17.
- 18.
- 19.
- 20.
- twenty one.
- twenty two.
- twenty three.
- twenty four.
- 25.
- 26.
- 27.
- 28.
- 29.
- 30.
- 31.
- 32.
- 33.
- 34.
- 35.
- 36.
- 37.
- 38.
- 39.
- 40.
- 41.
- 42.
- 43.
- 44.
- 45.
- 46.
- 47.
- 48.
- 49.
- 50.
- 51.
- 52.
- 53.
- 54.
- 55.
- 56.
- 57.
- 58.
- 59.
- 60.
- 61.
- 62.
- 63.
A lot of work has been done in this handler. The first is to use code to exchange access token and id_token with the authorization server. The authorization server is responsible for issuing tokens with tokenHandler:
// oidc-examples/open-yunpan/main.go

func tokenHandler(w http.ResponseWriter, r *http.Request) {
 fmt.Println("tokenHandler:", *r)

 // check client_id and client_secret
 user, password, ok := r.BasicAuth()
 if !ok {
  fmt.Println("no authorization header")
  w.WriteHeader(http.StatusNonAuthoritativeInfo)
  return
 }

 mu.Lock()
 v, ok := validClients[user]
 if !ok {
  fmt.Println("not found user:", user)
  mu.Unlock()
  w.WriteHeader(http.StatusNonAuthoritativeInfo)
  return
 }
 mu.Unlock()

 if v != password {
  fmt.Println("invalid password")
  w.WriteHeader(http.StatusNonAuthoritativeInfo)
  return
 }

 // check code and redirect_uri
 code := r.FormValue("code")
 redirect_uri := r.FormValue("redirect_uri")

 mu.Lock()
 ac, ok := codeCache[code]
 if !ok {
  fmt.Println("not found code:", code)
  mu.Unlock()
  w.WriteHeader(http.StatusNotFound)
  return
 }
 mu.Unlock()

 if ac.redirectURI != redirect_uri {
  fmt.Println("invalid redirect_uri:", redirect_uri)
  w.WriteHeader(http.StatusBadRequest)
  return
 }

 var authResponse struct {
  AccessToken string `json:"access_token"`
  IDToken     string `json:"id_token,omitempty"`
  ExpireIn    int    `json:"expires_in"`
 }

 // generate access_token
 authResponse.AccessToken = randString(16)
 authResponse.ExpireIn = 3600
 now := time.Now()
 expired := now.Add(10 * time.Minute)
 claims := jwt.RegisteredClaims{
  Issuer:    "http://open.my-yunpan.com:8091/oauth/token",
  Subject:   ac.userID,
  Audience:  jwt.ClaimStrings{user}, //client_id
  IssuedAt:  &jwt.NumericDate{now},
  ExpiresAt: &jwt.NumericDate{expired},
 }

 if strings.Contains(ac.scopeTxt, "openid") {
  // generate id_token if contains openid
  mySigningKey := []byte("iamtonybai")
  jwtToken := jwt.NewWithClaims(jwt.SigningMethodHS256, claims)
  authResponse.IDToken, _ = jwtToken.SignedString(mySigningKey)
 }

 respData, _ := json.Marshal(&authResponse)
 w.Write(respData)
}- 1.
- 2.
- 3.
- 4.
- 5.
- 6.
- 7.
- 8.
- 9.
- 10.
- 11.
- 12.
- 13.
- 14.
- 15.
- 16.
- 17.
- 18.
- 19.
- 20.
- twenty one.
- twenty two.
- twenty three.
- twenty four.
- 25.
- 26.
- 27.
- 28.
- 29.
- 30.
- 31.
- 32.
- 33.
- 34.
- 35.
- 36.
- 37.
- 38.
- 39.
- 40.
- 41.
- 42.
- 43.
- 44.
- 45.
- 46.
- 47.
- 48.
- 49.
- 50.
- 51.
- 52.
- 53.
- 54.
- 55.
- 56.
- 57.
- 58.
- 59.
- 60.
- 61.
- 62.
- 63.
- 64.
- 65.
- 66.
- 67.
- 68.
- 69.
- 70.
- 71.
- 72.
- 73.
- 74.
- 75.
- 76.
- 77.
- 78.
We see that tokenHandler first verifies the client credentials, and then verifies the code. If the code passes the verification, access_token will be allocated, and id_token will be allocated based on whether openid is included in the scope. Here is our permission authorization. Contains openid, so tokenHandler generates id_token (a jwt) and returns it to the client.
The oauthCallbackHandler of my-photo-print that gets the access_token and id_token will parse the id_token, extract the valid information, such as subject, etc., and use the subject (the user's unique ID) in the access_token and id_token to authorize the service to obtain the user (EU) Basic identity information (name, homepage, email, etc.), and store the user's unique ID in the user's browser as a cookie. Finally, let the browser redirect to the profile page of my-photo-print.
Please note: This is only for simplicity, please consider a more secure session mechanism in production environments.
The processing function of the profile page is profileHandler:
// oidc-examples/my-photo-print/main.go

// user profile页面
func profileHandler(w http.ResponseWriter, r *http.Request) {
 fmt.Println("profileHandler:", *r)

 cookie, err := r.Cookie("my-photo-print.com-session")
 if err != nil {
  http.Error(w, "找不到cookie,请重新登录", 401)
  return
 }
 fmt.Printf("found cookie: %#v\n", cookie)

 mu.Lock()
 pf, ok := userProfile[cookie.Value]
 if !ok {
  mu.Unlock()
  fmt.Println("not found user:", cookie.Value)
  // 跳转到首页
  http.Redirect(w, r, "/", http.StatusSeeOther)
  return
 }
 mu.Unlock()

 // 渲染照片页面模板
 tmpl := template.Must(template.ParseFiles("profile.html"))
 tmpl.Execute(w, pf)
}- 1.
- 2.
- 3.
- 4.
- 5.
- 6.
- 7.
- 8.
- 9.
- 10.
- 11.
- 12.
- 13.
- 14.
- 15.
- 16.
- 17.
- 18.
- 19.
- 20.
- twenty one.
- twenty two.
- twenty three.
- twenty four.
- 25.
- 26.
- 27.
- 28.
We see: The handler first checks whether the user ID exists in the cookie. If it does not exist, it redirects to the login page. If it exists, it takes out the user's unique ID and uses the ID to find the user profile information, and finally displays it on the web page. :
Here, we see: This mechanism that entrusts the cloud disk authorization service to authenticate the user of my-photo-print and obtain the user's basic information is oidc.
Note: Once the user information after identity authentication of the cloud disk authorization service is obtained, RP can use various identity authentication mechanisms to manage EU users. For example, RP can use session management technology (such as using session identifiers or browser cookies) to track EU session state. If the EU accesses the RP application during the same session, the RP can identify the EU through the session identifier without having to authenticate again.
3. Summary
Through the above content, we have a more intuitive understanding of OpenID Connect (OIDC). Here is a summary:
- OIDC is a set of open standard protocols for identity authentication, built on OAuth 2.0 and compatible with OAuth 2.0.
- The OIDC protocol mainly involves three roles: RP (relying party), OP (identity provider), and EU (end user).
- After the EU uses the OP for identity authentication through the RP, the RP can obtain the EU's identity information. The entire process is highly similar to the OAuth 2.0 authorization code process.
- The key difference is that in addition to the access_token, the token returned by the OP also contains an ID_TOKEN (JWT format).
- RP can obtain EU's unique identification and other information by parsing ID_TOKEN, and further obtain EU's detailed identity information through access_token.
- After RP obtains EU identity information, it can identify and manage EU through various mechanisms without repeated identity verification by EU.
In general, OIDC uses the OAuth 2.0 process for identity authentication and provides EU identity information through the additional returned ID_TOKEN, which well meets the RP's needs for EU identity management.
The source code involved in the text can be downloaded here [10].
4. References
- OIDC(OpenID Connect) Specification[11] - https://openid.net/specs/openid-connect-core-1_0.html
- Using OAuth 2.0 to implement an OpenID Connect user identity authentication protocol [12] - https://time.geekbang.org/column/article/262672