Still using OpenFeign? Come try this new thing in SpringBoot3!

Still using OpenFeign? Come try this new thing in SpringBoot3!
The new year is over, and Brother Song has been moving bricks and bricks for three days.
After the epidemic was released, this year was particularly relaxed and comfortable, and a particularly depressing thing in my heart was removed. In the news, I saw tourists from all over the world, and tourists from Xi'an Datang Everbright City crowded shoulder to shoulder. It really seems to be back in 2019, my friend Everyone in the circle is also beaming, and life is still very beautiful.
I haven't posted a technical article for a long time. I recently returned to my work place. I can code code technology when I have time at night. Today we will talk about a new thing in Spring Boot3, declarative HTTP calls.
1. Origin
Spring Boot 3 was officially released at the end of last year, and I also had a taste of it. Recently, when I have time, I will talk to my friends slowly about what new things Spring Boot 3 has brought us.
Today we will first look at the declarative HTTP interface.
Friends who have used Spring Cloud know that in the Spring Cloud family, we can use RestTemplate or OpenFeign for inter-process communication (of course, there are other ways such as message-driven microservices based on message middleware or gRPC-based calls, etc. ).
We can treat RestTemplate as an ordinary HTTP calling tool. Different from other HTTP clients, RestTemplate is very convenient for calling RESTful-style interfaces.
However, OpenFeign is more convenient than RestTemplate, and remote calls can be realized through interface declarations. The specific usage of these is mentioned in the previous video by Song Ge, so I won’t go into details here.
In the past, we wanted to use declarative HTTP calls, which needed to be implemented through OpenFeign. This required third-party dependencies. Starting from Spring 6 (Spring Boot 3), Spring itself provides similar functions through the @HttpExchange annotation to easily implement declarative HTTP. transfer. In the future, there will be another option for cross-service calls.
2. use
Next, Brother Song uses a case to demonstrate the specific gameplay of the @HttpExchange annotation with his friends.
First of all, we first create an ordinary Spring Boot project named server. In this ordinary Spring Boot project, we only need to provide a simple test interface, as follows:
@RestController
public class HelloController {

    @GetMapping("/server/hello")
    public String hello(String name){
        return "hello " + name;
    }

}- 1.
- 2.
- 3.
- 4.
- 5.
- 6.
- 7.
- 8.
- 9.
This should be no difficulty for everyone, so I won't say more.
Now suppose I have another service named client, and I want to call the interface provided by the server in the client.
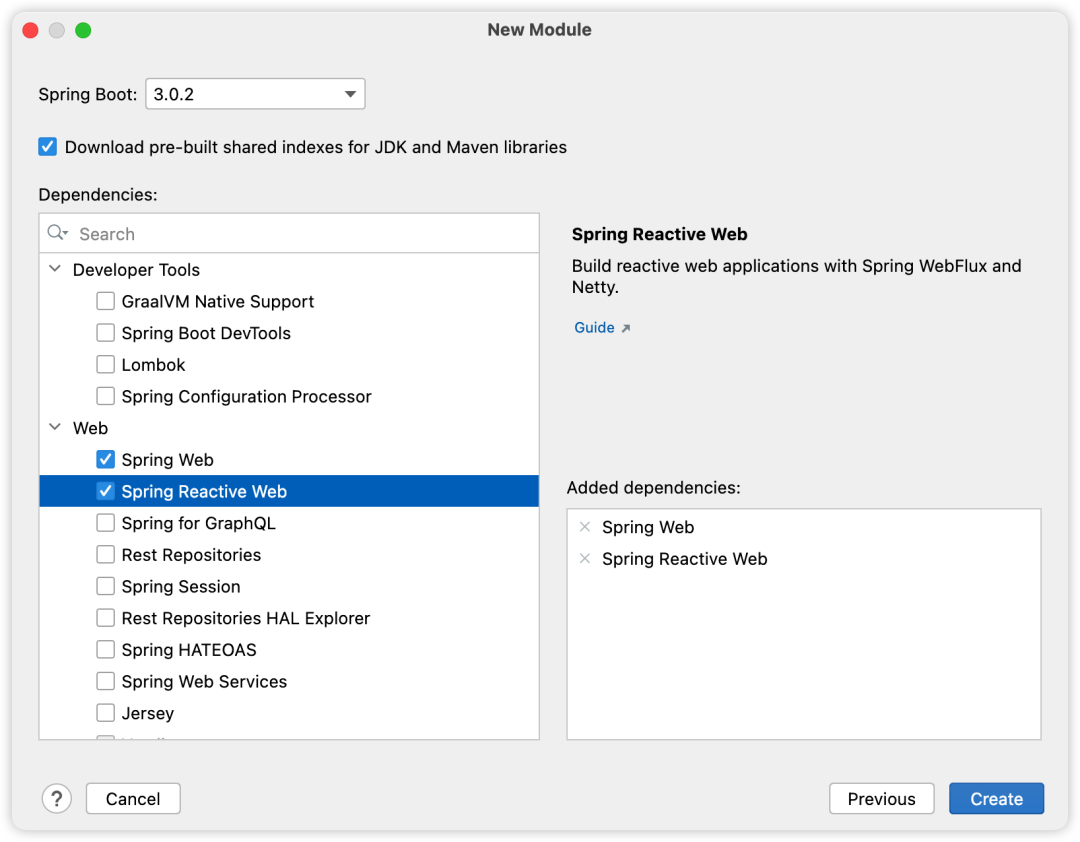
First of all, let's create the client project. Please note that when creating, we not only need to add Web dependencies, but also Reactive Web, because the bottom layer of @HttpExchange is based on WebClient, and WebClient is provided by Reactive Web:

After the creation is complete, we can declare the Http interface:
@HttpExchange("/server")
public interface ToDoService {
    @GetExchange("/hello")
    String hello(@RequestParam String name);
}- 1.
- 2.
- 3.
- 4.
- 5.
These usages are very similar to the @RequestMapping and @GetMapping we commonly use in SpringMVC:
- @HttpExchange Similar to @RequestMapping, it can be placed on the class to play a role of request narrowing, or it can be placed on the method. We can use the method attribute to specify the specific request method. This is also Similar to @RequestMapping: @HttpExchange(value = "/server", method = "GET").
- @GetExchange is similar to @GetMapping, so I won’t go into details here. Other similar annotations include @DeleteExchange, @PatchExchange, @PostExchange, @PutExchange, etc.
- Another thing to note is that the parameters of the request method need to be annotated with @RequestParam, which is similar to OpenFeign.
After the interface is declared, we still need to configure it before it can be used. as follows:
@Configuration
public class WebConfig {
    @Bean
    WebClient webClient(){
        return WebClient.builder()
                .baseUrl("http://localhost:8080")
                .build();
    }
    @Bean
    ToDoService toDoService(){
        HttpServiceProxyFactory httpServiceProxyFactory =
                HttpServiceProxyFactory.builder(WebClientAdapter.forClient(webClient()))
                        .build();
        return httpServiceProxyFactory.createClient(ToDoService.class);
    }
}- 1.
- 2.
- 3.
- 4.
- 5.
- 6.
- 7.
- 8.
- 9.
- 10.
- 11.
- 12.
- 13.
- 14.
- 15.
- 16.
This configuration is mainly two aspects:
- @HttpExchange is based on WebClient, so we first need to configure WebClient. When configuring WebClient, we also configure the specific address of the request by the way (because @HttpExchange
- Since the ToDoService we provided earlier is an interface, we also need to provide an implementation class of this interface. Of course, this configuration is completely routine and templated, so there is nothing to say about this.
After all configurations are completed, we can directly inject ToDoService instances to use wherever we need them. Here is a simple example for your reference:
@SpringBootTest
class ClientApplicationTests {

    @Autowired
    ToDoService toDoService;

    @Test
    void contextLoads(){
        String hello = toDoService.hello("javaboy");
        System.out.println("hello = " + hello);
    }

}- 1.
- 2.
- 3.
- 4.
- 5.
- 6.
- 7.
- 8.
- 9.
- 10.
- 11.
- 12.
- 13.
Well, a simple example, friends may wish to experience it.
In the future, declarative service calls can be implemented without OpenFeign~