Explore the assignment and filtering behavior of Docker's default network NAT mapping

In the article "WebRTC Lesson 1: Network Architecture and How NAT Works", we explain the network architecture of WebRTC, and learn how NAT works, the four traditional classifications of NAT in RFC 3489 [2], and the classification of NAT behavior by allocation behavior and filtering behavior in the newer RFC 4787 [3].
However, "it is not enough on paper, but you never know what to do", and in this article, I am going to pick a specific NAT implementation for a case study. Among the NAT implementations on the market, Docker container network NAT is definitely the easiest implementation to obtain. Therefore, we will take the NAT implementation mechanism of the Docker default network [4] as the research object of this article, and explore the allocation behavior and filtering behavior of this NAT to determine the NAT type of the Docker default network.
For this exploration, we first need to build an experimental network environment.
1. Build an experimental environment
The Docker default network uses NAT (Network Address Translation) to allow containers to access the external network. When creating a container, if no network settings are specified, the container connects to the default "bridge" network and is assigned an internal IP address (usually in the 172.17.0.0/16 range). Docker creates a virtual bridge (docker0) on the host that acts as an interface between the container and the external network. When a container tries to access an external network, it uses Source Network Address Translation (SNAT) to translate the internal IP and port to the host's IP and a random high bit port in order to communicate with the external network. Docker implements these NAT functions by configuring iptables rules to handle packet forwarding, address translation, and filtering.
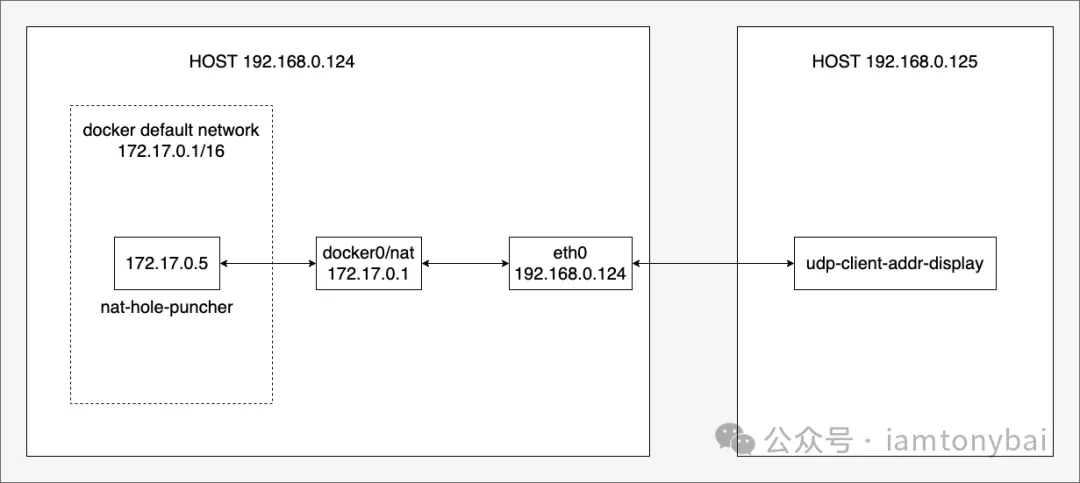
Based on the above description, we use two hosts to build an experimental environment, and the topology diagram is as follows:
 Image
Image
As you can see from the image above, our lab environment has two hosts: 192.168.0.124 and 192.168.0.125. On 124, we start a container based on the docker default network, in which we put a nat-hole-puncher program for NAT hole punching verification, which leaves a "hole" in Docker's NAT by accessing the udp-client-addr-display program on 192.168.0.125, and then we use the nc (natcat) tool on 125 [5] Verify that data can be sent to the container through this hole.
We need to determine the specific type of Docker default network NAT, and we need to do some testing to see how it behaves. Specifically, there are two main areas to focus on:
- Port Allocation Behavior: Observe how NAT allocates external ports to internal hosts (containers).
- Filtering behavior: Check how NAT processes and filters inbound data, and whether it is related to the source IP address or port.
Next, let's prepare the two programs needed to verify the NAT type: nat-hole-puncher and udp-client-addr-display.
2. Prepare the nat-hole-puncher program and the udp-client-addr-display program
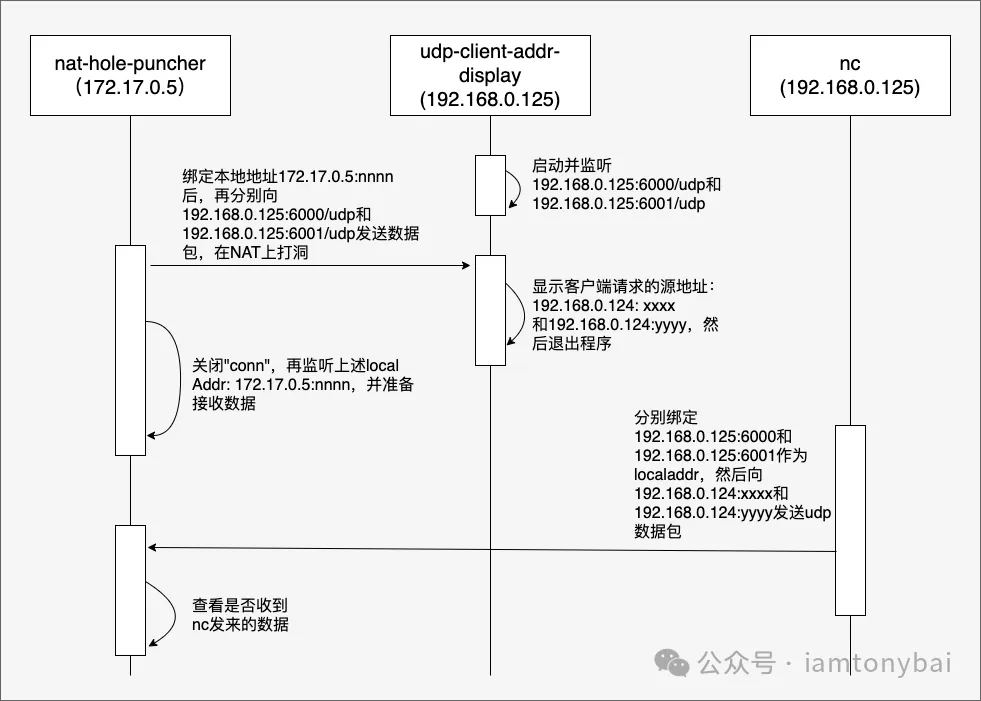
The following diagram depicts the interaction of nat-hole-puncher, udp-client-addr-display, and nc commands:
 Image
Image
The interaction process of the three has been marked with words in the diagram very clearly.
According to the logic in the diagram, let's implement nat-hole-puncher and udp-client-addr-display, respectively.
Here's the source code for nat-hole-puncher:
// docker-default-nat/nat-hole-puncher/main.go

package main

import (
 "fmt"
 "net"
 "os"
 "strconv"
)

func main() {
 if len(os.Args) != 5 {
  fmt.Println("Usage: nat-hole-puncher <local_ip> <local_port> <target_ip> <target_port>")
  return
 }

 localIP := os.Args[1]
 localPort := os.Args[2]
 targetIP := os.Args[3]
 targetPort := os.Args[4]

 // 向target_ip:target_port发送数据
 err := sendUDPMessage("Hello, World!", localIP, localPort, targetIP+":"+targetPort)
 if err != nil {
  fmt.Println("Error sending message:", err)
  return
 }
 fmt.Println("sending message to", targetIP+":"+targetPort, "ok")

 // 向target_ip:target_port+1发送数据
 p, _ := strconv.Atoi(targetPort)
 nextTargetPort := fmt.Sprintf("%d", p+1)
 err = sendUDPMessage("Hello, World!", localIP, localPort, targetIP+":"+nextTargetPort)
 if err != nil {
  fmt.Println("Error sending message:", err)
  return
 }
 fmt.Println("sending message to", targetIP+":"+nextTargetPort, "ok")

 // 重新监听local addr
 startUDPReceiver(localIP, localPort)
}

func sendUDPMessage(message, localIP, localPort, target string) error {
 addr, err := net.ResolveUDPAddr("udp", target)
 if err != nil {
  return err
 }

 lport, _ := strconv.Atoi(localPort)
 conn, err := net.DialUDP("udp", &net.UDPAddr{
  IP:   net.ParseIP(localIP),
  Port: lport,
 }, addr)
 if err != nil {
  return err
 }
 defer conn.Close()

 // 发送数据
 _, err = conn.Write([]byte(message))
 if err != nil {
  return err
 }

 return nil
}

func startUDPReceiver(ip, port string) {
 addr, err := net.ResolveUDPAddr("udp", ip+":"+port)
 if err != nil {
  fmt.Println("Error resolving address:", err)
  return
 }

 conn, err := net.ListenUDP("udp", addr)
 if err != nil {
  fmt.Println("Error listening:", err)
  return
 }
 defer conn.Close()
 fmt.Println("listen address:", ip+":"+port, "ok")

 buf := make([]byte, 1024)
 for {
  n, senderAddr, err := conn.ReadFromUDP(buf)
  if err != nil {
   fmt.Println("Error reading:", err)
   return
  }
  fmt.Printf("Received message: %s from %s\n", string(buf[:n]), senderAddr.String())
 }
}- 1.
- 2.
- 3.
- 4.
- 5.
- 6.
- 7.
- 8.
- 9.
- 10.
- 11.
- 12.
- 13.
- 14.
- 15.
- 16.
- 17.
- 18.
- 19.
- 20.
- 21.
- 22.
- 23.
- 24.
- 25.
- 26.
- 27.
- 28.
- 29.
- 30.
- 31.
- 32.
- 33.
- 34.
- 35.
- 36.
- 37.
- 38.
- 39.
- 40.
- 41.
- 42.
- 43.
- 44.
- 45.
- 46.
- 47.
- 48.
- 49.
- 50.
- 51.
- 52.
- 53.
- 54.
- 55.
- 56.
- 57.
- 58.
- 59.
- 60.
- 61.
- 62.
- 63.
- 64.
- 65.
- 66.
- 67.
- 68.
- 69.
- 70.
- 71.
- 72.
- 73.
- 74.
- 75.
- 76.
- 77.
- 78.
- 79.
- 80.
- 81.
- 82.
- 83.
- 84.
- 85.
- 86.
- 87.
- 88.
- 89.
- 90.
- 91.
- 92.
- 93.
- 94.
Let's compile it and put it into the image, the Makefile and Dockerfile are as follows:
// docker-default-nat/nat-hole-puncher/Makefile

all:
 CGO_ENABLED=0 GOOS=linux GOARCH=amd64 go build -o nat-hole-puncher main.go
image:
 docker build -t nat-hole-puncher .

// docker-default-nat/nat-hole-puncher/Dockerfile

# 使用 Alpine 作为基础镜像
FROM alpine:latest

# 创建工作目录
WORKDIR /app

# 复制已编译的可执行文件到镜像中
COPY nat-hole-puncher .

# 设置文件权限
RUN chmod +x nat-hole-puncher- 1.
- 2.
- 3.
- 4.
- 5.
- 6.
- 7.
- 8.
- 9.
- 10.
- 11.
- 12.
- 13.
- 14.
- 15.
- 16.
- 17.
- 18.
- 19.
- 20.
Execute the build and image commands:
$ make
CGO_ENABLED=0 GOOS=linux GOARCH=amd64 go build -o nat-hole-puncher main.go
$ make image
docker build -t nat-hole-puncher .
[+] Building 0.7s (9/9) FINISHED                                                                                   docker:default
 => [internal] load .dockerignore                                                                                            0.0s
 => => transferring context: 2B                                                                                              0.0s
 => [internal] load build definition from Dockerfile                                                                         0.0s
 => => transferring dockerfile: 265B                                                                                         0.0s
 => [internal] load metadata for docker.io/library/alpine:latest                                                             0.0s
 => [1/4] FROM docker.io/library/alpine:latest                                                                               0.0s
 => [internal] load build context                                                                                            0.0s
 => => transferring context: 2.70MB                                                                                          0.0s
 => CACHED [2/4] WORKDIR /app                                                                                                0.0s
 => [3/4] COPY nat-hole-puncher .                                                                                            0.2s
 => [4/4] RUN chmod +x nat-hole-puncher                                                                                      0.3s
 => exporting to image                                                                                                       0.1s
 => => exporting layers                                                                                                      0.1s
 => => writing image sha256:fec6c105f36b1acce5e3b0a5fb173f3cac5c700c2b07d1dc0422a5917f934530                                 0.0s
=> => naming to docker.io/library/nat-hole-puncher 0.0s- 1.
- 2.
- 3.
- 4.
- 5.
- 6.
- 7.
- 8.
- 9.
- 10.
- 11.
- 12.
- 13.
- 14.
- 15.
- 16.
- 17.
- 18.
- 19.
- 20.
Next, let's take a look at the udp-client-addr-display source code:
// docker-default-nat/udp-client-addr-display/main.go
package main

import (
 "fmt"
 "net"
 "os"
 "strconv"
 "sync"
)

func main() {
 if len(os.Args) != 3 {
  fmt.Println("Usage: udp-client-addr-display <local_ip> <local_port>")
  return
 }

 localIP := os.Args[1]
 localPort := os.Args[2]

 var wg sync.WaitGroup
 wg.Add(2)

 go func() {
  defer wg.Done()
  startUDPReceiver(localIP, localPort)
 }()

 go func() {
  defer wg.Done()
  p, _ := strconv.Atoi(localPort)
  nextLocalPort := fmt.Sprintf("%d", p+1)
  startUDPReceiver(localIP, nextLocalPort)
 }()

 wg.Wait()
}

func startUDPReceiver(localIP, localPort string) {
 addr, err := net.ResolveUDPAddr("udp", localIP+":"+localPort)
 if err != nil {
  fmt.Println("Error:", err)
  return
 }

 conn, err := net.ListenUDP("udp", addr)
 if err != nil {
  fmt.Println("Error:", err)
  return
 }
 defer conn.Close()

 buf := make([]byte, 1024)

 n, clientAddr, err := conn.ReadFromUDP(buf)
 if err != nil {
  fmt.Println("Error:", err)
  return
 }

 fmt.Printf("Received message: %s from %s\n", string(buf[:n]), clientAddr.String())
}- 1.
- 2.
- 3.
- 4.
- 5.
- 6.
- 7.
- 8.
- 9.
- 10.
- 11.
- 12.
- 13.
- 14.
- 15.
- 16.
- 17.
- 18.
- 19.
- 20.
- 21.
- 22.
- 23.
- 24.
- 25.
- 26.
- 27.
- 28.
- 29.
- 30.
- 31.
- 32.
- 33.
- 34.
- 35.
- 36.
- 37.
- 38.
- 39.
- 40.
- 41.
- 42.
- 43.
- 44.
- 45.
- 46.
- 47.
- 48.
- 49.
- 50.
- 51.
- 52.
- 53.
- 54.
- 55.
- 56.
- 57.
- 58.
- 59.
- 60.
- 61.
- 62.
Now that both programs are in place, let's start our exploration.
3. Explore the steps
Let's start udp-client-addr-display on 192.168.0.125 and listen on UDP ports 6000 and 6001:
// 在192.168.0.125上执行

$./udp-client-addr-display 192.168.0.125 6000- 1.
- 2.
- 3.
Then create the client1 container on 192.168.0.124:
// 在192.168.0.124上执行
$docker run -d --name client1 nat-hole-puncher:latest sleep infinity
eeebc0fbe3c7d56e7f43cd5af19a18e65a703b3f987115c521e81bb8cdc6c0be- 1.
- 2.
- 3.
Obtain the IP address of client1 container:
// 在192.168.0.124上执行
$docker inspect -f '{{range .NetworkSettings.Networks}}{{.IPAddress}}{{end}}' client1
172.17.0.5- 1.
- 2.
- 3.
Start the nat-hole-puncher program in the client1 container, bind the local port 5000, and then send packets to ports 6000 and 6001 of 192.168.0.125:
$ docker exec client1 /app/nat-hole-puncher 172.17.0.5 5000 192.168.0.125 6000
sending message to 192.168.0.125:6000 ok
sending message to 192.168.0.125:6001 ok
listen address: 172.17.0.5:5000 ok- 1.
- 2.
- 3.
- 4.
After that, we'll see something like this in the udp-client-addr-display output of 125:
./udp-client-addr-display 192.168.0.125 6000
Received message: Hello, World! from 192.168.0.124:5000
Received message: Hello, World! from 192.168.0.124:5000- 1.
- 2.
- 3.
From this result, we get the NAT mapped source address and port: 192.168.0.124:5000.
Now we use the nc program on 125 to send three UDP packets to this mapped address:
$ echo "hello from 192.168.0.125:6000" | nc -u -p 6000 -v 192.168.0.124 5000
Ncat: Version 7.50 ( https://nmap.org/ncat )
Ncat: Connected to 192.168.0.124:5000.
Ncat: 30 bytes sent, 0 bytes received in 0.01 seconds.

$ echo "hello from 192.168.0.125:6001" | nc -u -p 6001 -v 192.168.0.124 5000
Ncat: Version 7.50 ( https://nmap.org/ncat )
Ncat: Connected to 192.168.0.124:5000.
Ncat: 30 bytes sent, 0 bytes received in 0.01 seconds.

$ echo "hello from 192.168.0.125:6002" | nc -u -p 6002 -v 192.168.0.124 5000
Ncat: Version 7.50 ( https://nmap.org/ncat )
Ncat: Connected to 192.168.0.124:5000.
Ncat: 30 bytes sent, 0 bytes received in 0.01 seconds.- 1.
- 2.
- 3.
- 4.
- 5.
- 6.
- 7.
- 8.
- 9.
- 10.
- 11.
- 12.
- 13.
- 14.
On 124, we see that the nat-hole-puncher program outputs something like this:
Received message: hello from 192.168.0.125:6000
 from 192.168.0.125:6000
Received message: hello from 192.168.0.125:6001
from 192.168.0.125:6001- 1.
- 2.
- 3.
- 4.
4. Conclusions after exploration
Based on the above steps and the output results, we analyze the behavior characteristics of Docker's default network NAT from two aspects: port allocation behavior and filtering behavior.
First, let's look at port allocation behavior.
In the exploration steps above, we executed:
- 172.17.0.5:5000 -> 192.168.0.125:6000
- 172.17.0.5:5000 -> 192.168.0.125:6001
But from the output of udp-client-addr-display:
Received message: Hello, World! from 192.168.0.124:5000
Received message: Hello, World! from 192.168.0.124:5000- 1.
- 2.
The port allocation behavior of NAT on the Docker default network is definitely not Address and Port-Dependent Mapping, so is it Address-Dependent Mapping at all? You can comment out the startUDPReceiver call in nat-hole-puncher/main.go, then start a udp-client-addr-display (listening to 7000 and 7001) on another machine 192.168.0.126, and then execute them on 124 respectively:
$ docker exec client1 /app/nat-hole-puncher 172.17.0.5 5000 192.168.0.125 6000
sending message to 192.168.0.125:6000 ok
sending message to 192.168.0.125:6001 ok

$ docker exec client1 /app/nat-hole-puncher 172.17.0.4 5000 192.168.0.126 7000
sending message to 192.168.0.126:7000 ok
sending message to 192.168.0.126:7001 ok- 1.
- 2.
- 3.
- 4.
- 5.
- 6.
- 7.
And from the output of udp-client-addr-display on 125 and 126:
//125:
./udp-client-addr-display 192.168.0.125 6000
Received message: Hello, World! from 192.168.0.124:5000
Received message: Hello, World! from 192.168.0.124:5000

//126:
 ./udp-client-addr-display 192.168.0.126 7000
Received message: Hello, World! from 192.168.0.124:5000
Received message: Hello, World! from 192.168.0.124:5000- 1.
- 2.
- 3.
- 4.
- 5.
- 6.
- 7.
- 8.
- 9.
It can be seen that even if the target IP is different, as long as the source ip+port is the same, NAT will only allocate the same port (5000 here), obviously in terms of port allocation behavior, the NAT of the default Docker network is the Endpoint-Independent Mapping type!
Let's look at filtering behavior. After nat-hole-puncher punches a hole in NAT, we use the nc tool on 125 to send UDP packets to the "hole", and the result is that only the destination IP and port (such as 6000 and 6001) sent by nat-hole-puncher can successfully send data to nat-hole-puncher through the "hole". Change the port (e.g. 6002) and the data will be discarded. Even though we didn't test sending UDP data from different IPs to the "hole", the above filtering behavior is enough to determine that the NAT filtering behavior of Docker's default network is Address and Port-Dependent Filtering.
Based on the above two behavioral characteristics, if the traditional NAT type is divided, the NAT of the Docker default network should belong to the port restricted cone.
5. Summary
This article explores the NAT (Network Address Translation) behavior of the Docker default network. We tested and analyzed the port allocation and filtering behavior of Docker NAT by building an experimental environment, using two homebrew programs (nat-hole-puncher and udp-client-addr-display) and the nc tool.
The main conclusions of the exploration are as follows:
- Port allocation behavior: The NAT of the default Docker network is of the Endpoint-Independent Mapping type. That is, no matter how the destination IP and port change, as long as the source IP and port are the same, NAT will assign the same external port.
- Filtering behavior: The NAT of the default Docker network is of the Address and Port-Dependent Filtering type. Only a specific combination of IPs and ports that have been previously communicated can successfully send packets through NAT to the internal network.
Based on these two behavioral characteristics, we can conclude that according to the traditional NAT type, the NAT of the Docker default network belongs to the Port Restricted Cone NAT.
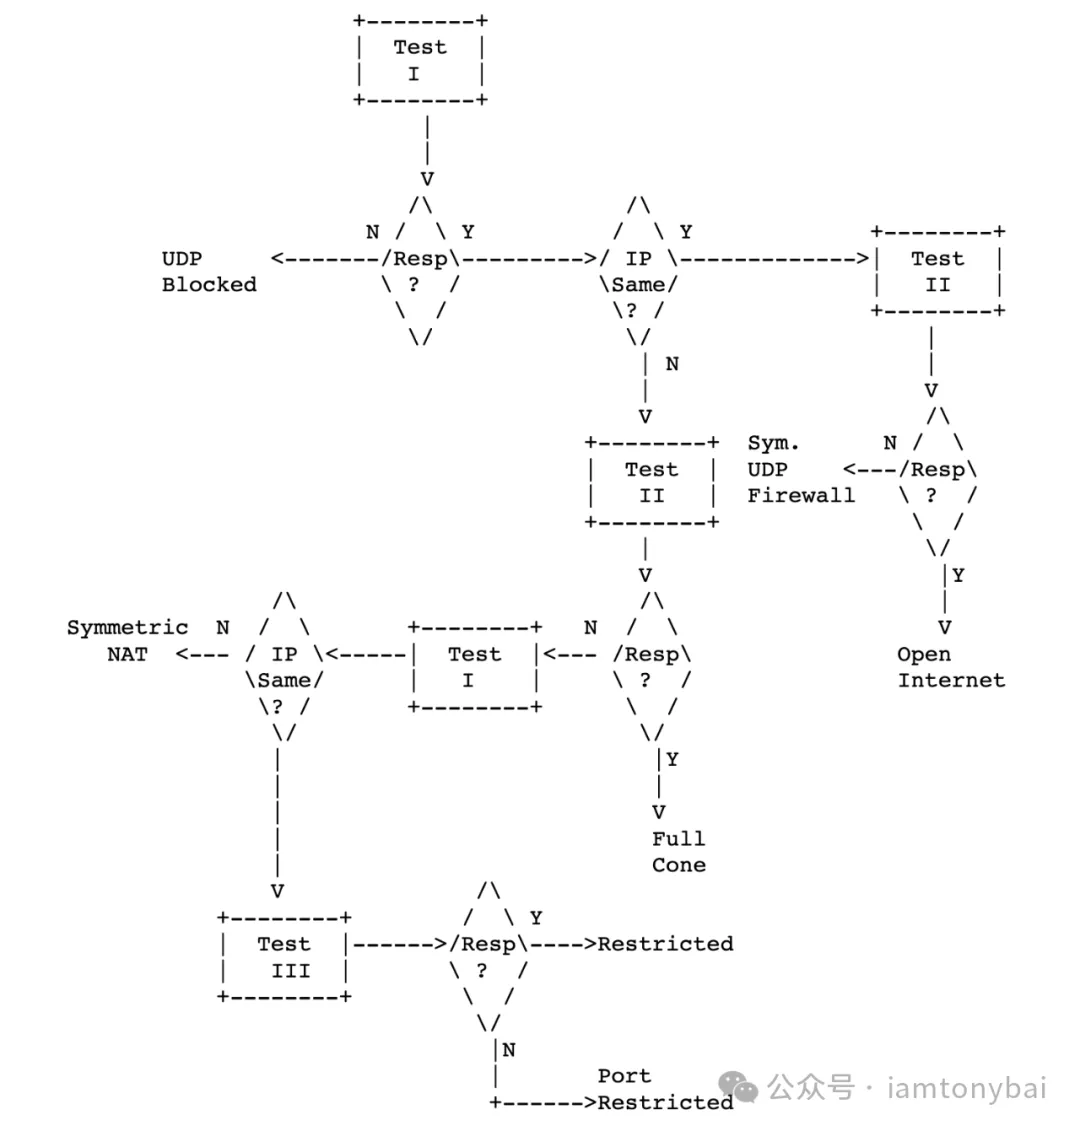
However, in practice, there is no need to be so laborious in determining the type of NAT, and a flowchart for detecting NAT types (the traditional four categories) RFC3489 given [6]:
 Image
Image
There are also open-source implementations of the above algorithms on GitHub, such as pystun3 [7]. Here's how to use pystun3 to detect the NAT type of the network:
$docker run -it python:3-alpine /bin/sh
/ # pip install pystun3
/ # pystun3
NAT Type: Symmetric NAT
External IP: xxx.xxx.xxx.xxx
External Port: yyyy- 1.
- 2.
- 3.
- 4.
- 5.
- 6.
Note: The detection result of pystun3 here is the result of multi-layer NAT, not the NAT type of the Docker default network.
The source code involved in this article can be downloaded here[8] - https://github.com/bigwhite/experiments/blob/master/docker-default-nat