Higress 或許是目前最好的雲端原生閘道?

Higress 是基於阿里內部的Envoy Gateway 實踐沉澱、以開源Istio + Envoy 為核心構建的雲原生API 網關,實現了流量網關+ 微服務網關+ 安全網關三合一的高集成能力,深度集成Dubbo、Nacos、 Sentinel 等微服務技術棧,能夠幫助用戶極大的降低網關的部署及運維成本;在標準上全面支援Ingress 與Gateway API,積極擁抱雲原生下的標準API 規範;同時,Higress Controller 也支持Nginx Ingress平滑遷移,幫助用戶零成本快速遷移到Higress。
產業中通常把網關分為兩個大類:流量網關與業務網關,流量網關主要提供全域性的、與後端業務無關的策略配置,例如阿里內部的統一存取網關Tengine 就是典型的流量網關;業務網關顧名思義主要提供獨立業務域級別的、與後端業務緊密結合策略配置,隨著應用架構模式從單體演進到現在的分散式微服務,業務網關也有了新的叫法- 微服務網關。
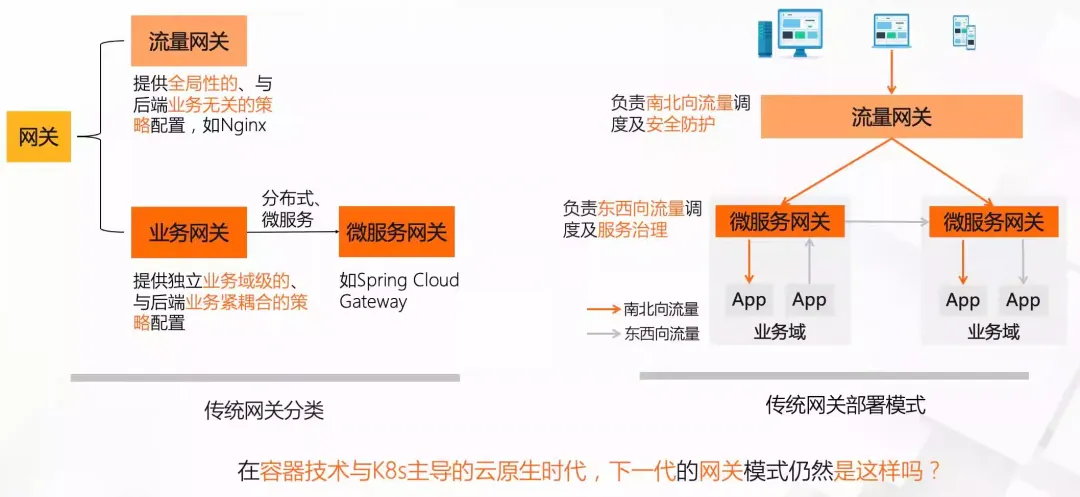
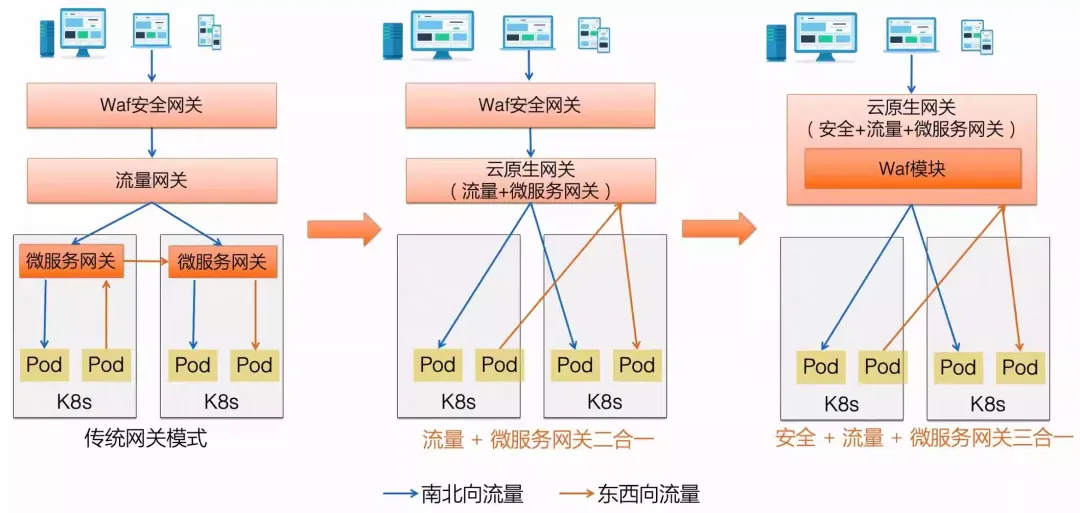
在虛擬化時期的微服務架構下,業務通常採用流量網關+ 微服務網關的兩層架構,流量網關負責南北向流量調度和安全防護,微服務網關負責東西向流量調度和服務治理,而在容器和K8s 主導的雲端原生時代,Ingress 成為K8s 生態的網關標準,賦予了網關新的使命,使得流量閘道+ 微服務閘道合而為一成為可能。
作為面向南北向的公網網關,使用Waf 防護異常流量是很常規的需求,而且隨著互聯網環境變得越來越複雜,用戶對防護的訴求是持續增強的,常規做法是將流量先接入Waf 安全網關,過濾後再將流量轉送給流量網關,最後到達微服務網關;Higress 希望透過內建Waf 模組,讓使用者的請求連結只經過Higress 就可以同時完成Waf 防護、流量分發、微服務治理,既可以降低鏈路RT,也可以降低網關的運維複雜度。因此Higress 實現了流量閘道+ 微服務閘道+ 安全閘道三合一的高整合能力。
使用場景
Higress 支援多種功能特性,適用於多種場景:
- Kubernetes Ingress 網關:
Higress 可以作為K8s 叢集的Ingress 入口網關, 並且相容了大量K8s Nginx Ingress 的註解,可以從K8s Nginx Ingress 快速平滑遷移到Higress。
支援Gateway API 標準,支援使用者從Ingress API 平滑遷移到Gateway API。 - 微服务网关:
Higress 可以作为微服务网关, 能够对接多种类型的注册中心发现服务配置路由,例如 Nacos, ZooKeeper, Consul, Eureka 等。
并且深度集成了 Dubbo, Nacos, Sentinel 等微服务技术栈,基于 Envoy C++ 网关内核的出色性能,相比传统 Java 类微服务网关,可以显著降低资源使用率,减少成本。 - 安全防護網關:
Higress 可以作為安全防護網關, 提供WAF 的能力,並且支援多種認證鑑權策略,例如key-auth, hmac-auth, jwt-auth, basic-auth, oidc 等。
核心優勢
- 生產等級
脫胎於阿里巴巴2 年多生產驗證的內部產品,支援每秒鐘請求量達數十萬級的大規模場景。
徹底擺脫reload 造成的流量抖動,配置變更毫秒生效且業務無感。 - 平滑演進
支援Nacos/Zookeeper/Eureka 等多種註冊中心,可不依賴K8s Service 進行服務發現,支援非容器架構平滑演進到雲端原生架構。
支援從Nginx Ingress Controller 平滑遷移,支援平滑過渡到Gateway API,支援業務架構平滑演進到ServiceMesh。 - 相容性強
相容Nginx Ingress Annotation 80%+ 的使用場景,且提供功能更豐富的Higress Annotation 註解。
相容於Ingress API/Gateway API/Istio API,可組合多種CRD 實現流量精細化管理。 - 方便擴充
提供Wasm、Lua、進程外三種插件擴充機制,支援多國語言編寫插件,生效粒度支援全域級、網域級,路由級。
插件支援熱更新,變更插件邏輯和配置都對流量無損。
架構
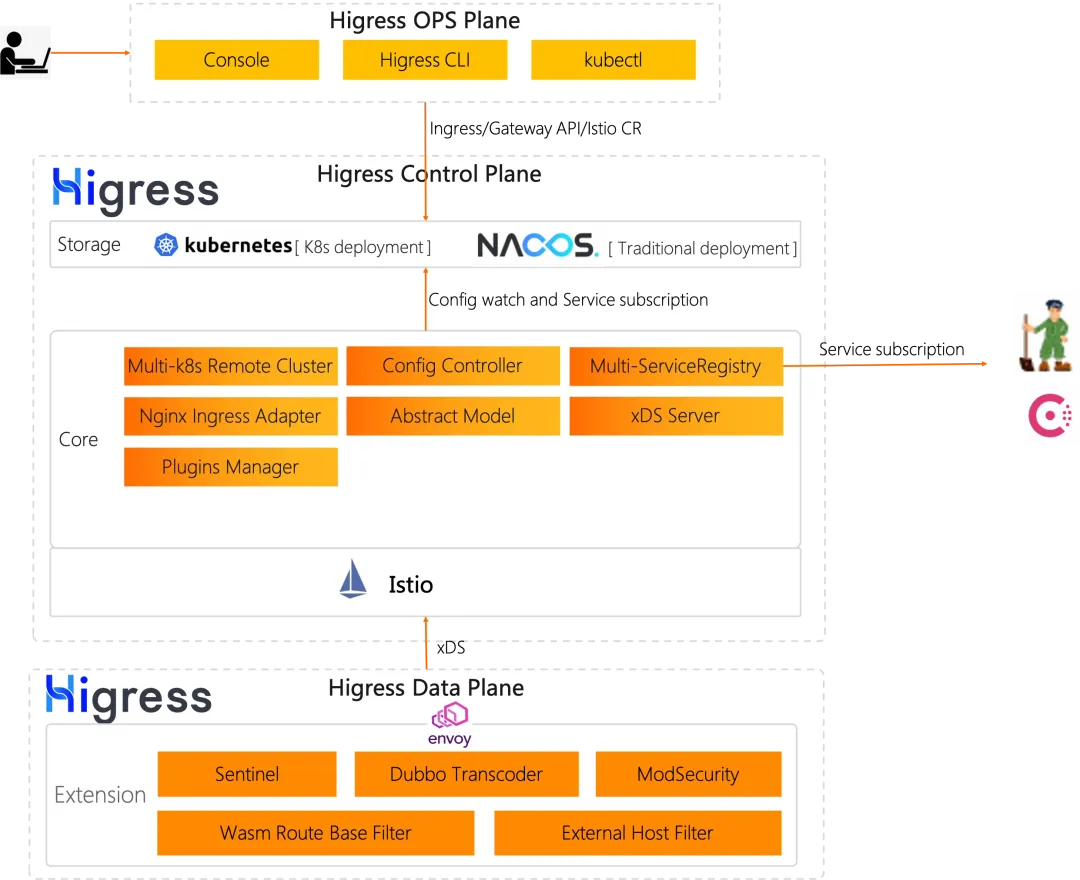
整體上Higress 閘道由控制面元件 higress-controller 和資料面元件 higress-gateway 組成。 higress-gateway 負責承載資料流量,higress-controller 負責管理配置下發。
海格斯
資料面元件higress-gateway 是基於Envoy 開發的網關元件,負責接收和處理流量,支援HTTP/1.1、HTTP/2、gRPC 等協議,支援TLS、mTLS、WAF、限流、熔斷、重試、負載平衡、路由、轉送、重定向、跨域等功能,也就是說真正的流量處理都是在higress-gateway 中完成的。
控制面元件higress-controller 負責管理配置下發,支援Ingress API、Gateway API、Istio API,支援多種註冊中心,支援多種認證鑑權策略,支援多種外掛程式擴充機制,支援多種CRD 實現流量精細化管理,也就是說所有的配置都是透過higress-controller 下發到higress-gateway 中的。
安裝
Higress 的安裝非常簡單,只需要透過Helm 安裝即可,如果想要根據自己的需求進行定制,可以透過修改Helm 的參數來實現,完整參數介紹可以查看運維參數說明,常用的一些可自訂參數如下所示:
參數名 | 參數說明 | 預設值 |
全域參數 | ||
全域.本地 | 如果要安裝至本機K8s 叢集(如Kind、Rancher Desktop 等),請設定為 true | 錯誤的 |
全域.ingressClass | 用於過濾被Higress Controller 監聽的Ingress 資源的IngressClass。在叢集內部署了多個網關時,可以使用此參數來區分每個網關的職責範圍。 IngressClass 有一些特殊的值: 1. 如果設定為“nginx”,Higress Controller 將監聽Ingress 為 nginx 或為空的Ingress 資源。 2. 若設為空,Higress Controller 將監聽K8s 叢集內的全部Ingress 資源。 | 海格雷斯 |
全域.watch命名空間 | 如果值不為空,Higress Controller 將只會監聽指定命名空間下的資源。當基於K8s 命名空間進行業務系統隔離時,若需要對每個命名空間部署一套獨立的網關,可以透過此參數來限制Higress 監聽指定命名空間內的Ingress。 | ”” |
全域.disableAlpnH2 | 是否在ALPN 中停用HTTP/2 協議 | 真的 |
全域啟用狀態 | 若為true, Higress Controller 將會更新Ingress 資源的 status 欄位。為避免從Nginx Ingress 遷移過程中,覆寫Ingress 物件的 status 字段,可以將此參數設為false,這樣Higress 預設就不會將入口IP 寫入Ingress 的 status 字段。 | 真的 |
全域啟用IstioAPI | 若為true,Higress Controller 將同時監聽istio 資源 | 錯誤的 |
global.enableGatewayAPI | 若為true,Higress Controller 將同時監聽Gateway API 資源 | 錯誤的 |
global.onlyPushRouteCluster | 若為true,Higress Controller 將會只推送被路由關聯的服務 | 真的 |
核心組件參數 | ||
higress-core.gateway.replicas | Higress Gateway 的pod 數量 | 2 |
higress-core.controller.replicas | Higress Controller 的pod 數量 | 1 |
控制台參數 | ||
higress-console.replicaCount | Higress Console 的pod 數量 | 1 |
higress-console.service.type | Higress Console 所使用的K8s Service 類型 | 集群IP |
higress-console.web.login.prompt | 登入頁面上顯示的提示訊息 | ”” |
higress-console.o11y.enabled | 若為 true,將同時安裝可觀測性套件(Grafana + Promethues) | 錯誤的 |
higress-console.pvc.rwx支持 | 標識目標K8s 叢集是否支援PersistentVolumeClaim 的ReadWriteMany 操作方式。 | 真的 |
預設情況下ingress-gateway 會透過一個LoadBalancer Service 暴露出來,如果你的叢集不支援LoadBalancer 類型的Service,可以透過修改higress-core.gateway.service.type 參數來修改Service 類型,或透過修改higress-core. gateway.hostNetwork 參數來直接使用宿主機網絡,例如我們這裡就使用hostNetwork 來直接使用宿主機網絡:
helm repo add higress.io https://higress.io/helm-charts
helm upgrade --install higress -n higress-system higress.io/higress --set higress-core.gateway.hostNetwork=true,higress-core.gateway.service.type=ClusterIP --create-namespace- 1.
- 2.
另外Higress 也支援Istio CRD(可選),但叢集裡需要事先安裝好Istio 的CRD,如果不希望安裝Istio,也可以只安裝Istio 的CRD:
helm repo add istio https://istio-release.storage.googleapis.com/charts
helm install istio-base istio/base -n istio-system --create-namespace- 1.
- 2.
在這種模式下,需要更新Higress 的部署參數:
helm upgrade higress -n higress-system --set global.enableIstioAPI=true higress.io/higress --reuse-values- 1.
同樣Higress 也支援Gateway API CRD(可選),一樣我們也需要事先安裝好Gateway API 的CRD:https://github.com/kubernetes-sigs/gateway-api/releases,例如我們這裡安裝1.0.0 版本的CRD,具體版本可以根據實際情況進行選擇:
kubectl apply -f https://github.com/kubernetes-sigs/gateway-api/releases/download/v1.0.0/experimental-install.yaml- 1.
在這種模式下,需要更新Higress 的部署參數:
helm upgrade higress -n higress-system --set global.enableGatewayAPI=true higress.io/higress --reuse-values- 1.
安裝完成後我們可以查看Higress 的部署情況:
$ kubectl get pods -n higress-system
NAME                                 READY   STATUS    RESTARTS   AGE
higress-console-796544b9df-9v5hn     1/1     Running   0          4m57s
higress-controller-8d4bb7456-4nx6l   2/2     Running   0          4m57s
higress-gateway-596f4f6d9-d46wg      1/1     Running   0          4m57s
higress-gateway-596f4f6d9-mbhp9      1/1     Running   0          4m57s
$ kubectl get svc -n higress-system
NAME                 TYPE        CLUSTER-IP    EXTERNAL-IP   PORT(S)                                                    AGE
higress-console      ClusterIP   10.96.2.141   <none>        8080/TCP                                                   9m35s
higress-controller   ClusterIP   10.96.0.98    <none>        8888/TCP,15051/TCP,15010/TCP,15012/TCP,443/TCP,15014/TCP   9m35s
higress-gateway ClusterIP 10.96.3.17 <none> 80/TCP,443/TCP 9m35s- 1.
- 2.
- 3.
- 4.
- 5.
- 6.
- 7.
- 8.
- 9.
- 10.
- 11.
接下來我們可以建立一個如下所示的Ingress 物件來暴露服務: higress-console
# higress-console.yaml
apiVersion: networking.k8s.io/v1
kind: Ingress
metadata:
  name: higress-console
  namespace: higress-system
spec:
  ingressClassName: higress
  rules:
    - host: higress.k8s.local
      http:
        paths:
          - path: /
            pathType: Prefix
            backend:
              service:
                name: higress-console
                port:
number: 8080- 1.
- 2.
- 3.
- 4.
- 5.
- 6.
- 7.
- 8.
- 9.
- 10.
- 11.
- 12.
- 13.
- 14.
- 15.
- 16.
- 17.
- 18.
- 19.
直接套用上面的Ingress 物件即可:
$ kubectl apply -f higress-console.yaml
$ kubectl get ingress -n higress-system
NAME              CLASS     HOSTS               ADDRESS   PORTS   AGE
higress-console higress higress.k8s.local 80 15s- 1.
- 2.
- 3.
- 4.
由於我們在這裡將higress-gateway 設定成了hostNetwork 模式,所以我們只需要將higress.k8s.local 解析到higress-gateway 所在的任一節點即可,這樣我們就可以透過higress.k8s.local 來存取higress- console 服務了。
初始化管理員
基本使用
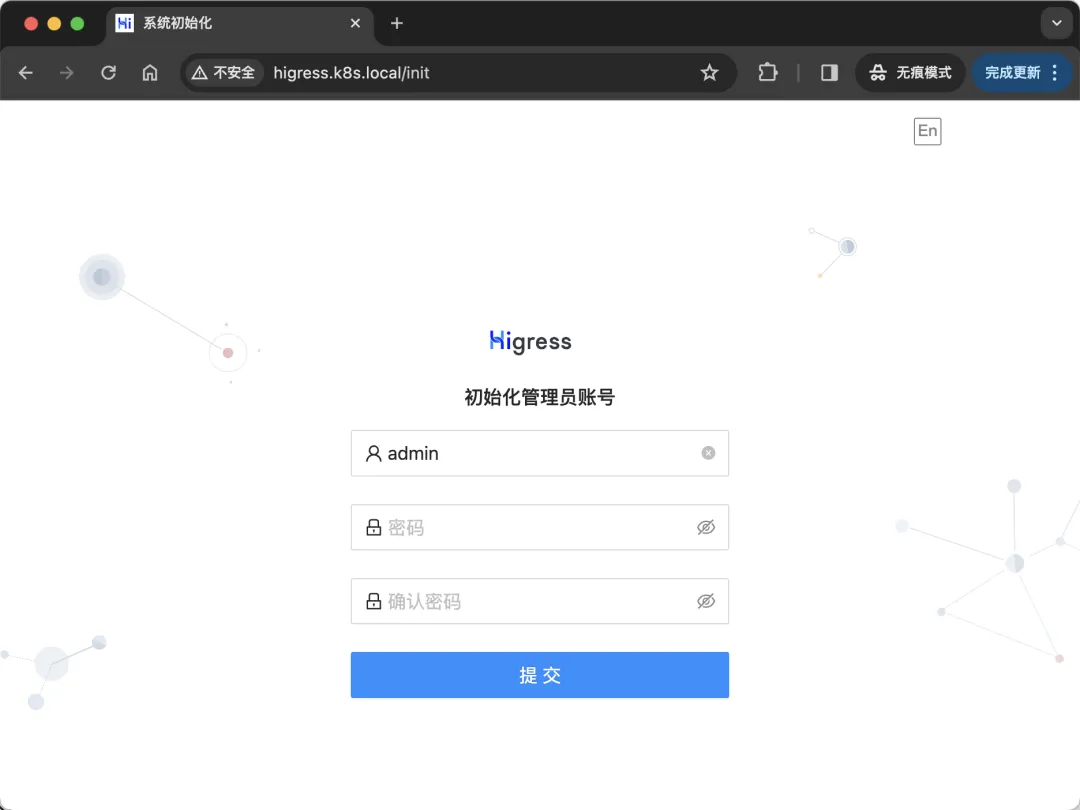
當我們第一次造訪 higress-console 的時候需要初始化管理員帳號,初始化完成後我們就可以透過管理員帳號登入 higress-console 控制台了。
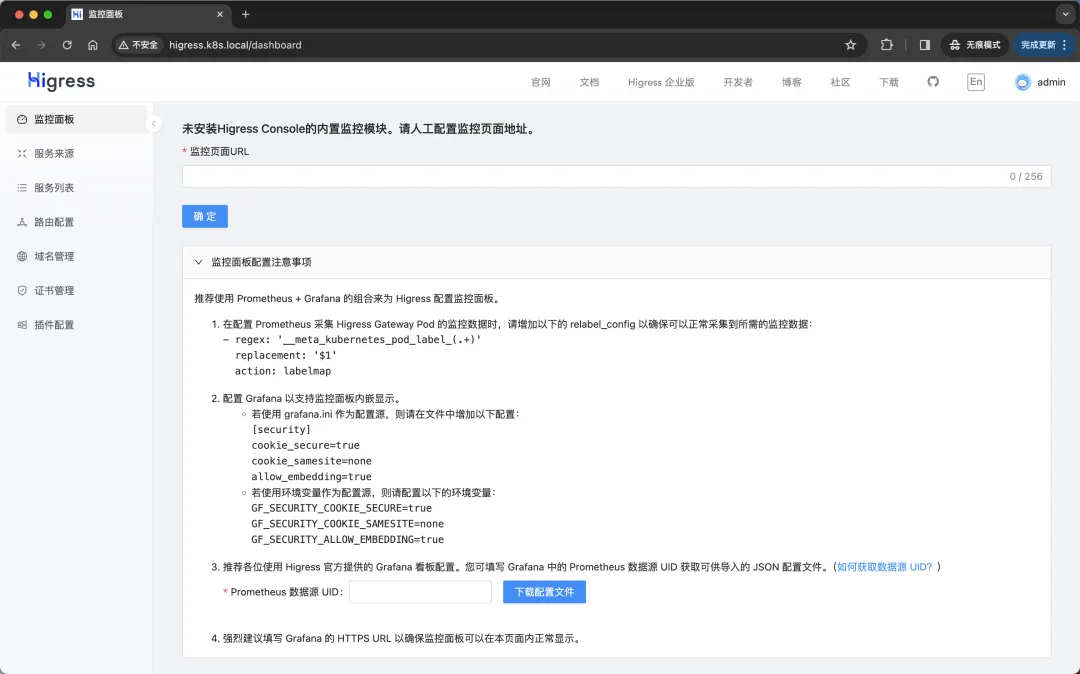
海格斯控制台
然後接下來就可以透過 higress-console 控制台來設定我們的網關了,包括建立路由規則、服務、憑證等等。
例如現在在 default 命名空間下有如下所示的一個 foo 服務:
# foo.yaml
kind: Pod
apiVersion: v1
metadata:
  name: foo-app
  labels:
    app: foo
spec:
  containers:
    - name: foo-app
      image: higress-registry.cn-hangzhou.cr.aliyuncs.com/higress/http-echo:0.2.4-alpine
      args:
        - "-text=foo"
---
kind: Service
apiVersion: v1
metadata:
  name: foo-service
spec:
  selector:
    app: foo
  ports:
    # Default port used by the image
- port: 5678- 1.
- 2.
- 3.
- 4.
- 5.
- 6.
- 7.
- 8.
- 9.
- 10.
- 11.
- 12.
- 13.
- 14.
- 15.
- 16.
- 17.
- 18.
- 19.
- 20.
- 21.
- 22.
- 23.
- 24.
現在我們希望建立一個對應 http://foo.bar.com/foo 的路由來指向該服務。這裡我們有兩種方法可以實現,一種是透過 higress-console 控制台來創建,另一種是透過YAML 檔案來創建。
透過控制台創建
首先點選左側網域管理導覽欄,然後點選頁面右側的建立網域按鈕,依照下圖所示內容填寫表單並點選確定按鈕。
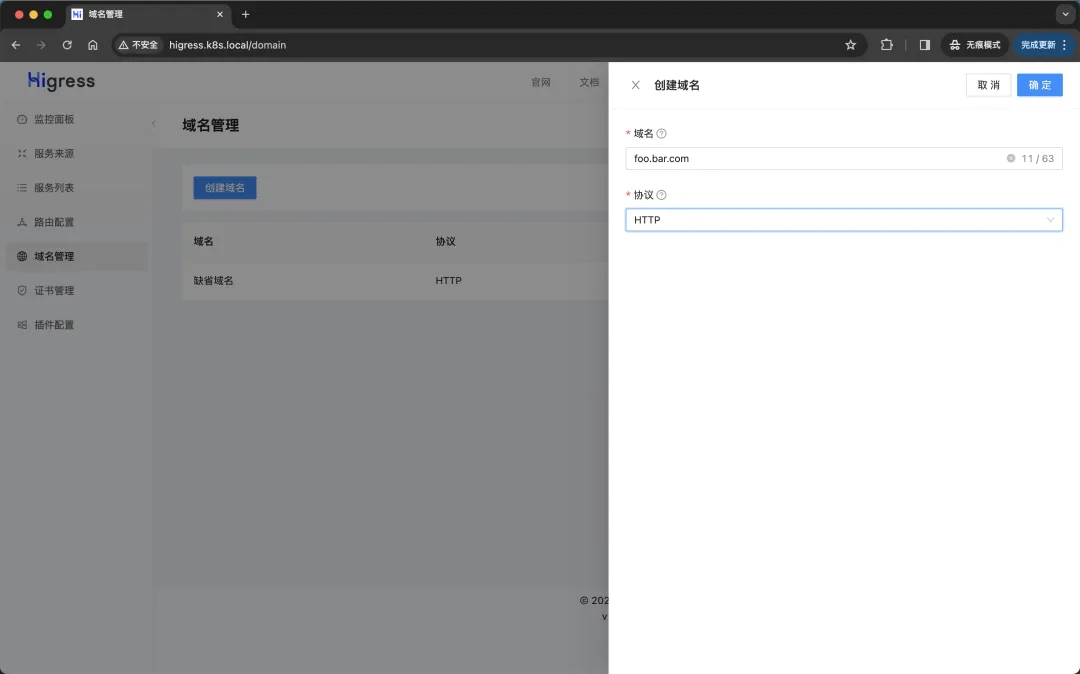
建立域名
然後點選左側路由管理導覽欄,然後點選頁面右側的建立路由按鈕,依照下圖所示內容填寫表單並點選確定按鈕(若要注意選擇目標服務)。
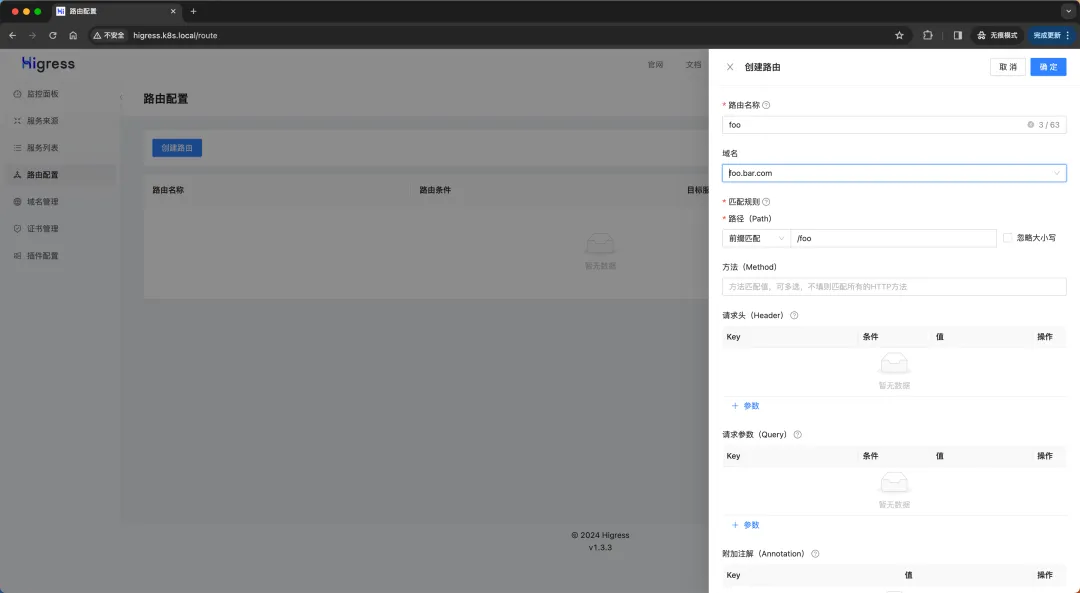
建立路由
接下來同樣我們只需要將網域 foo.bar.com 解析到 higress-gateway 所在的任一節點即可,這樣我們就可以透過 foo.bar.com 來存取 foo-service 服務了。
$ curl http://foo.bar.com/foo
foo- 1.
- 2.
透過YAML 檔案創建
同樣我們也可以透過YAML 文件來創建路由(其實就是一個Ingress 物件),首先我們需要建立一個文件,然後使用下方YAML 來創建我們需要的路由配置。 foo-route.yaml
# foo-route.yaml
apiVersion: networking.k8s.io/v1
kind: Ingress
metadata:
  name: foo
spec:
  ingressClassName: higress
  rules:
    - host: foo.bar.com
      http:
        paths:
          - pathType: Prefix
            path: "/foo"
            backend:
              service:
                name: foo-service
                port:
number: 5678- 1.
- 2.
- 3.
- 4.
- 5.
- 6.
- 7.
- 8.
- 9.
- 10.
- 11.
- 12.
- 13.
- 14.
- 15.
- 16.
- 17.
- 18.
然後我們只需要應用上面的YAML 檔案(記得先將控制台中新增的網域和路由刪除):
$ kubectl apply -f foo-route.yaml
$ kubectl get ingress
NAME   CLASS     HOSTS         ADDRESS   PORTS   AGE
foo higress foo.bar.com 80 4s- 1.
- 2.
- 3.
- 4.
同樣現在我們也可以透過 foo.bar.com 來存取 foo-service 服務了。
$ curl foo.bar.com/foo
foo- 1.
- 2.
但要注意的是透過YAML 檔案管理的路由配置並不會同步到控制台中去,所以在管理路由的時候需要注意。
進階用法
標準的K8s Ingress 資源只能處理簡單場景下的HTTP(S)流量路由,無法處理流量切分,超時重試,Header 控制和跨域等問題。因此,不同的Ingress Controller 利用自訂的Ingress Annotation 來增強Ingress 能力。常見的Nginx Ingress Controller 引入了100 多個Annotation 對Ingress 在流量治理和安全防護上進行了擴展實現。目前,Higress 已經全面相容了大部分Nginx Ingress Annotation,方便用戶從Nginx Ingress 無縫遷移至Higress,所以我們可以繼續使用Nginx Ingress 的Annotation 來設定Higress。
我們可以根據使用習慣繼續使用Nginx Ingress 的Annotation 前綴nginx.ingress.kubernetes.io ,或者使用H igress Ingress 的Annotation 前綴higress.io,兩者是等價的,下面我們就通過幾個簡單的例子來演示如何使用Annotation 來設定Higress。
跨域
跨網域資源共享CORS 是指允許Web 應用伺服器進行跨網域存取控制,從而實現跨網域資料安全傳輸,我們可以透過下面的Annotation 來設定Higress 的跨網域原則:
- higress.io/enable-cors:true 或 false,用於開啟或關閉跨域。
- higress.io/cors-allow-origin:允許的第三方站點,支援泛域名,逗號分隔;支援通配符。預設值為 *,即允許所有第三方網站。
- higress.io/cors-allow-methods:允許的請求方法,如GET、POST,逗號分隔;支援通配符 *。預設值為GET, PUT, POST, DELETE, PATCH, OPTIONS。
- higress.io/cors-allow-headers:允許的請求頭部,逗號分隔;支援通配符 *。預設值為DNT,X-CustomHeader,Keep-Alive,User-Agent,X-Requested-With,If-Modified-Since,Cache-Control,Content-Type,Authorization。
- higress.io/cors-expose-headers:允許的回應頭部,逗號分隔。
- higress.io/cors-allow-credentials:true 或 false。是否允許攜帶憑證資訊。預設允許。
- higress.io/cors-max-age:預檢結果的最大快取時間,單位為秒;預設值為1728000。
例如我們現在有一需求是跨域請求被限制為只能來自example.com 域的請求,並且HTTP 方法只能是GET 和POST,允許的請求頭部為X-Foo-Bar,不允許攜帶憑證訊息,那我們可以透過下面的Annotation 來設定Higress:
apiVersion: networking.k8s.io/v1
kind: Ingress
metadata:
  annotations:
    higress.io/enable-cors: "true"
    higress.io/cors-allow-origin: "example.com"
    higress.io/cors-allow-methods: "GET,POST"
    higress.io/cors-allow-headers: "X-Foo-Bar"
    higress.io/cors-allow-credentials: "false"
  name: demo
spec:
  ingressClassName: higress
  rules:
    - http:
        paths:
          - backend:
              service:
                name: demo-service
                port:
                  number: 80
            path: /hello
pathType: Exact- 1.
- 2.
- 3.
- 4.
- 5.
- 6.
- 7.
- 8.
- 9.
- 10.
- 11.
- 12.
- 13.
- 14.
- 15.
- 16.
- 17.
- 18.
- 19.
- 20.
- 21.
- 22.
改寫
在請求轉送給目標後端服務之前,Rewrite 會重寫可以修改原始請求的路徑(Path)和主機網域(Host),我們可以透過下面的Annotation 來設定Higress 的Rewrite 重寫策略:
- higress.io/rewrite-target:重寫Path,支援擷取群組(Capture Group)。
- higress.io/upstream-vhost:重寫Host。
Rewrite 重寫Path
將請求 example.com/test 在轉送至後端服務之前,重寫為 example.com/dev:
apiVersion: networking.k8s.io/v1
kind: Ingress
metadata:
  annotations:
    higress.io/rewrite-target: "/dev"
  name: demo
spec:
  ingressClassName: higress
  rules:
    - host: example.com
      http:
        paths:
          - backend:
              service:
                name: demo-service
                port:
                  number: 80
            path: /test
pathType: Exact- 1.
- 2.
- 3.
- 4.
- 5.
- 6.
- 7.
- 8.
- 9.
- 10.
- 11.
- 12.
- 13.
- 14.
- 15.
- 16.
- 17.
- 18.
- 19.
將請求 example.com/v1/app 在轉寄至後端服務之前,先去掉Path 前綴 /v1:
apiVersion: networking.k8s.io/v1
kind: Ingress
metadata:
  annotations:
    higress.io/rewrite-target: "/$2"
  name: demo
spec:
  ingressClassName: higress
  rules:
    - host: example.com
      http:
        paths:
          - backend:
              service:
                name: demo-service
                port:
                  number: 80
            path: /v1(/|$)(.*)
pathType: ImplementationSpecific- 1.
- 2.
- 3.
- 4.
- 5.
- 6.
- 7.
- 8.
- 9.
- 10.
- 11.
- 12.
- 13.
- 14.
- 15.
- 16.
- 17.
- 18.
- 19.
將請求 example.com/v1/app 在轉寄至後端服務之前,將Path 前綴 /v1 變更為 /v2:
apiVersion: networking.k8s.io/v1
kind: Ingress
metadata:
  annotations:
    higress.io/rewrite-target: "/v2/$2"
  name: demo
spec:
  ingressClassName: higress
  rules:
    - host: example.com
      http:
        paths:
          - backend:
              service:
                name: demo-service
                port:
                  number: 80
            path: /v1(/|$)(.*)
pathType: ImplementationSpecific- 1.
- 2.
- 3.
- 4.
- 5.
- 6.
- 7.
- 8.
- 9.
- 10.
- 11.
- 12.
- 13.
- 14.
- 15.
- 16.
- 17.
- 18.
- 19.
Rewrite 重寫Host
將請求 example.com/test 在轉送至後端服務之前,重寫為 test.com/test:
apiVersion: networking.k8s.io/v1
kind: Ingress
metadata:
  annotations:
    higress.io/upstream-vhost: "test.com"
  name: demo
spec:
  ingressClassName: higress
  rules:
    - host: example.com
      http:
        paths:
          - backend:
              service:
                name: demo-service
                port:
                  number: 80
            path: /test
pathType: Exact- 1.
- 2.
- 3.
- 4.
- 5.
- 6.
- 7.
- 8.
- 9.
- 10.
- 11.
- 12.
- 13.
- 14.
- 15.
- 16.
- 17.
- 18.
- 19.
重定向
透過重定向可以將原始客戶端請求變更為目標請求。
配置HTTP 重定向至HTTPS
我們可以使用下面的Annotation 來設定Higress 將HTTP 請求重新導向至HTTPS:
- higress.io/ssl-redirect:HTTP 重定向到HTTPS
- higress.io/force-ssl-redirect: HTTP 重定向到HTTPS
Higress 對於以上兩個註解不區分對待,都是強制將HTTP 重定向到HTTPS。
例如我們需要將請求 http://example.com/test 重新導向為 https://example.com/test,我們可以透過下面的Annotation 來設定Higress:
apiVersion: networking.k8s.io/v1
kind: Ingress
metadata:
  annotations:
    higress.io/ssl-redirect: "true"
  name: demo
spec:
  ingressClassName: higress
  rules:
    - host: example.com
      http:
        paths:
          - backend:
              service:
                name: demo-service
                port:
                  number: 80
            path: /test
pathType: Exact- 1.
- 2.
- 3.
- 4.
- 5.
- 6.
- 7.
- 8.
- 9.
- 10.
- 11.
- 12.
- 13.
- 14.
- 15.
- 16.
- 17.
- 18.
- 19.
永久重定向
- higress.io/permanent-redirect:永久重定向的目標url,必須包含scheme(http or https)。
- higress.io/permanent-redirect-code:永久重定向的HTTP 狀態碼,預設為301。
例如將請求 http://example.com/test 永久重定向為 http://example.com/app,我們可以透過下面的Annotation 來設定Higress:
apiVersion: networking.k8s.io/v1
kind: Ingress
metadata:
  annotations:
    higress.io/permanent-redirect: "http://example.com/app"
  name: demo
spec:
  ingressClassName: higress
  rules:
    - host: example.com
      http:
        paths:
          - backend:
              service:
                name: demo-service
                port:
                  number: 80
            path: /test
pathType: Exact- 1.
- 2.
- 3.
- 4.
- 5.
- 6.
- 7.
- 8.
- 9.
- 10.
- 11.
- 12.
- 13.
- 14.
- 15.
- 16.
- 17.
- 18.
- 19.
暫時重定向
- higress.io/temporal-redirect:暫時重定向的目標url,必須包含scheme(http or https)。
需要將請求 http://example.com/test 暫時重定向為 http://example.com/app,我們可以透過下面的Annotation 來設定Higress:
apiVersion: networking.k8s.io/v1
kind: Ingress
metadata:
  annotations:
    higress.io/temporal-redirect: "http://example.com/app"
  name: demo
spec:
  ingressClassName: higress
  rules:
    - host: example.com
      http:
        paths:
          - backend:
              service:
                name: demo-service
                port:
                  number: 80
            path: /test
pathType: Exact- 1.
- 2.
- 3.
- 4.
- 5.
- 6.
- 7.
- 8.
- 9.
- 10.
- 11.
- 12.
- 13.
- 14.
- 15.
- 16.
- 17.
- 18.
- 19.
配置後端服務協定
Higress 預設使用HTTP 協定轉送請求到後端業務容器。當您的業務容器為HTTPS 協議時,可以透過使用註解higress.io/backend-protocol: "HTTPS";當您的業務容器為GRPC 服務時,可以透過使用註解higress.io/backend-protocol: "GRPC "。
比起Nginx Ingress 的優勢,如果您的後端服務所屬的K8s Service 資源中關於Port Name 的定義為grpc 或http2,您無需配置註解higress.io/backend-protocol: "GRPC",Higress 會自動使用GRPC或HTTP2。
例如我們需要請求 example/test 轉送至後端服務使用HTTPS 協議,我們可以透過下面的Annotation 來設定Higress:
apiVersion: networking.k8s.io/v1
kind: Ingress
metadata:
  annotations:
    higress.io/backend-protocol: "HTTPS"
  name: demo
spec:
  ingressClassName: higress
  rules:
    - host: example.com
      http:
        paths:
          - backend:
              service:
                name: demo-service
                port:
                  number: 80
            path: /
pathType: Exact- 1.
- 2.
- 3.
- 4.
- 5.
- 6.
- 7.
- 8.
- 9.
- 10.
- 11.
- 12.
- 13.
- 14.
- 15.
- 16.
- 17.
- 18.
- 19.
如果需要請求 example/test 轉送至後端服務使用 GRPC 協議,第一種做法就是透過註解,如下所示:
apiVersion: networking.k8s.io/v1
kind: Ingress
metadata:
  annotations:
    higress.io/backend-protocol: "GRPC"
  name: demo
spec:
  ingressClassName: higress
  rules:
    - host: example.com
      http:
        paths:
          - backend:
              service:
                name: demo-service
                port:
                  number: 80
            path: /test
pathType: Exact- 1.
- 2.
- 3.
- 4.
- 5.
- 6.
- 7.
- 8.
- 9.
- 10.
- 11.
- 12.
- 13.
- 14.
- 15.
- 16.
- 17.
- 18.
- 19.
第二種做法是透過指定Service Port Name 為 grpc即可,如下所示:
apiVersion: networking.k8s.io/v1
kind: Ingress
metadata:
  name: demo
spec:
  ingressClassName: higress
  rules:
    - host: example.com
      http:
        paths:
          - backend:
              service:
                name: demo-service
                port:
                  number: 80
            path: /order
            pathType: Exact
---
apiVersion: v1
kind: Service
metadata:
  name: demo-service
spec:
  ports:
    - name: grpc # 指定 Service Port Name 为 grpc,Higress 会自动使用 GRPC 协议
      port: 80
      protocol: TCP
  selector:
app: demo-service- 1.
- 2.
- 3.
- 4.
- 5.
- 6.
- 7.
- 8.
- 9.
- 10.
- 11.
- 12.
- 13.
- 14.
- 15.
- 16.
- 17.
- 18.
- 19.
- 20.
- 21.
- 22.
- 23.
- 24.
- 25.
- 26.
- 27.
- 28.
- 29.
超時
Higress 提供路由層級的逾時設置,與nginx ingress 不同,沒有區分連接/讀寫逾時,而是面向的介面處理總延遲進行配置,在未進行配置時預設不限制,例如後端未傳回應答,網關將無限等待。
設定超時時間為5s:
apiVersion: networking.k8s.io/v1
kind: Ingress
metadata:
  annotations:
    higress.io/timeout: "5"
  name: demo
spec:
  ingressClassName: higress
  rules:
    - host: example.com
      http:
        paths:
          - backend:
              service:
                name: demo-service
                port:
                  number: 80
            path: /test
pathType: Exact- 1.
- 2.
- 3.
- 4.
- 5.
- 6.
- 7.
- 8.
- 9.
- 10.
- 11.
- 12.
- 13.
- 14.
- 15.
- 16.
- 17.
- 18.
- 19.
灰階發布
Higress 提供複雜的路由處理能力,和Ingress Nginx 類似,Higress 也支援基於Header、Cookie 以及權重的灰階發布功能。灰階發布功能可以透過設定註解來實現,為了啟用灰階發布功能,需要設定註解 higress.io/canary: "true"。透過不同註解可以實現不同的灰階發布功能。
當多種方式同時配置時,灰階方式選擇優先順序為:基於Header > 基於Cookie > 基於權重(從高到低)。
下面我們透過一個範例應用程式來對灰階發布功能進行說明。
第一步. 部署Production 應用
先建立一個production 環境的應用資源清單:
# production.yaml
apiVersion: apps/v1
kind: Deployment
metadata:
  name: production
  labels:
    app: production
spec:
  selector:
    matchLabels:
      app: production
  template:
    metadata:
      labels:
        app: production
    spec:
      containers:
        - name: production
          image: mirrorgooglecontainers/echoserver:1.10
          ports:
            - containerPort: 8080
          env:
            - name: NODE_NAME
              valueFrom:
                fieldRef:
                  fieldPath: spec.nodeName
            - name: POD_NAME
              valueFrom:
                fieldRef:
                  fieldPath: metadata.name
            - name: POD_NAMESPACE
              valueFrom:
                fieldRef:
                  fieldPath: metadata.namespace
            - name: POD_IP
              valueFrom:
                fieldRef:
                  fieldPath: status.podIP
---
apiVersion: v1
kind: Service
metadata:
  name: production
  labels:
    app: production
spec:
  ports:
    - port: 80
      targetPort: 8080
      name: http
  selector:
app: production- 1.
- 2.
- 3.
- 4.
- 5.
- 6.
- 7.
- 8.
- 9.
- 10.
- 11.
- 12.
- 13.
- 14.
- 15.
- 16.
- 17.
- 18.
- 19.
- 20.
- 21.
- 22.
- 23.
- 24.
- 25.
- 26.
- 27.
- 28.
- 29.
- 30.
- 31.
- 32.
- 33.
- 34.
- 35.
- 36.
- 37.
- 38.
- 39.
- 40.
- 41.
- 42.
- 43.
- 44.
- 45.
- 46.
- 47.
- 48.
- 49.
- 50.
- 51.
- 52.
然後建立一個用於production 環境存取的Ingress 資源物件:
# production-ingress.yaml
apiVersion: networking.k8s.io/v1
kind: Ingress
metadata:
  name: production
spec:
  ingressClassName: higress
  rules:
    - host: echo.k8s.local
      http:
        paths:
          - path: /
            pathType: Prefix
            backend:
              service:
                name: production
                port:
number: 80- 1.
- 2.
- 3.
- 4.
- 5.
- 6.
- 7.
- 8.
- 9.
- 10.
- 11.
- 12.
- 13.
- 14.
- 15.
- 16.
- 17.
- 18.
直接建立上面的幾個資源物件:
☸ ➜ kubectl apply -f production.yaml
☸ ➜ kubectl apply -f production-ingress.yaml
☸ ➜ kubectl get pods -l app=production
NAME                          READY   STATUS    RESTARTS   AGE
production-64cfc46b65-j6krb   1/1     Running   0          56s
☸ ➜ kubectl get ingress production
NAME         CLASS     HOSTS            ADDRESS   PORTS   AGE
production higress echo.k8s.local 80 9s- 1.
- 2.
- 3.
- 4.
- 5.
- 6.
- 7.
- 8.
應用程式部署成功後即可正常存取應用程式:
☸ ➜ curl http://echo.k8s.local


Hostname: production-64cfc46b65-j6krb

Pod Information:
        node name:      node1
        pod name:       production-64cfc46b65-j6krb
        pod namespace:  default
        pod IP: 10.0.1.249

Server values:
        server_versinotallow=nginx: 1.13.3 - lua: 10008

Request Information:
        client_address=10.0.1.162
        method=GET
        real path=/
        query=
        request_versinotallow=1.1
        request_scheme=http
        request_uri=http://echo.k8s.local:8080/

Request Headers:
        accept=*/*
        host=echo.k8s.local
        original-host=echo.k8s.local
        req-start-time=1713508680651
        user-agent=curl/7.87.0
        x-b3-sampled=0
        x-b3-spanid=5ec284bec822750c
        x-b3-traceid=5c48c3cc4192ddc85ec284bec822750c
        x-envoy-attempt-count=1
        x-envoy-decorator-operatinotallow=production.default.svc.cluster.local:80/*
        x-envoy-internal=true
        x-forwarded-for=192.168.0.112
        x-forwarded-proto=http
        x-request-id=d42c8455-5b2e-471d-811c-65f80210ccec

Request Body:
-no body in request-- 1.
- 2.
- 3.
- 4.
- 5.
- 6.
- 7.
- 8.
- 9.
- 10.
- 11.
- 12.
- 13.
- 14.
- 15.
- 16.
- 17.
- 18.
- 19.
- 20.
- 21.
- 22.
- 23.
- 24.
- 25.
- 26.
- 27.
- 28.
- 29.
- 30.
- 31.
- 32.
- 33.
- 34.
- 35.
- 36.
- 37.
- 38.
- 39.
- 40.
- 41.
第二步. 建立Canary 版本
參考將上述Production 版本的 production.yaml 文件,再建立一個Canary 版本的應用程式。
# canary.yaml
apiVersion: apps/v1
kind: Deployment
metadata:
  name: canary
  labels:
    app: canary
spec:
  selector:
    matchLabels:
      app: canary
  template:
    metadata:
      labels:
        app: canary
    spec:
      containers:
        - name: canary
          image: mirrorgooglecontainers/echoserver:1.10
          ports:
            - containerPort: 8080
          env:
            - name: NODE_NAME
              valueFrom:
                fieldRef:
                  fieldPath: spec.nodeName
            - name: POD_NAME
              valueFrom:
                fieldRef:
                  fieldPath: metadata.name
            - name: POD_NAMESPACE
              valueFrom:
                fieldRef:
                  fieldPath: metadata.namespace
            - name: POD_IP
              valueFrom:
                fieldRef:
                  fieldPath: status.podIP
---
apiVersion: v1
kind: Service
metadata:
  name: canary
  labels:
    app: canary
spec:
  ports:
    - port: 80
      targetPort: 8080
      name: http
  selector:
app: canary- 1.
- 2.
- 3.
- 4.
- 5.
- 6.
- 7.
- 8.
- 9.
- 10.
- 11.
- 12.
- 13.
- 14.
- 15.
- 16.
- 17.
- 18.
- 19.
- 20.
- 21.
- 22.
- 23.
- 24.
- 25.
- 26.
- 27.
- 28.
- 29.
- 30.
- 31.
- 32.
- 33.
- 34.
- 35.
- 36.
- 37.
- 38.
- 39.
- 40.
- 41.
- 42.
- 43.
- 44.
- 45.
- 46.
- 47.
- 48.
- 49.
- 50.
- 51.
- 52.
接下來就可以透過設定Annotation 規則進行流量切分了。
基於Header 灰階發布
當我們需要透過Header 來進行灰階發佈時,我們可以透過下面的Annotation 來設定Higress 的灰階發布策略:
- 只配置 higress.io/canary-by-header:基於Request Header 的名稱進行流量切分。當請求包含該Header 並其值為 always 時,請求流量會被指派到灰階服務入口;其他情況時,請求流量不會被指派到灰階服務。
- 同時設定 higress.io/canary-by-header 和 higress.io/canary-by-header-value:基於Request Header 的名稱和值進行流量切分。當請求中的header 的名稱和header 的值與該配置相符時,請求流量會被分配到灰階服務;其他情況時,請求流量不會被分配到灰階服務。
例如現在當請求Header 為 higress:always 時將存取灰階服務 canary;其他情況將存取正式服務 production,那麼我們可以建立如下的Ingress 物件:
# canary-ingress.yaml
apiVersion: networking.k8s.io/v1
kind: Ingress
metadata:
  annotations:
    higress.io/canary: "true"
    higress.io/canary-by-header: "higress"
  name: canary
spec:
  ingressClassName: higress
  rules:
    - host: echo.k8s.local
      http:
        paths:
          - backend:
              service:
                name: canary
                port:
                  number: 80
            path: /
pathType: Prefix- 1.
- 2.
- 3.
- 4.
- 5.
- 6.
- 7.
- 8.
- 9.
- 10.
- 11.
- 12.
- 13.
- 14.
- 15.
- 16.
- 17.
- 18.
- 19.
- 20.
- 21.
直接套用上面的YAML 檔案即可:
☸ ➜ kubectl apply -f canary.yaml
☸ ➜ kubectl apply -f canary-ingress.yaml
☸ ➜ kubectl get pods -l app=canary
NAME                      READY   STATUS    RESTARTS   AGE
canary-7d97679b67-sh2r8   1/1     Running   0          12m
☸ ➜ kubectl get ingress canary
NAME     CLASS     HOSTS            ADDRESS   PORTS   AGE
canary higress echo.k8s.local 80 37s- 1.
- 2.
- 3.
- 4.
- 5.
- 6.
- 7.
- 8.
更新上面的Ingress 資源物件後,我們在請求中加入不同的Header 值,再次造訪應用程式的網域以查看效果。
☸ ➜ for i in $(seq 1 10); do curl -s echo.k8s.local | grep "Hostname"; done
Hostname: production-64cfc46b65-j6krb
Hostname: production-64cfc46b65-j6krb
Hostname: production-64cfc46b65-j6krb
Hostname: production-64cfc46b65-j6krb
Hostname: production-64cfc46b65-j6krb
Hostname: production-64cfc46b65-j6krb
Hostname: production-64cfc46b65-j6krb
Hostname: production-64cfc46b65-j6krb
Hostname: production-64cfc46b65-j6krb
Hostname: production-64cfc46b65-j6krb- 1.
- 2.
- 3.
- 4.
- 5.
- 6.
- 7.
- 8.
- 9.
- 10.
- 11.
這裡我們在請求的時候沒有配置任何Header,所以請求沒有發送到Canary 應用程式中去,如果設定為其他值呢:
☸ ➜ for i in $(seq 1 10); do curl -s -H "higress: always" echo.k8s.local | grep "Hostname"; done
Hostname: canary-7d97679b67-sh2r8
Hostname: canary-7d97679b67-sh2r8
Hostname: canary-7d97679b67-sh2r8
Hostname: canary-7d97679b67-sh2r8
Hostname: canary-7d97679b67-sh2r8
Hostname: canary-7d97679b67-sh2r8
Hostname: canary-7d97679b67-sh2r8
Hostname: canary-7d97679b67-sh2r8
Hostname: canary-7d97679b67-sh2r8
Hostname: canary-7d97679b67-sh2r8- 1.
- 2.
- 3.
- 4.
- 5.
- 6.
- 7.
- 8.
- 9.
- 10.
- 11.
由於我們要求設定的Header 值為 higress: always,所以請求全都路由到了canary 的服務,如果是其他的值則不會路由到canary 的服務。
這時候我們可以在上一個annotation (即canary-by-header)的基礎上添加一條higress.io/canary-by-header-value: user-value 這樣的規則,就可以將指定Header 值的請求路由到Canary Ingress 中指定的服務了。
annotations:
  higress.io/canary: "true" # 要开启灰度发布机制,首先需要启用 Canary
  higress.io/canary-by-header: "higress" # 基于header的流量切分
higress.io/canary-by-header-value: "user-value"- 1.
- 2.
- 3.
- 4.
同樣更新Ingress 物件後,重新存取應用,當Request Header 滿足 higress: user-value時,所有請求就會被路由到Canary 版本:
☸ ➜ for i in $(seq 1 10); do curl -s -H "higress: user-value" echo.k8s.local | grep "Hostname"; done
Hostname: canary-7d97679b67-sh2r8
Hostname: canary-7d97679b67-sh2r8
Hostname: canary-7d97679b67-sh2r8
Hostname: canary-7d97679b67-sh2r8
Hostname: canary-7d97679b67-sh2r8
Hostname: canary-7d97679b67-sh2r8
Hostname: canary-7d97679b67-sh2r8
Hostname: canary-7d97679b67-sh2r8
Hostname: canary-7d97679b67-sh2r8
Hostname: canary-7d97679b67-sh2r8- 1.
- 2.
- 3.
- 4.
- 5.
- 6.
- 7.
- 8.
- 9.
- 10.
- 11.
基於Cookie 灰階發布
與基於Request Header 的annotation 用法規則類似。例如在A/B 測試場景下,需要讓地域為北京的使用者存取Canary 版本。那麼當cookie 的annotation 設定為higress.io/canary-by-cookie: "users_from_Beijing",此時後台可對登入的使用者請求進行檢查,如果該使用者存取來源來自北京則設定cookie users_from_Beijing 的值為always,這樣就可以確保北京的用戶僅存取Canary 版本。
基於Cookie 的灰階發布不支援自訂設定Key 對應的值,只能是always。
例如我們現在要求的Cookie 為 users_from_Beijing=always 時將存取灰階版本服務canary;其他情況將存取正式服務production,則我們可以建立如下的Ingress 物件:
# canary-ingress.yaml
apiVersion: networking.k8s.io/v1
kind: Ingress
metadata:
  annotations:
    higress.io/canary: "true"
    higress.io/canary-by-cookie: "users_from_Beijing"
  name: canary
spec:
  ingressClassName: higress
  rules:
    - host: echo.k8s.local
      http:
        paths:
          - backend:
              service:
                name: canary
                port:
                  number: 80
            path: /
pathType: Prefix- 1.
- 2.
- 3.
- 4.
- 5.
- 6.
- 7.
- 8.
- 9.
- 10.
- 11.
- 12.
- 13.
- 14.
- 15.
- 16.
- 17.
- 18.
- 19.
- 20.
- 21.
更新上面的Ingress 資源物件後,我們在請求中設定一個 users_from_Beijing=always 的Cookie 值,再次造訪應用程式的網域。
☸ ➜ for i in $(seq 1 10); do curl -s -b "users_from_Beijing=always" echo.k8s.local | grep "Hostname"; done
Hostname: canary-7d97679b67-sh2r8
Hostname: canary-7d97679b67-sh2r8
Hostname: canary-7d97679b67-sh2r8
Hostname: canary-7d97679b67-sh2r8
Hostname: canary-7d97679b67-sh2r8
Hostname: canary-7d97679b67-sh2r8
Hostname: canary-7d97679b67-sh2r8
Hostname: canary-7d97679b67-sh2r8
Hostname: canary-7d97679b67-sh2r8
Hostname: canary-7d97679b67-sh2r8- 1.
- 2.
- 3.
- 4.
- 5.
- 6.
- 7.
- 8.
- 9.
- 10.
- 11.
我們可以看到應用程式都被路由到了Canary 版本的應用程式中去了,如果我們將這個Cookie 值設定為其他值,則不會路由到Canary 應用程式中。
基於權重灰階發布
基於權重的流量切分的典型應用場景是藍綠部署,可透過將權重設為0 或100 來實現。例如,可將Green 版本設定為主要部分,並將Blue 版本的入口配置為Canary。最初,將權重設為0,因此不會將流量代理到Blue 版本。一旦新版本測試和驗證都成功後,即可將Blue 版本的權重設為100,即所有流量從Green 版本轉向Blue。
在Higress 中,我們可以透過下面的Annotation 來設定基於權重的灰階發布策略:
- higress.io/canary-weight:設定請求到指定服務的百分比(值為0~100 的整數)
- higress.io/canary-weight-total:設定權重總和,預設為100
例如我們配置灰階服務canary 的權重為20%,而配置正式服務production 的權重為80%,則我們可以建立如下的Ingress 物件:
# canary-ingress.yaml
apiVersion: networking.k8s.io/v1
kind: Ingress
metadata:
  annotations:
    higress.io/canary: "true"
    higress.io/canary-weight: "20" # 分配20%流量到当前Canary版本
  name: canary
spec:
  ingressClassName: higress
  rules:
    - host: echo.k8s.local
      http:
        paths:
          - backend:
              service:
                name: canary
                port:
                  number: 80
            path: /
pathType: Prefix- 1.
- 2.
- 3.
- 4.
- 5.
- 6.
- 7.
- 8.
- 9.
- 10.
- 11.
- 12.
- 13.
- 14.
- 15.
- 16.
- 17.
- 18.
- 19.
- 20.
- 21.
更新上面的Ingress 對象,接下來我們在命令列終端機中來不斷存取這個應用,觀察Hostname 變化:
☸ ➜ for i in $(seq 1 10); do curl -s echo.k8s.local | grep "Hostname"; done
Hostname: production-64cfc46b65-j6krb
Hostname: canary-7d97679b67-sh2r8
Hostname: production-64cfc46b65-j6krb
Hostname: canary-7d97679b67-sh2r8
Hostname: production-64cfc46b65-j6krb
Hostname: production-64cfc46b65-j6krb
Hostname: production-64cfc46b65-j6krb
Hostname: production-64cfc46b65-j6krb
Hostname: production-64cfc46b65-j6krb
Hostname: production-64cfc46b65-j6krb- 1.
- 2.
- 3.
- 4.
- 5.
- 6.
- 7.
- 8.
- 9.
- 10.
- 11.
由於我們為Canary 版本應用程式分配了20% 左右權重的流量,所以上面我們訪問10 次有3 次(不是一定)訪問到了Canary 版本的應用,符合我們的預期。
到這裡我們就透過Higress 的灰階發布功能實現了流量的切分,可以根據不同的場景選擇不同的灰階發布方式。
外掛
Higress 提供Wasm、Lua、進程外三種外掛程式擴充機制,可透過外掛機制實現自訂的功能擴充。支援多語言編寫插件,生效粒度支援全域級、網域名稱級,路由級。插件支援熱更新,變更插件邏輯和配置都對流量無損。
要為Higress 啟用插件,一共有兩種方法,一是透過Higress 控制台進行配置,另外還可以透過Higress WasmPlugin CRD 進行配置。
透過Higress 控制台進行配置
Higress 控制台提供了3 個入口進行外掛設定:
- 全域配置:插件市場-> 選擇插件進行配置
- 網域級配置:網域管理-> 選擇網域-> 點選策略-> 選擇插件進行配置
- 路由級設定: 路由設定-> 選擇路由-> 點選策略-> 選擇插件進行設定
這三個設定的生效優先權是:路由等級> 網域等級> 全域,也就是沒有符合到特定路由或網域的請求才會生效全域設定。
對於一般的插件,包括自訂插件在內,路由/網域名稱等級的設定欄位和全域設定欄位是完全一樣的;對於認證類插件(Key 認證、HMAC 認證、Basic 認證、JWT 認證等)則不同,全域配置僅做Consumer 憑證配置,以及是否開啟全域認證,而在路由/網域層級透過allow 欄位配置允許存取的Consumer 清單。
例如我們要為前面的 foo.bar.com 服務設定一個Basic Auth 插件,首先需要在全域設定啟用Basic Auth 插件,然後在網域名稱層級(或是路由級)設定Basic Auth 插件。
在控制台中切換到插件市場,找到Basic Auth 插件,點擊配置,然後在資料編輯器中透過欄位配置使用者憑證,如下所示: consumers
global_auth: false
consumers: # 配置两个用户凭证
  - name: consumer1
    credential: admin:123456
  - name: consumer2
credential: guest:abc- 1.
- 2.
- 3.
- 4.
- 5.
- 6.
若要記得選擇開啟狀態,然後點選儲存。
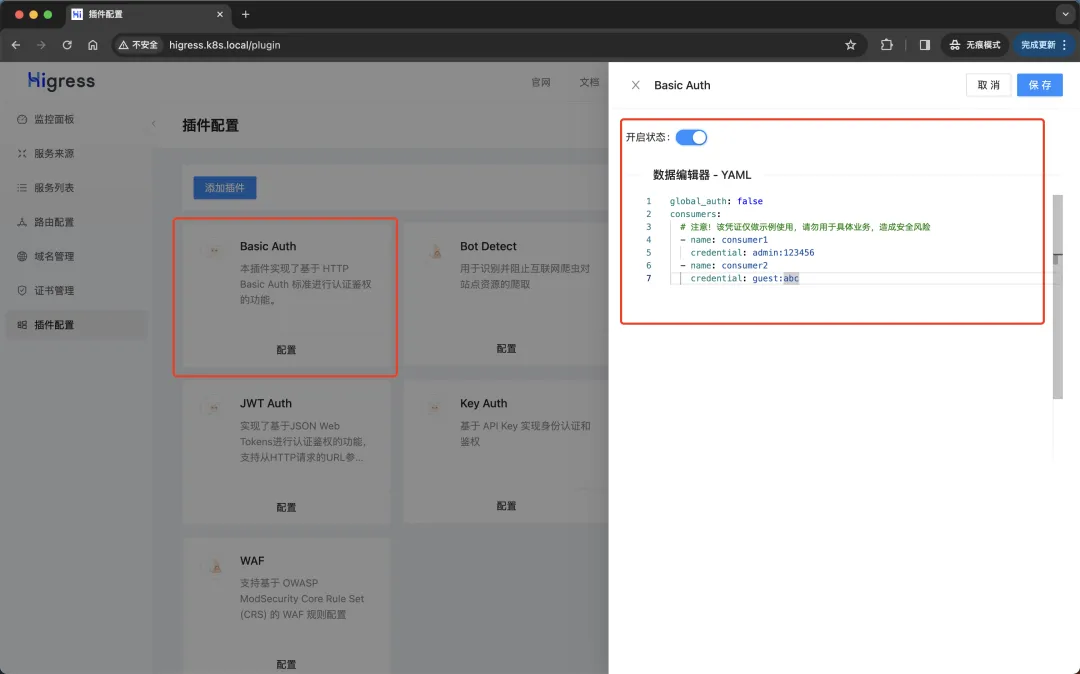
配置Basic 認證
接下來切換到網域管理頁面,新增一個網域 foo.bar.com,然後點選策略,選擇Basic Auth 外掛程式進行配置,。
在資料編輯器中透過 allow 欄位配置允許存取的用戶,如下所示:
allow:
- consumer1- 1.
- 2.
若要記得選擇開啟狀態,然後點選儲存。這裡我們配置的是只允許 consumer1 使用者存取 foo.bar.com 服務,其他呼叫者不允許存取。
現在我們可以造訪下 foo.bar.com 服務進行驗證:
$ curl -v foo.bar.com/foo
*   Trying 192.168.0.116:80...
* Connected to foo.bar.com (192.168.0.116) port 80 (#0)
> GET /foo HTTP/1.1
> Host: foo.bar.com
> User-Agent: curl/7.87.0
> Accept: */*
>
* Mark bundle as not supporting multiuse
< HTTP/1.1 401 Unauthorized
< www-authenticate: Basic realm=MSE Gateway
< date: Sat, 20 Apr 2024 06:05:15 GMT
< server: istio-envoy
< content-length: 0
<
* Connection #0 to host foo.bar.com left intact- 1.
- 2.
- 3.
- 4.
- 5.
- 6.
- 7.
- 8.
- 9.
- 10.
- 11.
- 12.
- 13.
- 14.
- 15.
- 16.
可以看到回傳了401 Unauthorized,因為我們沒有提供使用者憑證,接下來我們提供使用者憑證進行存取:
$ curl -v -u admin:123456 foo.bar.com/foo
*   Trying 192.168.0.116:80...
* Connected to foo.bar.com (192.168.0.116) port 80 (#0)
* Server auth using Basic with user 'admin'
> GET /foo HTTP/1.1
> Host: foo.bar.com
> Authorization: Basic YWRtaW46MTIzNDU2
> User-Agent: curl/7.87.0
> Accept: */*
>
* Mark bundle as not supporting multiuse
< HTTP/1.1 200 OK
< x-app-name: http-echo
< x-app-version: 0.2.4
< date: Sat, 20 Apr 2024 06:06:10 GMT
< content-length: 4
< content-type: text/plain; charset=utf-8
< req-cost-time: 1
< req-arrive-time: 1713593170671
< resp-start-time: 1713593170673
< x-envoy-upstream-service-time: 1
< server: istio-envoy
<
foo
* Connection #0 to host foo.bar.com left intact- 1.
- 2.
- 3.
- 4.
- 5.
- 6.
- 7.
- 8.
- 9.
- 10.
- 11.
- 12.
- 13.
- 14.
- 15.
- 16.
- 17.
- 18.
- 19.
- 20.
- 21.
- 22.
- 23.
- 24.
- 25.
可以看到我們提供了使用者憑證後成功存取了服務,如果我們提供的使用者憑證不在允許存取的使用者清單中,則會傳回403 Forbidden 錯誤。
$ curl -v -u guest:abc foo.bar.com/foo
*   Trying 192.168.0.116:80...
* Connected to foo.bar.com (192.168.0.116) port 80 (#0)
* Server auth using Basic with user 'guest'
> GET /foo HTTP/1.1
> Host: foo.bar.com
> Authorization: Basic Z3Vlc3Q6YWJj
> User-Agent: curl/7.87.0
> Accept: */*
>
* Mark bundle as not supporting multiuse
< HTTP/1.1 403 Forbidden
< www-authenticate: Basic realm=MSE Gateway
< date: Sat, 20 Apr 2024 06:06:54 GMT
< server: istio-envoy
< content-length: 0
<
* Connection #0 to host foo.bar.com left intact- 1.
- 2.
- 3.
- 4.
- 5.
- 6.
- 7.
- 8.
- 9.
- 10.
- 11.
- 12.
- 13.
- 14.
- 15.
- 16.
- 17.
- 18.
透過Higress WasmPlugin 進行配置
除了透過控制台可以設定插件,還可以透過Higress WasmPlugin CRD 進行配置,Higress WasmPlugin CRD 是Istio WasmPlugin CRD 的擴展,新增了一些配置欄位。
欄位名稱 | 資料類型 | 填寫要求 | 描述 |
預設配置 | 目的 | 選填 | 插件預設配置,全域生效於沒有符合特定網域名稱和路由配置的請求 |
比賽規則 | 物件數組 | 選填 | 匹配域名或路由生效的配置 |
matchRules中每一項的設定欄位說明:
欄位名稱 | 資料類型 | 填寫要求 | 配置範例 | 描述 |
入口 | 字串數組 | ingress和domain中必填一項 | [“預設/foo”,“預設/欄”] | 匹配ingress 資源對象,匹配格式為: 命名空間/ingress名稱 |
領域 | 字串數組 | ingress和domain中必填一項 | [“example.com”,“*.test.com”] | 匹配域名,支援泛域名 |
配置 | 目的 | 選填 | - | 匹配後生效的插件配置 |
同樣如果要透過 WasmPlugin 來設定實作Basic Auth 插件,首先需要建立一個WasmPlugin CRD 對象,如下所示:
# basic-auth-plugin.yaml
apiVersion: extensions.higress.io/v1alpha1
kind: WasmPlugin
metadata:
  name: basic-auth
  namespace: higress-system
spec:
  url: oci://higress-registry.cn-hangzhou.cr.aliyuncs.com/plugins/basic-auth:1.0.0 # 插件镜像地址
  defaultConfig:
    consumers:
      - name: consumer1
        credential: admin:123456
      - name: consumer2
        credential: guest:abc
  matchRules:
    - domain:
        - foo.bar.com
      config:
        allow:
- consumer2- 1.
- 2.
- 3.
- 4.
- 5.
- 6.
- 7.
- 8.
- 9.
- 10.
- 11.
- 12.
- 13.
- 14.
- 15.
- 16.
- 17.
- 18.
- 19.
- 20.
將上面透過控制台配置的Basic Auth 插件配置重置還原,不啟用Basic Auth 插件。
在上面的WasmPlugin 物件中我們透過defaultConfig 欄位配置了使用者憑證,這部分其實就對應於控制台中的全域配置,然後透過matchRules 欄位配置了網域名稱層級的配置,這部分對應於控制台中的網域層級配置,當然除了domain 之外還可以配置ingress 字段,這部分對應於控制台中的路由級配置。例如上面的配置表示只允許 consumer2 使用者存取 foo.bar.com 服務。
直接建立上面的WasmPlugin 物件:
☸ ➜ kubectl apply -f basic-auth-plugin.yaml- 1.
然後再次造訪 foo.bar.com 服務進行驗證:
☸ ➜ curl -v foo.bar.com/foo
*   Trying 192.168.0.116:80...
* Connected to foo.bar.com (192.168.0.116) port 80 (#0)
> GET /foo HTTP/1.1
> Host: foo.bar.com
> User-Agent: curl/7.87.0
> Accept: */*
>
* Mark bundle as not supporting multiuse
< HTTP/1.1 401 Unauthorized
< www-authenticate: Basic realm=MSE Gateway
< date: Sat, 20 Apr 2024 06:23:48 GMT
< server: istio-envoy
< content-length: 0
<
* Connection #0 to host foo.bar.com left intact- 1.
- 2.
- 3.
- 4.
- 5.
- 6.
- 7.
- 8.
- 9.
- 10.
- 11.
- 12.
- 13.
- 14.
- 15.
- 16.
可以看到回傳了401 Unauthorized,因為我們沒有提供使用者憑證,接下來我們提供使用者憑證進行存取:
☸ ➜ curl -v -u guest:abc foo.bar.com/foo
*   Trying 192.168.0.116:80...
* Connected to foo.bar.com (192.168.0.116) port 80 (#0)
* Server auth using Basic with user 'guest'
> GET /foo HTTP/1.1
> Host: foo.bar.com
> Authorization: Basic Z3Vlc3Q6YWJj
> User-Agent: curl/7.87.0
> Accept: */*
>
* Mark bundle as not supporting multiuse
< HTTP/1.1 200 OK
< x-app-name: http-echo
< x-app-version: 0.2.4
< date: Sat, 20 Apr 2024 06:24:49 GMT
< content-length: 4
< content-type: text/plain; charset=utf-8
< req-cost-time: 1
< req-arrive-time: 1713594289845
< resp-start-time: 1713594289847
< x-envoy-upstream-service-time: 0
< server: istio-envoy
<
foo
* Connection #0 to host foo.bar.com left intact- 1.
- 2.
- 3.
- 4.
- 5.
- 6.
- 7.
- 8.
- 9.
- 10.
- 11.
- 12.
- 13.
- 14.
- 15.
- 16.
- 17.
- 18.
- 19.
- 20.
- 21.
- 22.
- 23.
- 24.
- 25.
上面我們在WasmPlugin 中配置了只允許consumer2 使用者存取foo.bar.com 服務,所以只有提供了consumer2 使用者憑證的請求才能存取服務,所以這裡我們提供的guest:abc 使用者憑證成功存取了服務,如果提供的使用者憑證不在允許存取的使用者清單中,則會傳回403 Forbidden 錯誤。
☸ ➜ curl -v -u admin:123456 foo.bar.com/foo
*   Trying 192.168.0.116:80...
* Connected to foo.bar.com (192.168.0.116) port 80 (#0)
* Server auth using Basic with user 'admin'
> GET /foo HTTP/1.1
> Host: foo.bar.com
> Authorization: Basic YWRtaW46MTIzNDU2
> User-Agent: curl/7.87.0
> Accept: */*
>
* Mark bundle as not supporting multiuse
< HTTP/1.1 403 Forbidden
< www-authenticate: Basic realm=MSE Gateway
< date: Sat, 20 Apr 2024 06:26:00 GMT
< server: istio-envoy
< content-length: 0
<
* Connection #0 to host foo.bar.com left intact- 1.
- 2.
- 3.
- 4.
- 5.
- 6.
- 7.
- 8.
- 9.
- 10.
- 11.
- 12.
- 13.
- 14.
- 15.
- 16.
- 17.
- 18.
這裡我們就實作了透過Higress WasmPlugin CRD 物件來配置Basic Auth 插件,實現了使用者憑證認證功能。除了Basic Auth 插件,Higress 還提供了許多其他插件,例如Key Auth 插件、HMAC Auth 插件、JWT Auth 插件等,可以根據實際需求選擇不同的插件進行配置,每個插件的配置屬性可以參考控制台中的插件市場的配置說明。
自訂插件
除了Higress 提供的內建外掛外,有時候我們可能會有一些特殊的需求,這時候我們可以透過自訂外掛程式來實現自訂的功能擴充。我們可以使用多種程式語言來編寫插件,生效粒度支援全域級、網域級,路由級,此外插件還支援熱更新,變更插件邏輯和配置都對流量無損。下面我們就用一個簡單的範例來說明下如何寫一個自訂外掛程式。
首先需要安裝Golang 和TinyGo 兩個程式。 Golang 要求1.18 版本以上,官方指引連結:https://go.dev/doc/install;TinyGo 要求0.28.1 版本以上,官方指引連結:https://tinygo.org/getting-started/install/。
☸ ➜ go version
go version go1.20.14 darwin/arm64
☸ ➜ tinygo version
tinygo version 0.30.0 darwin/amd64 (using go version go1.20.14 and LLVM version 16.0.1)- 1.
- 2.
- 3.
- 4.
接下來首先我們初始化工程目錄,新建一個名為的目錄,在所建目錄下執行以下指令,進行Go 工程初始化 wasm-demo-go
go mod init wasm-demo-go- 1.
國內環境需要設定下載依賴包的代理
go env -w GOPROXY=https://proxy.golang.com.cn,direct- 1.
然後下載建置插件的依賴:
go get github.com/higress-group/proxy-wasm-go-sdk
go get github.com/alibaba/higress/plugins/wasm-go@main
go get github.com/tidwall/gjson- 1.
- 2.
- 3.
接下來我們來寫一個簡單的插件,實現一個簡單的功能,當插件配置中有mockEnable: true 時直接返回hello world 應答;未做插件配置,或者設置mockEnable: false 時給原始請求添加hello: world 請求Header 頭。
package main

import (
    "github.com/alibaba/higress/plugins/wasm-go/pkg/wrapper"
    "github.com/higress-group/proxy-wasm-go-sdk/proxywasm"
    "github.com/higress-group/proxy-wasm-go-sdk/proxywasm/types"
    "github.com/tidwall/gjson"
)

func main() {
    wrapper.SetCtx(
        // 插件名称
        "my-plugin",
        // 为解析插件配置,设置自定义函数
         wrapper.ParseConfigBy(parseConfig),
        // 为处理请求头,设置自定义函数
        wrapper.ProcessRequestHeadersBy(onHttpRequestHeaders),
    )
}

// 自定义插件配置
type MyConfig struct {
    mockEnable bool
}

// 在控制台插件配置中填写的yaml配置会自动转换为json,此处直接从json这个参数里解析配置即可
func parseConfig(json gjson.Result, config *MyConfig, log wrapper.Log) error {
    // 解析出配置,更新到config中
    config.mockEnable = json.Get("mockEnable").Bool()
    return nil
}

func onHttpRequestHeaders(ctx wrapper.HttpContext, config MyConfig, log wrapper.Log) types.Action {
    proxywasm.AddHttpRequestHeader("hello", "world")
    if config.mockEnable {
        proxywasm.SendHttpResponse(200, nil, []byte("hello world"), -1)
    }
    return types.ActionContinue
}- 1.
- 2.
- 3.
- 4.
- 5.
- 6.
- 7.
- 8.
- 9.
- 10.
- 11.
- 12.
- 13.
- 14.
- 15.
- 16.
- 17.
- 18.
- 19.
- 20.
- 21.
- 22.
- 23.
- 24.
- 25.
- 26.
- 27.
- 28.
- 29.
- 30.
- 31.
- 32.
- 33.
- 34.
- 35.
- 36.
- 37.
- 38.
- 39.
在網關控制台中的插件配置為yaml 格式,下發給插件時將自動轉換為json 格式,所以範例中的 parseConfig 可以直接從json 解析配置。
上面程式碼中透過 wrapper.ProcessRequestHeadersBy 將自訂函數 onHttpRequestHeaders 用於HTTP 請求頭處理階段處理請求,除此之外,還可以透過下面方式,設定其他階段的自訂處理函數。
HTTP 處理階段 | 觸發時機 | 掛載方法 |
HTTP 請求頭處理階段 | 網關接收到客戶端發送來的請求頭資料時 | 包裝器.ProcessRequestHeadersBy |
HTTP 請求Body 處理階段 | 網關接收到客戶端發送來的請求Body 資料時 | 包裝器.ProcessRequestBodyBy |
HTTP 應答頭處理階段 | 網關接收到後端服務回應的應答頭資料時 | 包裝器.ProcessResponseHeadersBy |
HTTP 應答Body 處理階段 | 網關接收到後端服務回應的應答Body 資料時 | 包裝器.ProcessResponseBodyBy |
上面範例程式碼中的 proxywasm.AddHttpRequestHeader 和 proxywasm.SendHttpResponse 是外掛程式SDK 提供的兩個工具方法,主要的工具方法請見下表:
分類 | 方法名稱 | 用途 | 可以生效的HTTP 處理階段 |
請求頭處理 | 取得HttpRequestHeaders | 獲取客戶端請求的全部請求頭 | HTTP 請求頭處理階段 |
取代HttpRequestHeaders | 替換客戶端請求的全部請求頭 | HTTP 請求頭處理階段 | |
取得Http請求頭 | 取得客戶端請求的指定請求頭 | HTTP 請求頭處理階段 | |
刪除HttpRequestHeader | 移除客戶端請求的指定請求頭 | HTTP 請求頭處理階段 | |
取代HttpRequestHeader | 替換客戶端請求的指定請求頭 | HTTP 請求頭處理階段 | |
新增HttpRequestHeader | 新增一個客戶端請求頭 | HTTP 請求頭處理階段 | |
請求Body 處理 | 取得HttpRequestBody | 取得客戶端請求Body | HTTP 請求Body 處理階段 |
追加HttpRequestBody | 將指定的位元組串附加到客戶端請求Body 結束 | HTTP 請求Body 處理階段 | |
前置HttpRequestBody | 將指定的位元組字串附加到客戶端請求Body 的開頭 | HTTP 請求Body 處理階段 | |
替換HttpRequestBody | 替換客戶端請求Body | HTTP 請求Body 處理階段 | |
應答頭處理 | 取得HttpResponseHeaders | 取得後端回應的全部應答頭 | HTTP 應答頭處理階段 |
替換HttpResponseHeaders | 替換後端回應的全部應答頭 | HTTP 應答頭處理階段 | |
取得Http響應頭 | 取得後端回應的指定應答頭 | HTTP 應答頭處理階段 | |
刪除HttpResponse標頭 | 移除後端回應的指定應答頭 | HTTP 應答頭處理階段 | |
替換HttpResponseHeader | 替換後端回應的指定應答頭 | HTTP 應答頭處理階段 | |
新增HttpResponse標頭 | 新增一個後端響應頭 | HTTP 應答頭處理階段 | |
應答Body 處理 | 取得HttpResponseBody | 取得客戶端請求Body | HTTP 應答Body 處理階段 |
追加HttpResponseBody | 將指定的位元組串附加到後端回應Body 結尾 | HTTP 應答Body 處理階段 | |
前置HttpResponseBody | 將指定的位元組串附加到後端回應Body 的開頭 | HTTP 應答Body 處理階段 | |
替換HttpResponseBody | 替換後端響應Body | HTTP 應答Body 處理階段 | |
HTTP 呼叫 | 調度HttpCall | 發送一個HTTP 請求 | - |
取得HttpCallResponseHeaders | 取得DispatchHttpCall 請求回應的應答頭 | - | |
取得HttpCallResponseBody | 取得DispatchHttpCall 請求回應的回應Body | - | |
取得HttpCallResponseTrailers | 取得DispatchHttpCall 請求回應的應答Trailer | - | |
直接回應 | 發送Http回應 | 直接回傳一個特定的HTTP 應答 | - |
流程恢復 | 恢復Http請求 | 恢復先前被暫停的請求處理流程 | - |
恢復Http響應 | 恢復先前被暫停的應答處理流程 | - |
接下來我們需要編譯產生WASM 檔:
go mod tidy
tinygo build -o main.wasm -scheduler=none -target=wasi -gc=custom -tags="custommalloc nottinygc_finalizer" ./main.go- 1.
- 2.
編譯成功會在目前目錄下產生檔案 main.wasm,要在Higress 中配合Wasmplugin CRD 或Console 的UI 互動配置該插件,需要將該wasm 檔案打包成oci 或docker 映像。
在專案根目錄下方建立一個Dockerfile 文件,內容如下:
FROM scratch
COPY main.wasm plugin.wasm- 1.
- 2.
然後執行以下命令建置並推送鏡像:
docker build -t cnych/higress-plugin-demo:1.0.0 .
docker push cnych/higress-plugin-demo:1.0.0- 1.
- 2.
這樣我們就將自訂插件打包成了一個Docker 映像。然後在網關控制台的插件市場中建立一個自訂插件,填入上面建立的Wasm 鏡像位址即可。
新增插件
創建完成後,點選插件卡的設定按鈕,填入插件的配置 mockEnable: true,打開開啟開關就生效了。如果插件邏輯發生了變更,可以建立一個新的鏡像,並使用不同的鏡像tag,點插件卡片右上方選單中的編輯按鈕,將Wasm 鏡像位址修改為新版本的位址即可。
不過要注意的是開啟後會對所有請求生效,所以在生產環境中需要謹慎使用,可以透過網域名稱層級或路由層級設定插件來控制插件的生效範圍。
除了透過控制台配置插件,還可以透過Higress WasmPlugin CRD 物件配置插件,這樣可以更靈活的控制插件的生效範圍。
# wasm-plugin-demo.yaml
apiVersion: extensions.higress.io/v1alpha1
kind: WasmPlugin
metadata:
  name: plugin-demo
  namespace: higress-system
spec:
  url: oci://docker.io/cnych/higress-plugin-demo:1.0.0
  defaultConfig:
    mockEnable: false
  matchRules:
    - domain:
        - foo.bar.com
      config:
mockEnable: true- 1.
- 2.
- 3.
- 4.
- 5.
- 6.
- 7.
- 8.
- 9.
- 10.
- 11.
- 12.
- 13.
- 14.
- 15.
直接應用上面的WasmPlugin 物件:
☸ ➜ kubectl apply -f wasm-plugin-demo.yaml- 1.
然後我們再次造訪 foo.bar.com 服務進行驗證:
☸ ➜ curl foo.bar.com/foo
hello world- 1.
- 2.
可以看到我們提供了插件配置 mockEnable: true 後直接返回了 hello world 應答,如果我們將插件配置設為 mockEnable: false,則會給原始請求添加 hello: world 請求Header 頭。
這樣我們就透過Higress WasmPlugin CRD 物件配置了自訂插件,實現了自訂的功能擴充。
這裡對插件的生效機制簡單做個說明:
- 使用者將程式碼編譯成wasm 文件
- 使用者將wasm 檔案建置成docker 映像
- 使用者將docker 映像推送至映像倉庫
- 使用者建立WasmPlugin 資源
- Istio watch 到WasmPlugin 資源的變化
- Higress Gateway 中的xDS proxy 程序從Istio 取得到配置,發現插件的鏡像位址
- xDS proxy 從鏡像倉庫拉取鏡像
- xDS proxy 從鏡像中提取出wasm 檔案
- Higress Gateway 中的envoy 進程從xDS proxy 取得到配置,發現wasm 檔案的本機路徑
- Envoy 從本機檔案載入wasm 文件
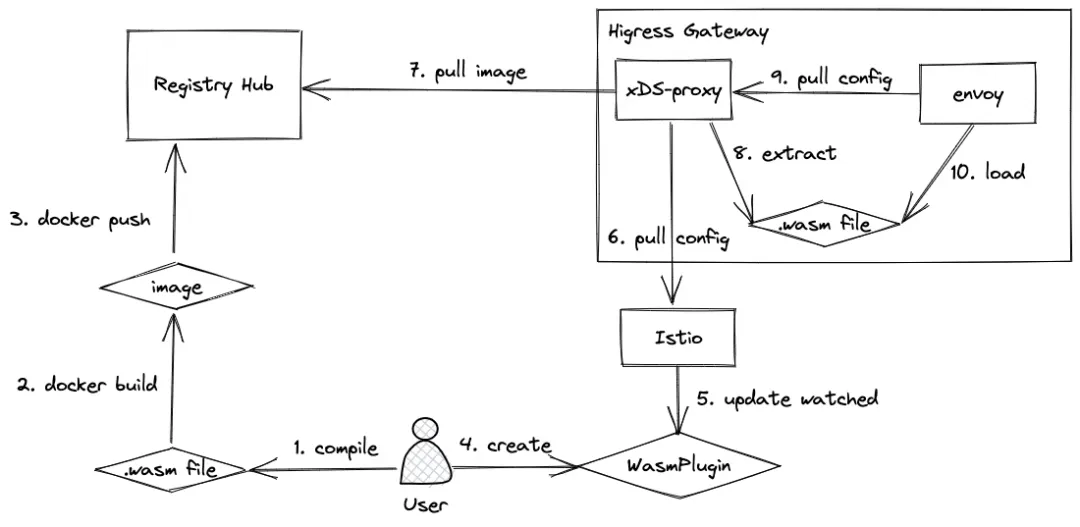
插件生效
這裡envoy 取得配置並載入wasm 檔案使用到了ECDS (Extension Config Discovery Service)的機制,實現了wasm 檔案更新,直接熱加載,不會導致任何連接中斷,業務流量完全無損。
除了本文介紹的Higress 功能之外,還有許多其他功能和最佳實踐方案,更多內容可以參考Higress 官方文件。
參考文件:https://higress.io