Integrate the mathematical formula editor into the visual construction platform based on Mathlive

Hi, hello everyone, my name is Xu Xiaoxi. In the last article, I shared with you the newly developed visual construction product-Chengzi Test Paper. I received a lot of feedback and suggestions from users, one of which I found very interesting, so I took It took me a day to research and implement this user requirement.
The specific requirements are as follows:
For the test papers of advanced mathematics courses, can the function of editing mathematical formulas be implemented?
After a series of research and feasibility analysis, I felt that this requirement was very valuable, had a wide range of applications, and was technically achievable from a web perspective, so I spent some time implementing it.
At the end of the article, I will also share the address of the visual editor integrated with mathematical formulas for your reference in university study.
Next, I will share with you how to implement a component that supports a mathematical formula editor from scratch and integrate it into the vue3 project.
Technical implementation of mathematical formula editor
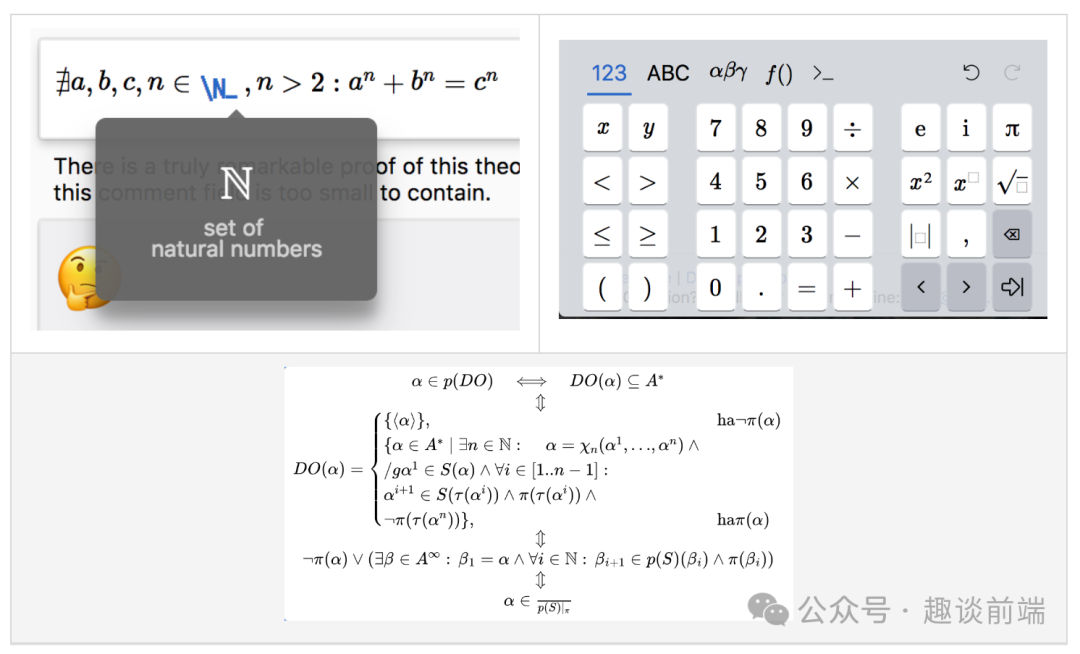
First of all, in order to display the mathematical formulas we are familiar with, we need to understand the following representations on the web:
- latex
- mathml
- ascimath
The above three representations are actually markup languages, which use specific syntax formats to elegantly display mathematical formulas. A simple example is as follows:
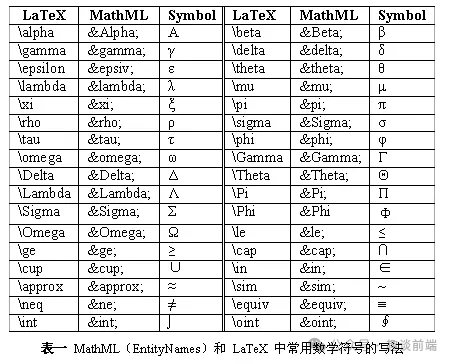
If everyone is familiar with these markup languages, we can easily use the front-end open source library MathJax to write mathematical formulas.

The specific usage is as follows:
<template>
  <div>
    <p id="math"></p>
    <p ref="math" v-html=“str”></p>
  </div>
</template>

<script>
export default {
  name: 'Formula',
  data() {
    return {
      str: ''
    }
  },
  mounted() {
    this.$nextTick(() => {
      // typesetPromise 需要 [] 包裹
      this.str = '\\[x = {-b \\pm \\sqrt{b^2-4ac} \\over 2a}.\\]'
      window.MathJax.typesetPromise([this.$refs.math]).catch(err => err)

      // tex2chtml 不需要 [] 包裹
      const str = `x = {-b \\pm \\sqrt{b^2-4ac} \\over 2a}`
      document
        .querySelector('#math')
        .appendChild(window.MathJax.tex2chtml(str))
    })
  }
}
</script>- 1.
- 2.
- 3.
- 4.
- 5.
- 6.
- 7.
- 8.
- 9.
- 10.
- 11.
- 12.
- 13.
- 14.
- 15.
- 16.
- 17.
- 18.
- 19.
- 20.
- 21.
- 22.
- 23.
- 24.
- 25.
- 26.
- 27.
- 28.
- 29.
- 30.
But as someone with a strong product concept, it is very painful for users to learn these markup languages, so we need to think of a simpler way so that users can visually write complex mathematical formulas without learning.
After researching some mature libraries, I found that there is an open source library that is very suitable for my "simplification" appeal, which is mathlive.
MathLive is a powerful web component that provides an easy-to-use interface for editing mathematical formulas.

However, its documentation and use in vue3 are very sparse on the Internet, and it can be said to be completely non-existent. Because the orange test paper construction platform I made is implemented using vue3, so I need to research a solution that supports vue3.
Fortunately, I found their pure English version of the documentation. After reading through its documentation, I have a deeper understanding of MathLive.
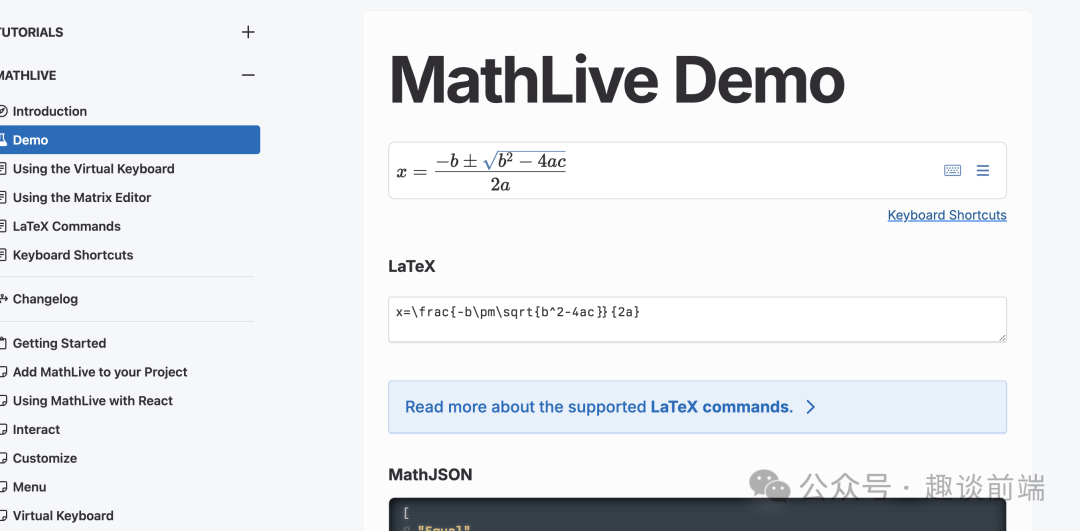
The document provides how to use native webcomponent and react use cases. Fortunately, I have more than 5 years of experience in react, and it seems to be very comfortable. Now I will directly share how to integrate it into the vue3 project. Interested Friends can directly use it in their own projects.
1. Install and introduce MathLive components
We can install using npm or yarn or pnpm (recommended):
pnpm install mathlive- 1.
Next let's register the component:
import * as MathLive from 'mathlive';
import VueMathfield from '@/assets/vue-mathlive.mjs';

app.use(VueMathfield, MathLive);- 1.
- 2.
- 3.
- 4.
This way we can use the mathlive formula editor component globally.
2. Use in projects

In order to achieve the effect shown above, we need to define components in the page:
<mathlive-mathfield
  :options="{ smartFence: false }"
  @input="handleChange"
  :value="content"
>
  {{ content }}
</mathlive-mathfield>- 1.
- 2.
- 3.
- 4.
- 5.
- 6.
- 7.
This is the default tag introduced by mathlive. Of course, we can modify its definition. If you are a react player, you can also use it directly like this:
// d.ts
declare global {
  namespace JSX {
    interface IntrinsicElements {
      'math-field': React.DetailedHTMLProps<React.HTMLAttributes<MathfieldElement>, MathfieldElement>;
    }
  }
}

// app.tsx
import "./App.css";
import "//unpkg.com/mathlive";
import { useState } from "react";

function App() {
  const [value, setValue] = useState<string>("");

  return (
    <div className="App">
      <math-field
        onInput={
          (evt: React.ChangeEvent<HTMLElement>) =>
            setValue(evt.target.value)
        }
      >
        {value}
      </math-field>
      <p>Value: {value}</p>
    </div>
  );
}

export default App;- 1.
- 2.
- 3.
- 4.
- 5.
- 6.
- 7.
- 8.
- 9.
- 10.
- 11.
- 12.
- 13.
- 14.
- 15.
- 16.
- 17.
- 18.
- 19.
- 20.
- 21.
- 22.
- 23.
- 24.
- 25.
- 26.
- 27.
- 28.
- 29.
- 30.
- 31.
- 32.
- 33.
Next, let’s learn about its properties. The following are the vue version of props, which are very important. You can save them:

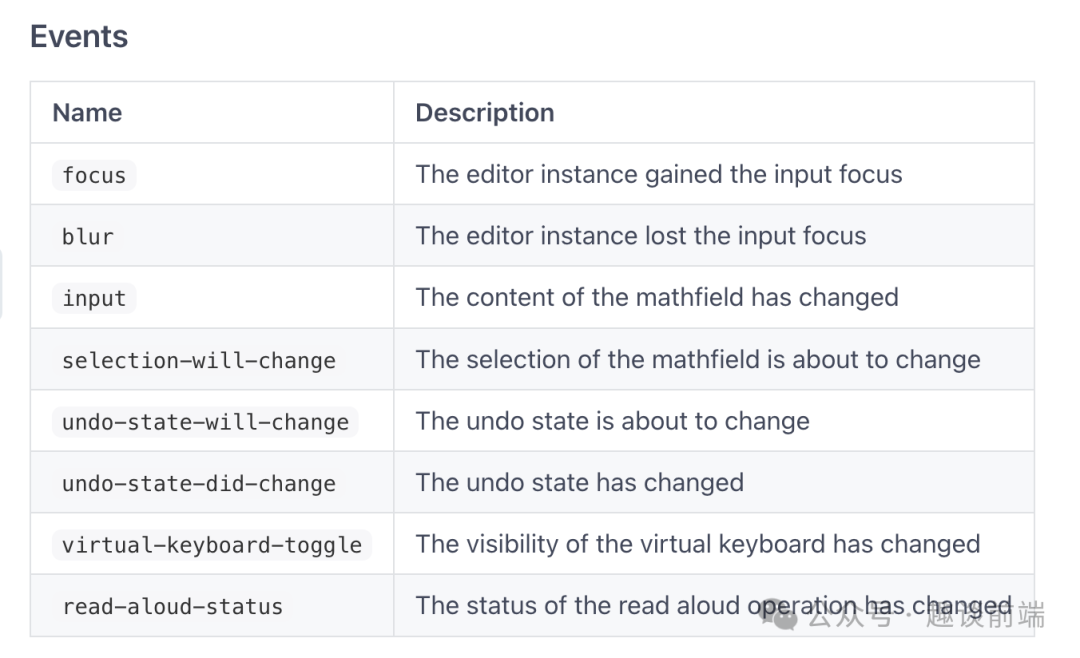
Here I have compiled several commonly used APIs:
- value The value bound to the component.
- input is a listening function when inputting content, used to update and obtain value.
- Options component option properties, such as editing mode, readability, etc., are very important.
Of course, if you want to modify its display style, you can operate the dom or attributes, or you can directly overwrite it with css:
.content {
  :deep(math-field) {
    width: 100%;
  }
}- 1.
- 2.
- 3.
- 4.
- 5.
Through the above steps, we can basically implement the formula editor we shared above:
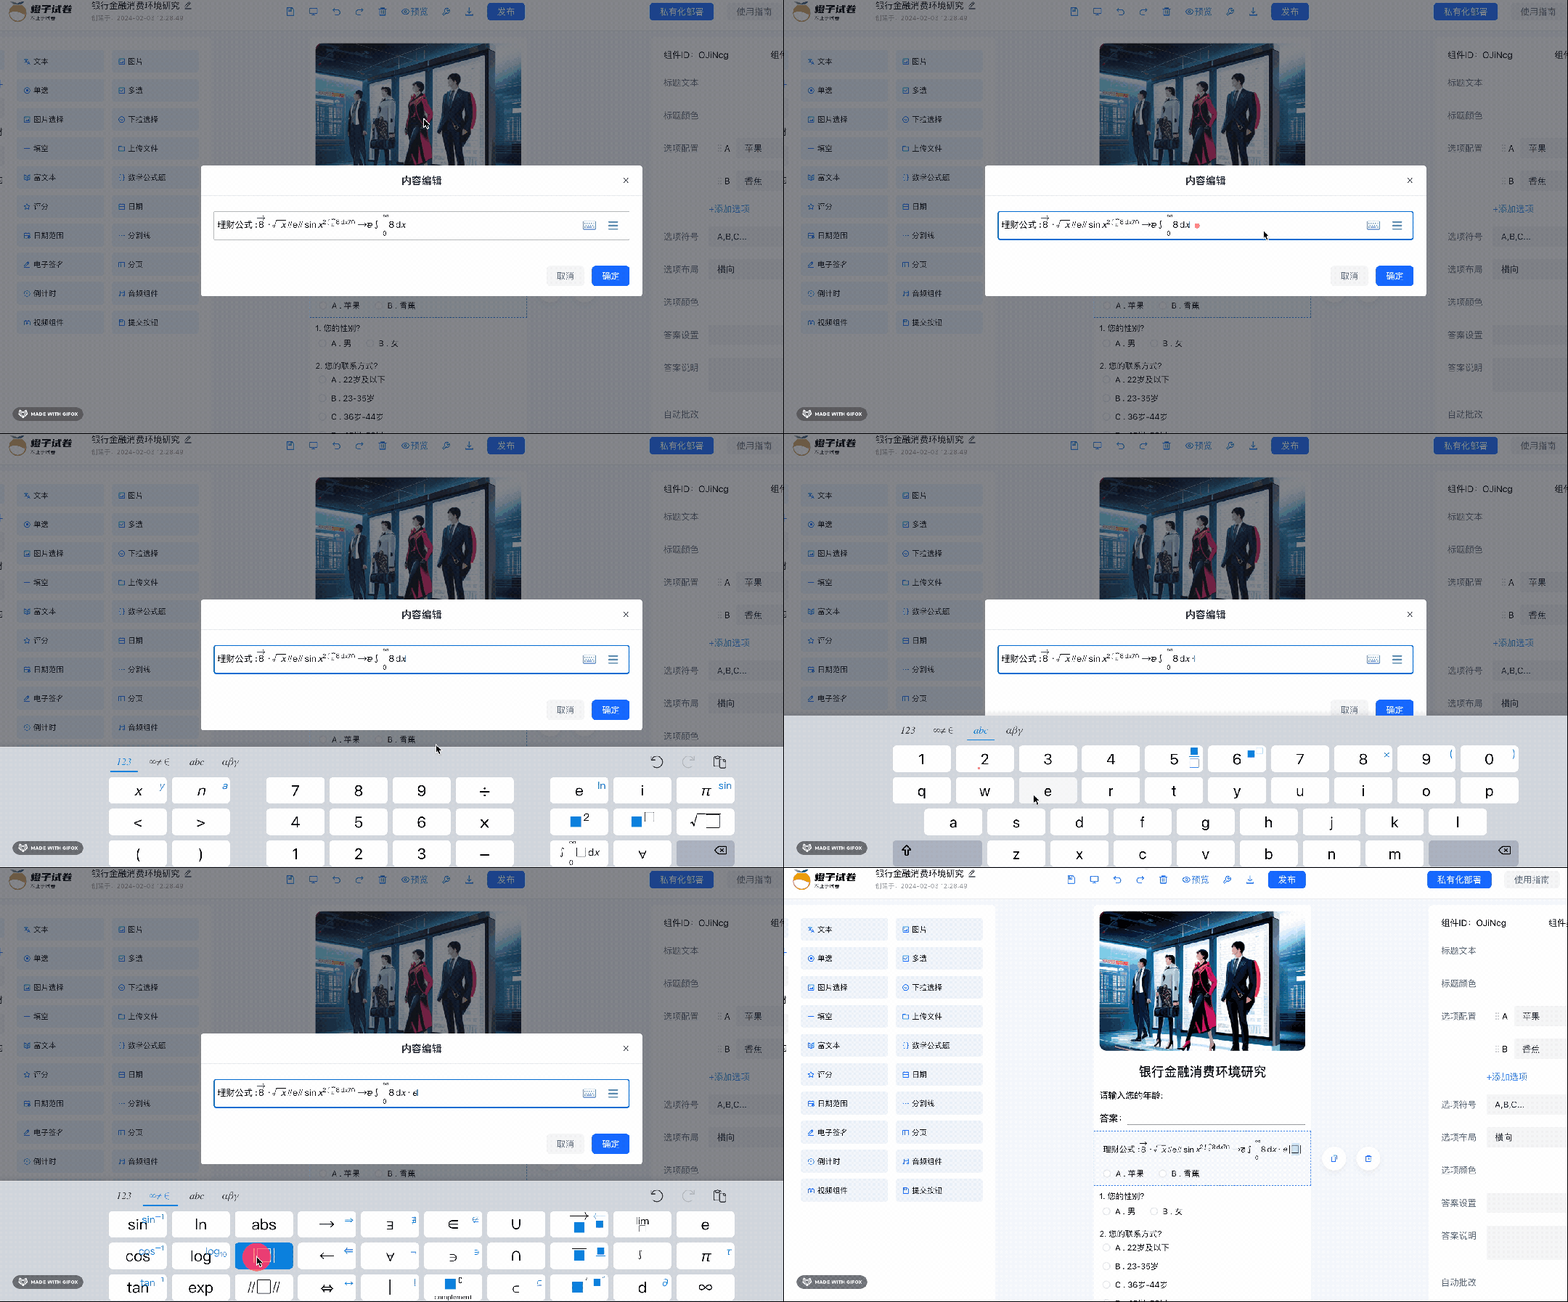
Quickly integrate into the visual construction platform
Next, let’s share how to integrate it into our Orange Test Paper zero-code construction platform.

First we need to add the mathematical formula editor component to the material library. The specific ideas are as follows:
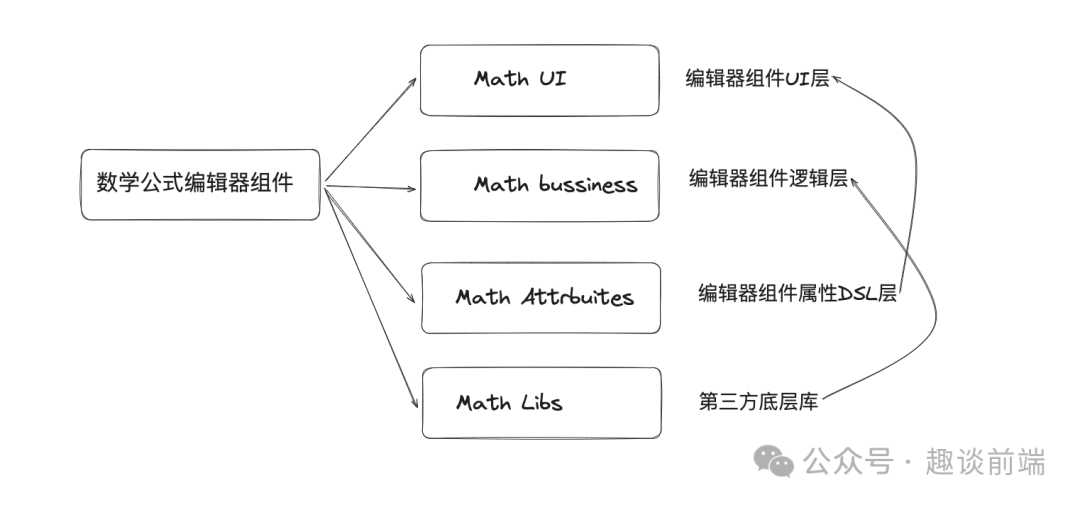
UI:
<template>
  <div>
    <div :>
      <mathlive-mathfield
        :options="{
          smartFence: false,
          readOnly: true,
        }"
      >
        {{ editorStore.data[index].titleText }}
      </mathlive-mathfield>
    </div>
    <a-radio-group
      :direction="editorStore.data[index].direction"
      v-model="editorStore.data[index].value"
    >
      <a-radio
        v-for="item in editorStore.data[index].options"
        :value="item.label"
        :key="item.label"
        :--radio-options-color': editorStore.data[index].optionsColor }"
        @click.stop
      >
        {{ item.label }} . {{ item.value }}</a-radio
      >
    </a-radio-group>
    <Message
      :value="editorStore.data[index].value"
      :answer="editorStore.data[index].answer"
      :auto="editorStore.data[index].auto"
      :analysis="editorStore.data[index].analysis"
    />
  </div>
</template>- 1.
- 2.
- 3.
- 4.
- 5.
- 6.
- 7.
- 8.
- 9.
- 10.
- 11.
- 12.
- 13.
- 14.
- 15.
- 16.
- 17.
- 18.
- 19.
- 20.
- 21.
- 22.
- 23.
- 24.
- 25.
- 26.
- 27.
- 28.
- 29.
- 30.
- 31.
- 32.
- 33.
- 34.
Among them, we need to pay attention to an attribute of mathlive-mathfield: readonly, which is a necessary attribute that allows us to render latex into visual mathematical formulas. Otherwise, we can only see mathematical formulas in edit mode.
Next we write the component configuration layer code, the specific effect is as follows:

When we edit the title, the formula editor opens:

In this part, we configure the property panel automatically generated by DSL. I H 5-Dooring have introduced this knowledge in detail when I shared the zero-code implementation principle. I will not analyze them one by one here, but go directly to the code:
export default class Math {
    component: any;
    constructor(id: string, arr=[{label:'A',value:'苹果'},{label:'B',value:'香蕉'}]) {
        this.component = {
            component: 'math',
            type: 'editor.math',
            id,
            check: true,
            titleText: '数学题目',
            titleColor: 'black',
            options: arr,
            symbol: 'A,B,C...',
            direction: 'horizontal',
            optionsColor:'black',
            answer:undefined,
            analysis: '',
            auto: '',
            value:undefined,
            margin: [10, 10, 10, 10],
            scores:0,
            required:false,
            attrbite: [
                {
                    name: 'editor.titleText',
                    field: 'titleText',
                    component: 'math'
                },
                {
                    name: 'editor.titleColor',
                    field: 'titleColor',
                    component: 'color',
                    props: {
                        type: 'color'
                    }
                },
                {
                    name: 'editor.optionConfig',
                    field: 'options',
                    component: 'options',
                    props: {
                        options:arr
                    }
                },
                {
                    name: 'editor.optionSymbol',
                    field: 'symbol',
                    component: 'select',
                    props: {
                        options: [
                            {label:'A,B,C...',value:'A,B,C...'},
                            {label:'1,2,3...',value:'1,2,3...'},
                            {label:'a,b,c...',value:'a,b,c...'},
                            {label:'I,II,III...',value:'I,II,III...'}
                        ],
                    }
                },
                {
                    name: 'editor.optionDirection',
                    field: 'direction',
                    component: "select",
                    props: {
                        options: [{ label:'editor.horizontal', value: 'horizontal' }, { label: 'editor.vertical', value: 'vertical' }],
                    }
                },
                {
                    name: 'editor.optionsColor',
                    field: 'optionsColor',
                    component: 'color',
                    props: {
                        type: 'color'
                    }
                },
                {
                    name: 'editor.answerSettings',
                    field: 'answer',
                    component: 'select-lable',
                },
                {
                    name: 'editor.answerillustrate',
                    field: 'analysis',
                    component: 'textarea'
                },
                {
                    name: 'editor.grading',
                    field: 'auto',
                    component: 'switch'
                },
                {
                    name: 'editor.scores',
                    field: 'scores',
                    component: 'numberInput',
                    props: {
                        min: 0
                    }
                },
                {
                    name: 'editor.required',
                    field: 'required',
                    component: 'switch'
                },
                {
                    name: 'editor.margin',
                    field: 'margin',
                    component: "padding",
                    props: {
                        min: 0,
                        type:'margin'
                    }
                },
            ]
        }
    }
}- 1.
- 2.
- 3.
- 4.
- 5.
- 6.
- 7.
- 8.
- 9.
- 10.
- 11.
- 12.
- 13.
- 14.
- 15.
- 16.
- 17.
- 18.
- 19.
- 20.
- 21.
- 22.
- 23.
- 24.
- 25.
- 26.
- 27.
- 28.
- 29.
- 30.
- 31.
- 32.
- 33.
- 34.
- 35.
- 36.
- 37.
- 38.
- 39.
- 40.
- 41.
- 42.
- 43.
- 44.
- 45.
- 46.
- 47.
- 48.
- 49.
- 50.
- 51.
- 52.
- 53.
- 54.
- 55.
- 56.
- 57.
- 58.
- 59.
- 60.
- 61.
- 62.
- 63.
- 64.
- 65.
- 66.
- 67.
- 68.
- 69.
- 70.
- 71.
- 72.
- 73.
- 74.
- 75.
- 76.
- 77.
- 78.
- 79.
- 80.
- 81.
- 82.
- 83.
- 84.
- 85.
- 86.
- 87.
- 88.
- 89.
- 90.
- 91.
- 92.
- 93.
- 94.
- 95.
- 96.
- 97.
- 98.
- 99.
- 100.
- 101.
- 102.
- 103.
- 104.
- 105.
- 106.
- 107.
- 108.
- 109.
- 110.
- 111.
- 112.
- 113.
In this way, we can successfully turn the editor component into a zero-code consumable component. Of course, this is inseparable from the zero-code rendering engine I implemented, which I will share in detail in a later article.
Above we have implemented the mathematical formula editor function of the Orange Test Paper visual construction system.
Experience address: https://turntip.cn/formManager.