K8s-Service Grid Practice-Getting Started with Istio

K8s-Service Grid Practice-Getting Started with Istio
background
Finally, we have entered the service grid series that everyone is more interested in, which has been explained before:
- How to deploy applications to kubernetes
- How to call between services
- How to access our services via domain name
- How to use the configuration ConfigMap that comes with kubernetes
Basically, it is enough for us to develop general-scale web applications; but in enterprises, there are often complex application calling relationships, and requests between applications also need to be managed. For example, common current limiting, downgrading, trace, monitoring, load balancing and other functions.
Before we used kubernetes, microservice frameworks were often used to solve these problems. For example, Dubbo and SpringCloud have corresponding functions.
But when we get on kubernetes, these things should be solved by a specialized cloud native component, which is the Istio we will talk about this time. It is currently the most widely used service mesh solution.
 picture
The official explanation of Istio is relatively concise, and the specific function points are just mentioned:
- Current limiting downgrade
- Routing and forwarding, load balancing
- Entry gateway, TLS security certification
- Grayscale publishing, etc.
 picture
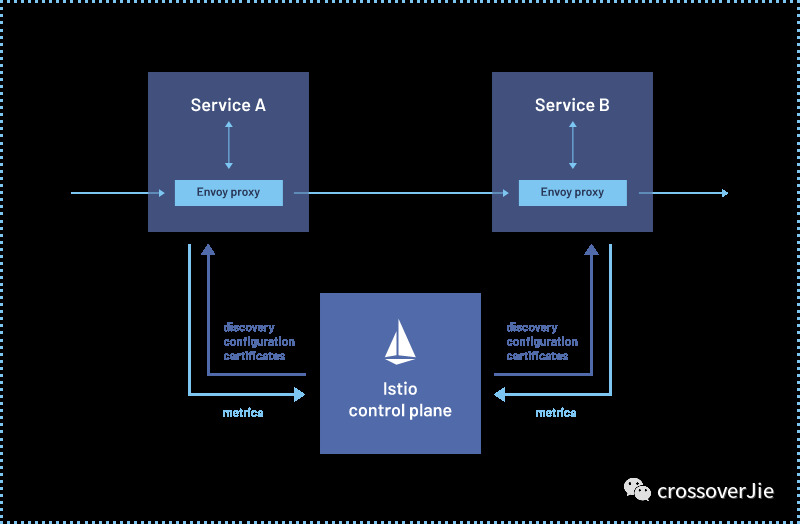
Combined with the official architecture diagram, we can see that Istio is divided into a control plane and a data plane.
The control plane can be understood as Istio's own management functions:
- For example, service registration discovery
- Manage and configure network rules required for the data plane, etc.
The data plane can be simply understood as our business application proxied by Envoy. All traffic in and out of our application will pass through the Envoy proxy.
Therefore, it can implement functions such as load balancing, circuit breaker protection, and authentication and authorization.
Install
First install the Istio command line tool
The premise here is that there is a kubernetes operating environment
Linux uses:
curl -L https://istio.io/downloadIstio | sh -- 1.
Mac can use brew:
brew install istioctl- 1.
For other environments, you can download Istio and configure environment variables:
export PATH=$PWD/bin:$PATH- 1.
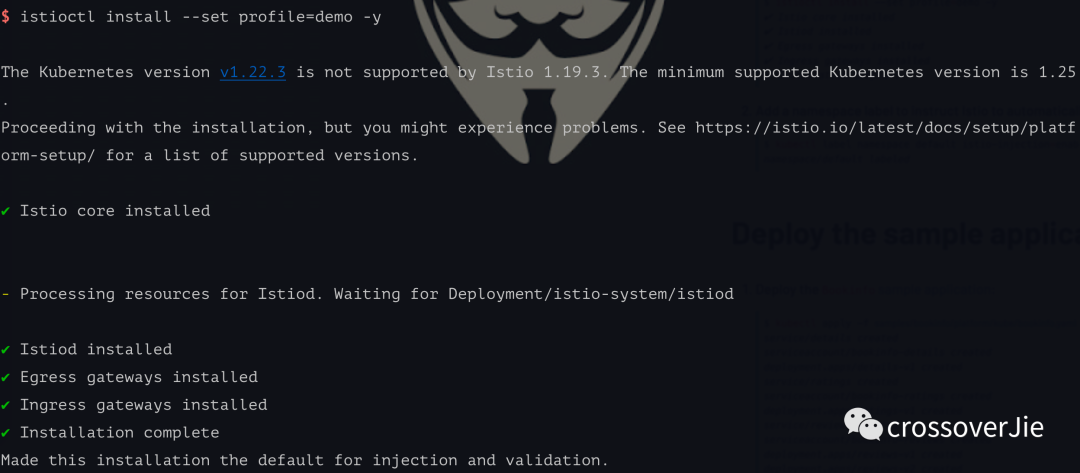
We can then install the control plane using the install command.
The kubernetes cluster configured by kubectl is used by default here.
istioctl install --set profile=demo -y- 1.
 picture
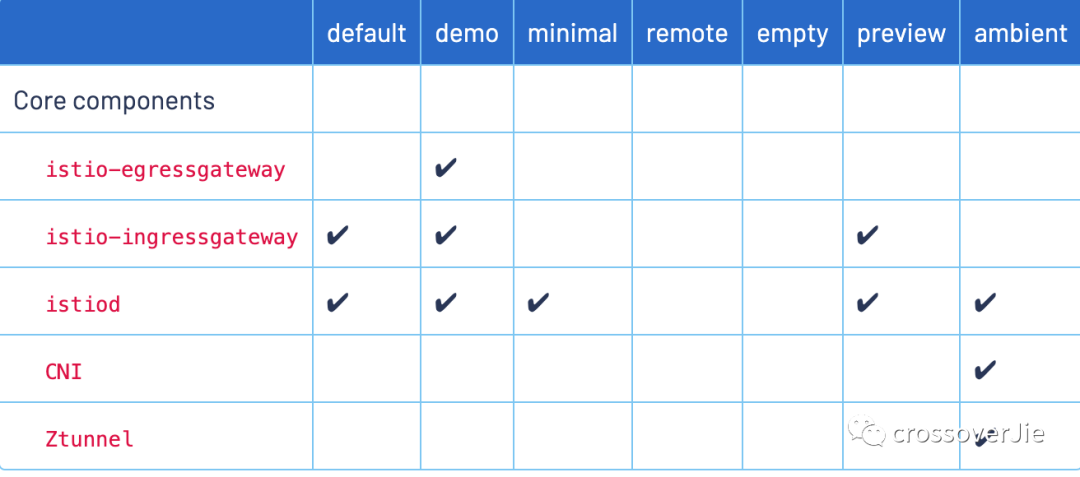
This profile also has the following different values. For demonstration purposes, we can use demo.
 picture
use
# 开启 default 命名空间自动注入
$ k label namespace default istio-injectinotallow=enabled

$ k describe ns default
Name:         default
Labels:       istio-injectinotallow=enabled
              kubernetes.io/metadata.name=default
Annotations:  <none>
Status:       Active
No resource quota.
No LimitRange resource.- 1.
- 2.
- 3.
- 4.
- 5.
- 6.
- 7.
- 8.
- 9.
- 10.
- 11.
After that, we label the namespace so that the Istio control plane knows which pod under the namespace will automatically inject the sidecar.
Here we turn on the automatic injection sidecar for the default namespace, and then deploy the deployment-istio.yaml we used before here.
$ k apply -f deployment/deployment-istio.yaml

$ k get pod
NAME                                  READY   STATUS    RESTARTS
k8s-combat-service-5bfd78856f-8zjjf   2/2     Running   0
k8s-combat-service-5bfd78856f-mblqd   2/2     Running   0
k8s-combat-service-5bfd78856f-wlc8z 2/2 Running 0- 1.
- 2.
- 3.
- 4.
- 5.
- 6.
- 7.
At this point, you will see that each Pod has two containers (one of which is istio-proxy sidecar), which is the code used in the previous gRPC load balancing test.
 picture
Or perform the load balancing test, the effect is the same, indicating that Istio works.
When we observe the sidecar logs at this time, we will see the traffic we just sent and received:
$ k logs -f k8s-combat-service-5bfd78856f-wlc8z -c istio-proxy

[2023-10-31T14:52:14.279Z] "POST /helloworld.Greeter/SayHello HTTP/2" 200 - via_upstream - "-" 12 61 14 9 "-" "grpc-go/1.58.3" "6d293d32-af96-9f87-a8e4-6665632f7236" "k8s-combat-service:50051" "172.17.0.9:50051" inbound|50051|| 127.0.0.6:42051 172.17.0.9:50051 172.17.0.9:40804 outbound_.50051_._.k8s-combat-service.default.svc.cluster.local default
[2023-10-31T14:52:14.246Z] "POST /helloworld.Greeter/SayHello HTTP/2" 200 - via_upstream - "-" 12 61 58 39 "-" "grpc-go/1.58.3" "6d293d32-af96-9f87-a8e4-6665632f7236" "k8s-combat-service:50051" "172.17.0.9:50051" outbound|50051||k8s-combat-service.default.svc.cluster.local 172.17.0.9:40804 10.101.204.13:50051 172.17.0.9:54012 - default
[2023-10-31T14:52:15.659Z] "POST /helloworld.Greeter/SayHello HTTP/2" 200 - via_upstream - "-" 12 61 35 34 "-" "grpc-go/1.58.3" "ed8ab4f2-384d-98da-81b7-d4466eaf0207" "k8s-combat-service:50051" "172.17.0.10:50051" outbound|50051||k8s-combat-service.default.svc.cluster.local 172.17.0.9:39800 10.101.204.13:50051 172.17.0.9:54012 - default
[2023-10-31T14:52:16.524Z] "POST /helloworld.Greeter/SayHello HTTP/2" 200 - via_upstream - "-" 12 61 28 26 "-" "grpc-go/1.58.3" "67a22028-dfb3-92ca-aa23-573660b30dd4" "k8s-combat-service:50051" "172.17.0.8:50051" outbound|50051||k8s-combat-service.default.svc.cluster.local 172.17.0.9:44580 10.101.204.13:50051 172.17.0.9:54012 - default
[2023-10-31T14:52:16.680Z] "POST /helloworld.Greeter/SayHello HTTP/2" 200 - via_upstream - "-" 12 61 2 2 "-" "grpc-go/1.58.3" "b4761d9f-7e4c-9f2c-b06f-64a028faa5bc" "k8s-combat-service:50051" "172.17.0.10:50051" outbound|50051||k8s-combat-service.default.svc.cluster.local 172.17.0.9:39800 10.101.204.13:50051 172.17.0.9:54012 - default- 1.
- 2.
- 3.
- 4.
- 5.
- 6.
- 7.
Summarize
The content of this issue is relatively simple, mainly related to installation and configuration. The next issue will update how to configure timeout, current limiting and other functions of internal service calls.
In fact, most of the current operations are partial to operation and maintenance. Even subsequent functions such as timeout configuration are just writing YAML resources.
But when used in production, we will provide developers with a visual page of the management console, allowing them to flexibly configure these functions that originally need to be configured in yaml.
 picture
In fact, all major cloud platform vendors provide similar capabilities, such as Alibaba Cloud's EDAS.
All the source code of this article can be accessed here: https://github.com/crossoverJie/k8s-combat