基於Mathlive將數學公式編輯器整合到視覺化搭建平台
2024.02.05

hi, 大家好, 我是徐小夕. 上篇文章和大家分享了剛開發完的可視化搭建產品——橙子試卷. 收到了很多用戶的反饋和建議, 其中有一個建議我覺得非常有意思, 所以花了一天時間研究和實現了這個用戶需求。
具體需求如下:
對於高等數學類課程的試卷, 能不能實現編輯數學公式的功能呢?
經過了一系列的研究和可行性分析, 我覺得這個需求非常有價值, 而且應用面很廣, 技術上從 web 的角度也是可以實現的, 所以我花了一點時間實現了它。
在文章末尾我也會把集成了數學公式的可視化編輯器地址分享給大家, 供大學學習參考。
接下裡我會和大家分享一下如何從零實現一個支援數學公式編輯器的元件, 並整合到 vue3 專案中。
數學公式編輯器的技術實現
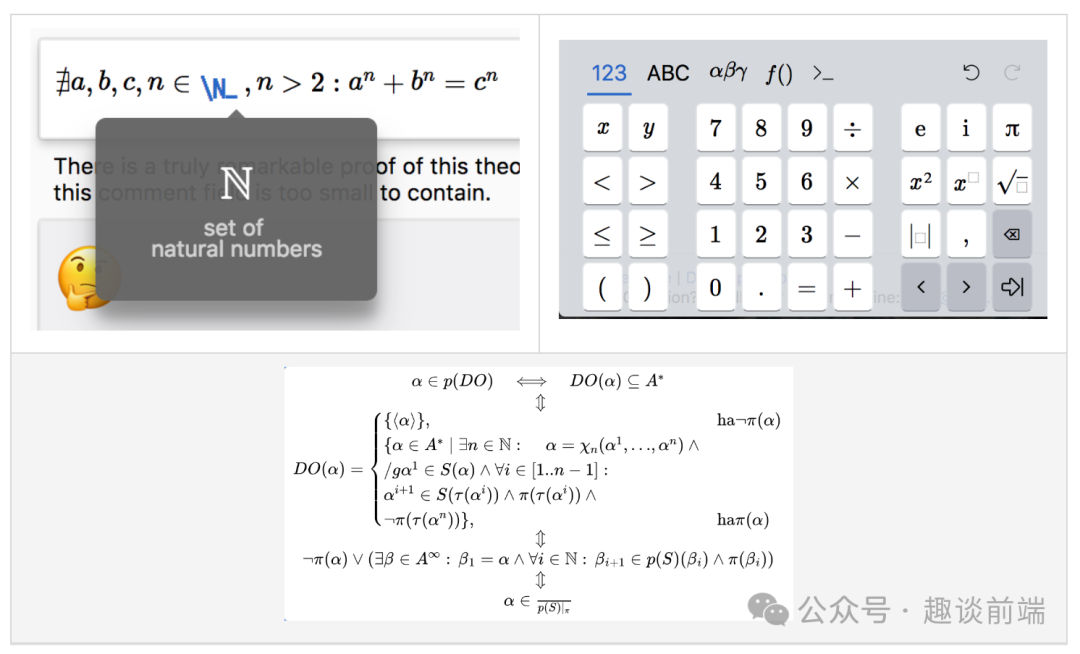
首先要想實現展示我們熟知的數學公式, 在 web 裡我們需要了解以下幾種表示法:
- 乳膠
- 數學
- 阿斯西馬斯
以上三種表示法其實都是標記語言, 透過特定的語法格式來優雅的展示數學公式, 簡單舉例如下:
如果大家熟悉這些標記語言, 我們就可以很容易的使用前端開源庫 MathJax 來編寫數學公式。

具體使用如下:
<template>
  <div>
    <p id="math"></p>
    <p ref="math" v-html=“str”></p>
  </div>
</template>

<script>
export default {
  name: 'Formula',
  data() {
    return {
      str: ''
    }
  },
  mounted() {
    this.$nextTick(() => {
      // typesetPromise 需要 [] 包裹
      this.str = '\\[x = {-b \\pm \\sqrt{b^2-4ac} \\over 2a}.\\]'
      window.MathJax.typesetPromise([this.$refs.math]).catch(err => err)

      // tex2chtml 不需要 [] 包裹
      const str = `x = {-b \\pm \\sqrt{b^2-4ac} \\over 2a}`
      document
        .querySelector('#math')
        .appendChild(window.MathJax.tex2chtml(str))
    })
  }
}
</script>- 1.
- 2.
- 3.
- 4.
- 5.
- 6.
- 7.
- 8.
- 9.
- 10.
- 11.
- 12.
- 13.
- 14.
- 15.
- 16.
- 17.
- 18.
- 19.
- 20.
- 21.
- 22.
- 23.
- 24.
- 25.
- 26.
- 27.
- 28.
- 29.
- 30.
但是作為極具產品觀念的我來說, 讓用戶學習這些標記語言是非常痛苦的, 所以我們要想一種更簡單的方式, 讓用戶不用學習, 也能可視化的編寫複雜數學公式。
我研究了一些成熟的庫之後發現, 有一個開源庫非常適合我的“簡單化”訴求, 它就是——mathlive。
MathLive 是一個功能強大的 Web 元件,它提供了一個易於使用的介面來編輯數學公式。
但是網上它的文檔和在 vue3 中的使用非常稀少, 可以說是完全沒有. 因為我做的橙子試卷搭建平台採用 vue3 來實現的, 所以我需要研究一種支持 vue3 的方案。
還好我找到了它們純英文版的文檔, 咬了一遍它的文檔之後, 對 MathLive 有了更深的理解。
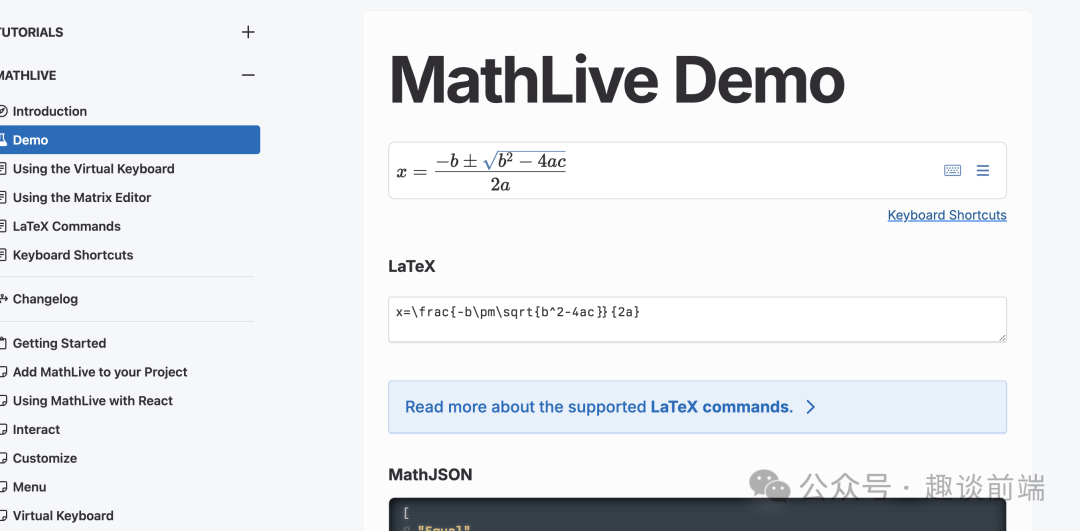
文檔裡提供了原生webcomponent 的使用方法和react的使用案例, 好在我有5年多的react 駕齡, 看起來還是非常順手的. 下面我就直接分享如何把它集成到vue3 項目裡. 感興趣的朋友可以直接拿來應用自己的專案裡。
1.安裝和引入MathLive組件
我們可以用 npm 或 yarn 或 pnpm(推薦) 安裝:
pnpm install mathlive- 1.
接下來我們來註冊一下元件:
import * as MathLive from 'mathlive';
import VueMathfield from '@/assets/vue-mathlive.mjs';

app.use(VueMathfield, MathLive);- 1.
- 2.
- 3.
- 4.
這樣我們就可以在全域使用 mathlive 公式編輯器元件了。
2、在專案中使用

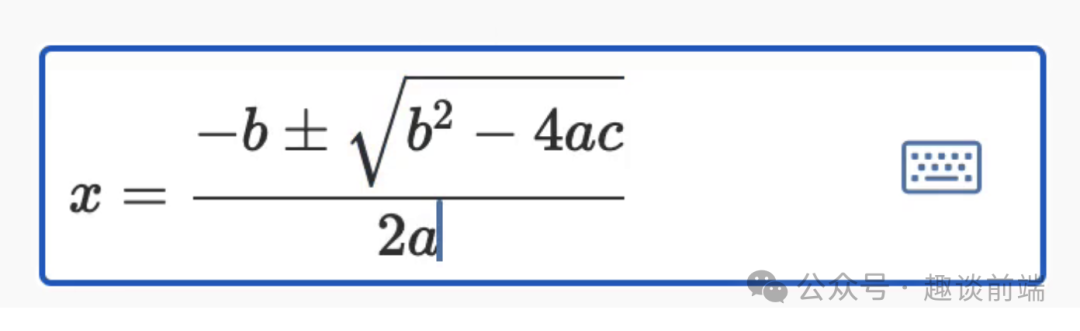
為了實現上圖的效果, 我們需要在頁面定義元件:
<mathlive-mathfield
  :options="{ smartFence: false }"
  @input="handleChange"
  :value="content"
>
  {{ content }}
</mathlive-mathfield>- 1.
- 2.
- 3.
- 4.
- 5.
- 6.
- 7.
這個是 mathlive 預設是引入標籤, 當然我們可以修改它的定義, 如果你是 react 選手, 也可以直接這麼使用:
// d.ts
declare global {
  namespace JSX {
    interface IntrinsicElements {
      'math-field': React.DetailedHTMLProps<React.HTMLAttributes<MathfieldElement>, MathfieldElement>;
    }
  }
}

// app.tsx
import "./App.css";
import "//unpkg.com/mathlive";
import { useState } from "react";

function App() {
  const [value, setValue] = useState<string>("");

  return (
    <div className="App">
      <math-field
        onInput={
          (evt: React.ChangeEvent<HTMLElement>) =>
            setValue(evt.target.value)
        }
      >
        {value}
      </math-field>
      <p>Value: {value}</p>
    </div>
  );
}

export default App;- 1.
- 2.
- 3.
- 4.
- 5.
- 6.
- 7.
- 8.
- 9.
- 10.
- 11.
- 12.
- 13.
- 14.
- 15.
- 16.
- 17.
- 18.
- 19.
- 20.
- 21.
- 22.
- 23.
- 24.
- 25.
- 26.
- 27.
- 28.
- 29.
- 30.
- 31.
- 32.
- 33.
接下來就來學習它的屬性, 下面是 vue 版的 props, 非常重要, 大家可以收藏一下:

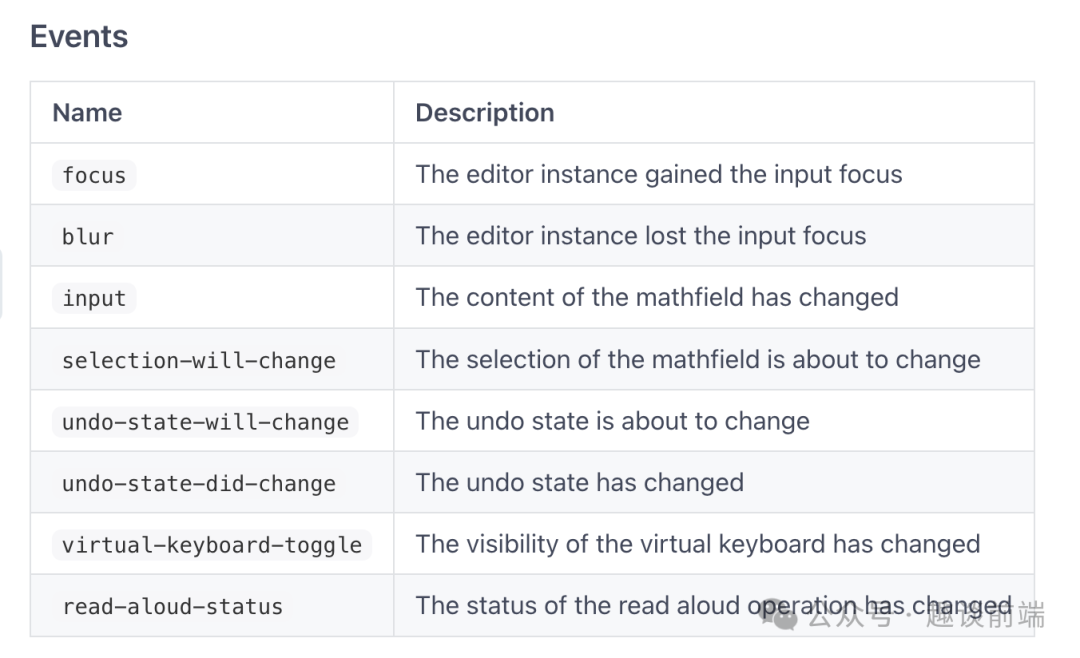
這裡我整理了幾個常用的api:
- value 元件綁定的值。
- input 輸入內容時的監聽函式, 用來更新和取得value。
- options 元件選項屬性, 例如編輯模式, 可讀性等, 非常重要。
當然如果你想修改它的顯示樣式, 可以透過操作 dom 或屬性, 也可以直接用 css 覆寫:
.content {
  :deep(math-field) {
    width: 100%;
  }
}- 1.
- 2.
- 3.
- 4.
- 5.
透過上述步驟, 基本上能實現我們上面分享的公式編輯器了:

快速整合到可視化建置平台
接下來分享如何整合到我們的橘子試卷零程式碼建立平台中。

首先我們需要先在物料庫中加入數學公式編輯器元件, 具體思路如下:
使用者介面:
<template>
  <div>
    <div :>
      <mathlive-mathfield
        :options="{
          smartFence: false,
          readOnly: true,
        }"
      >
        {{ editorStore.data[index].titleText }}
      </mathlive-mathfield>
    </div>
    <a-radio-group
      :direction="editorStore.data[index].direction"
      v-model="editorStore.data[index].value"
    >
      <a-radio
        v-for="item in editorStore.data[index].options"
        :value="item.label"
        :key="item.label"
        :--radio-options-color': editorStore.data[index].optionsColor }"
        @click.stop
      >
        {{ item.label }} . {{ item.value }}</a-radio
      >
    </a-radio-group>
    <Message
      :value="editorStore.data[index].value"
      :answer="editorStore.data[index].answer"
      :auto="editorStore.data[index].auto"
      :analysis="editorStore.data[index].analysis"
    />
  </div>
</template>- 1.
- 2.
- 3.
- 4.
- 5.
- 6.
- 7.
- 8.
- 9.
- 10.
- 11.
- 12.
- 13.
- 14.
- 15.
- 16.
- 17.
- 18.
- 19.
- 20.
- 21.
- 22.
- 23.
- 24.
- 25.
- 26.
- 27.
- 28.
- 29.
- 30.
- 31.
- 32.
- 33.
- 34.
其中我們需要關注 mathlive-mathfield 的一個屬性: readonly, 它是讓我們把 latex 渲染成可視的數學公式的必備屬性, 否則我們只能在編輯模式下看到數學公式了。
接下來我們來編寫元件配置層程式碼, 具體效果如下:

當我們編輯標題時, 會開啟公式編輯器:

這部分我們是透過配置DSL自動生成的屬性面板, 這塊的知識我在分享H 5-Dooring 零代碼實現原理時有具體的介紹, 這裡就不一一分析了, 直接上代碼:
export default class Math {
    component: any;
    constructor(id: string, arr=[{label:'A',value:'苹果'},{label:'B',value:'香蕉'}]) {
        this.component = {
            component: 'math',
            type: 'editor.math',
            id,
            check: true,
            titleText: '数学题目',
            titleColor: 'black',
            options: arr,
            symbol: 'A,B,C...',
            direction: 'horizontal',
            optionsColor:'black',
            answer:undefined,
            analysis: '',
            auto: '',
            value:undefined,
            margin: [10, 10, 10, 10],
            scores:0,
            required:false,
            attrbite: [
                {
                    name: 'editor.titleText',
                    field: 'titleText',
                    component: 'math'
                },
                {
                    name: 'editor.titleColor',
                    field: 'titleColor',
                    component: 'color',
                    props: {
                        type: 'color'
                    }
                },
                {
                    name: 'editor.optionConfig',
                    field: 'options',
                    component: 'options',
                    props: {
                        options:arr
                    }
                },
                {
                    name: 'editor.optionSymbol',
                    field: 'symbol',
                    component: 'select',
                    props: {
                        options: [
                            {label:'A,B,C...',value:'A,B,C...'},
                            {label:'1,2,3...',value:'1,2,3...'},
                            {label:'a,b,c...',value:'a,b,c...'},
                            {label:'I,II,III...',value:'I,II,III...'}
                        ],
                    }
                },
                {
                    name: 'editor.optionDirection',
                    field: 'direction',
                    component: "select",
                    props: {
                        options: [{ label:'editor.horizontal', value: 'horizontal' }, { label: 'editor.vertical', value: 'vertical' }],
                    }
                },
                {
                    name: 'editor.optionsColor',
                    field: 'optionsColor',
                    component: 'color',
                    props: {
                        type: 'color'
                    }
                },
                {
                    name: 'editor.answerSettings',
                    field: 'answer',
                    component: 'select-lable',
                },
                {
                    name: 'editor.answerillustrate',
                    field: 'analysis',
                    component: 'textarea'
                },
                {
                    name: 'editor.grading',
                    field: 'auto',
                    component: 'switch'
                },
                {
                    name: 'editor.scores',
                    field: 'scores',
                    component: 'numberInput',
                    props: {
                        min: 0
                    }
                },
                {
                    name: 'editor.required',
                    field: 'required',
                    component: 'switch'
                },
                {
                    name: 'editor.margin',
                    field: 'margin',
                    component: "padding",
                    props: {
                        min: 0,
                        type:'margin'
                    }
                },
            ]
        }
    }
}- 1.
- 2.
- 3.
- 4.
- 5.
- 6.
- 7.
- 8.
- 9.
- 10.
- 11.
- 12.
- 13.
- 14.
- 15.
- 16.
- 17.
- 18.
- 19.
- 20.
- 21.
- 22.
- 23.
- 24.
- 25.
- 26.
- 27.
- 28.
- 29.
- 30.
- 31.
- 32.
- 33.
- 34.
- 35.
- 36.
- 37.
- 38.
- 39.
- 40.
- 41.
- 42.
- 43.
- 44.
- 45.
- 46.
- 47.
- 48.
- 49.
- 50.
- 51.
- 52.
- 53.
- 54.
- 55.
- 56.
- 57.
- 58.
- 59.
- 60.
- 61.
- 62.
- 63.
- 64.
- 65.
- 66.
- 67.
- 68.
- 69.
- 70.
- 71.
- 72.
- 73.
- 74.
- 75.
- 76.
- 77.
- 78.
- 79.
- 80.
- 81.
- 82.
- 83.
- 84.
- 85.
- 86.
- 87.
- 88.
- 89.
- 90.
- 91.
- 92.
- 93.
- 94.
- 95.
- 96.
- 97.
- 98.
- 99.
- 100.
- 101.
- 102.
- 103.
- 104.
- 105.
- 106.
- 107.
- 108.
- 109.
- 110.
- 111.
- 112.
- 113.
這樣我們就能把編輯器元件成功變成一個零程式碼可消費的元件, 當然這離不開我實現的零程式碼渲染引擎, 這塊我會在後面的文章中詳細分享.
以上我們就實現了橘子試卷 可視化搭建系統的數學公式編輯器功能,
體驗地址: https://turntip.cn/formManager。