Get started quickly and build a personalized Python GUI calculator within five minutes

I. Introduction
In this tutorial, you'll learn how to make your own fully functional GUI calculator in Python using Tkinter in just a few minutes.
When completing this tutorial, you won't need any additional libraries other than Tkinter, which is usually installed with the Python standard library.
If you are using a Linux system, you may need to install it:
$ pip install python-tk- 1.
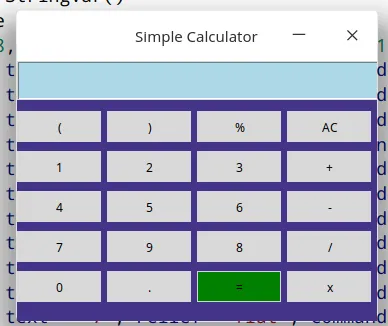
Once everything is installed, let's start writing our calculator code. By the end of the tutorial, we will have built something similar to the following:
 picture
2. Use eval() to solve mathematical problems
eval() is a built-in function in Python that parses expression arguments and evaluates them as Python expressions.
We will use the concept of eval() to solve mathematical expressions.
Usage examples:
>>> while True:
...     expression = input('Enter equation: ')
...     result = eval(expression)
...     print(result)
...
Enter equation: 2 + (9/9) *3
5.0
Enter equation: 12 /9 + (18 -2) % 5
2.333333333333333- 1.
- 2.
- 3.
- 4.
- 5.
- 6.
- 7.
- 8.
- 9.
Using these 4 lines of code, you have made a command line calculator in Python, now let us use the same concept to make a calculator with a graphical interface.
This GUI calculator has three main parts:
- The screen (frame) used to display expressions
- Button to save expression value
- Build calculator logic
3. Make a frame for the calculator
from tkinter import Tk, Entry, Button, StringVar
class Calculator:
    def __init__(self, master):
        master.title('Simple Calculator')
        master.geometry('360x260+0+0')
        master.config(bg='#438')
        master.resizable(False, False)
root = Tk()
calculator = Calculator(root)
root.mainloop()- 1.
- 2.
- 3.
- 4.
- 5.
- 6.
- 7.
- 8.
- 9.
- 10.
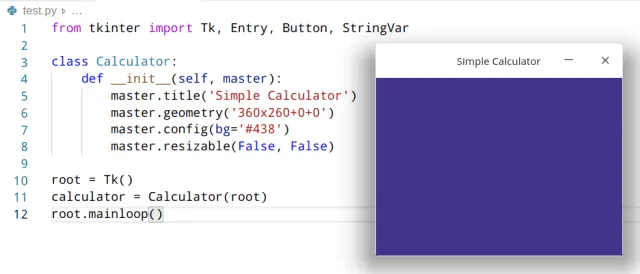
Output:
 picture
4. Add a screen to display expressions
from tkinter import Tk, Entry, Button, StringVar
class Calculator:
    def __init__(self, master):
        master.title('Simple Calculator')
        master.geometry('360x260+0+0')
        master.config(bg='#438')
        master.resizable(False, False)

        self.equation = StringVar()
        self.entry_value = ''
        Entry(width = 28,bg='lightblue', font = ('Times', 16), textvariable = self.equation).place(x=0,y=0)
root = Tk()
calculator = Calculator(root)
root.mainloop()- 1.
- 2.
- 3.
- 4.
- 5.
- 6.
- 7.
- 8.
- 9.
- 10.
- 11.
- 12.
- 13.
- 14.
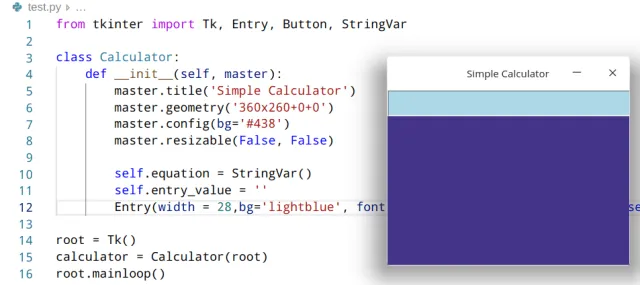
Output:
 picture
As shown above, we have completed building the display screen and now need to add a button for forming mathematical expressions.
5. Add buttons for forming mathematical expressions
These buttons are created in the same way, only the values they store and their positions differ. Buttons for forming mathematical expressions include:
- Numbers from 0 to 9
- Mathematical operators +, -, /, %
- decimal point
- brackets()
We need to attach a command to each button so that when we click it, it will show up on the display. For this purpose, write a simple show() function to implement this function.
from tkinter import Tk, Entry, Button, StringVar
class Calculator:
    def __init__(self, master):
        master.title('Simple Calculator')
        master.geometry('360x260+0+0')
        master.config(bg='#438')
        master.resizable(False, False)

        self.equation = StringVar()
        self.entry_value = ''
        Entry(width = 28,bg='lightblue', font = ('Times', 16), textvariable = self.equation).place(x=0,y=0)

        Button(width=8, text = '(', relief ='flat', command=lambda:self.show('(')).place(x=0,y=50)
        Button(width=8, text = ')', relief ='flat', command=lambda:self.show(')')).place(x=90, y=50)
        Button(width=8, text = '%', relief ='flat', command=lambda:self.show('%')).place(x=180, y=50)
        Button(width=8, text = '1', relief ='flat', command=lambda:self.show(1)).place(x=0,y=90)
        Button(width=8, text = '2', relief ='flat', command=lambda:self.show(2)).place(x=90,y=90)
        Button(width=8, text = '3', relief ='flat', command=lambda:self.show(3)).place(x=180,y=90)
        Button(width=8, text = '4', relief ='flat', command=lambda:self.show(4)).place(x=0,y=130)
        Button(width=8, text = '5', relief ='flat', command=lambda:self.show(5)).place(x=90,y=130)
        Button(width=8, text = '6', relief ='flat', command=lambda:self.show(6)).place(x=180,y=130)
        Button(width=8, text = '7', relief ='flat', command=lambda:self.show(7)).place(x=0,y=170)
        Button(width=8, text = '8', relief ='flat', command=lambda:self.show(8)).place(x=180,y=170)
        Button(width=8, text = '9', relief ='flat', command=lambda:self.show(9)).place(x=90,y=170)
        Button(width=8, text = '0', relief ='flat', command=lambda:self.show(0)).place(x=0,y=210)
        Button(width=8, text = '.', relief ='flat', command=lambda:self.show('.')).place(x=90,y=210)
        Button(width=8, text = '+', relief ='flat', command=lambda:self.show('+')).place(x=270,y=90)
        Button(width=8, text = '-', relief ='flat', command=lambda:self.show('-')).place(x=270,y=130)
        Button(width=8, text = '/', relief ='flat', command=lambda:self.show('/')).place(x=270,y=170)
        Button(width=8, text = 'x', relief ='flat', command=lambda:self.show('*')).place(x=270,y=210)
def show(self, value):
        self.entry_value +=str(value)
        self.equation.set(self.entry_value)

root = Tk()
calculator = Calculator(root)
root.mainloop()- 1.
- 2.
- 3.
- 4.
- 5.
- 6.
- 7.
- 8.
- 9.
- 10.
- 11.
- 12.
- 13.
- 14.
- 15.
- 16.
- 17.
- 18.
- 19.
- 20.
- twenty one.
- twenty two.
- twenty three.
- twenty four.
- 25.
- 26.
- 27.
- 28.
- 29.
- 30.
- 31.
- 32.
- 33.
- 34.
- 35.
- 36.
- 37.
Output:
The output is a calculator with buttons, and when you click any of the buttons, its value is displayed on the display.
Our calculator is now complete with just two buttons, a reset button that clears the screen, and an equal sign (=) button that evaluates the expression and displays the result on the screen.
6. Add reset and equal sign buttons to the calculator
from tkinter import Tk, Entry, Button, StringVar
class Calculator:
    def __init__(self, master):
        master.title('Simple Calculator')
        master.geometry('360x260+0+0')
        master.config(bg='#438')
        master.resizable(False, False)

        self.equation = StringVar()
        self.entry_value = ''
        Entry(width = 28,bg='lightblue', font = ('Times', 16), textvariable = self.equation).place(x=0,y=0)
Button(width=8, text = '(', relief ='flat', command=lambda:self.show('(')).place(x=0,y=50)
        Button(width=8, text = ')', relief ='flat', command=lambda:self.show(')')).place(x=90, y=50)
        Button(width=8, text = '%', relief ='flat', command=lambda:self.show('%')).place(x=180, y=50)
        Button(width=8, text = '1', relief ='flat', command=lambda:self.show(1)).place(x=0,y=90)
        Button(width=8, text = '2', relief ='flat', command=lambda:self.show(2)).place(x=90,y=90)
        Button(width=8, text = '3', relief ='flat', command=lambda:self.show(3)).place(x=180,y=90)
        Button(width=8, text = '4', relief ='flat', command=lambda:self.show(4)).place(x=0,y=130)
        Button(width=8, text = '5', relief ='flat', command=lambda:self.show(5)).place(x=90,y=130)
        Button(width=8, text = '6', relief ='flat', command=lambda:self.show(6)).place(x=180,y=130)
        Button(width=8, text = '7', relief ='flat', command=lambda:self.show(7)).place(x=0,y=170)
        Button(width=8, text = '8', relief ='flat', command=lambda:self.show(8)).place(x=180,y=170)
        Button(width=8, text = '9', relief ='flat', command=lambda:self.show(9)).place(x=90,y=170)
        Button(width=8, text = '0', relief ='flat', command=lambda:self.show(0)).place(x=0,y=210)
        Button(width=8, text = '.', relief ='flat', command=lambda:self.show('.')).place(x=90,y=210)
        Button(width=8, text = '+', relief ='flat', command=lambda:self.show('+')).place(x=270,y=90)
        Button(width=8, text = '-', relief ='flat', command=lambda:self.show('-')).place(x=270,y=130)
        Button(width=8, text = '/', relief ='flat', command=lambda:self.show('/')).place(x=270,y=170)
        Button(width=8, text = 'x', relief ='flat', command=lambda:self.show('*')).place(x=270,y=210)
        Button(width=8, text = '=', bg='green', relief ='flat', command=self.solve).place(x=180, y=210)
        Button(width=8, text = 'AC', relief ='flat', command=self.clear).place(x=270,y=50)
def show(self, value):
        self.entry_value +=str(value)
        self.equation.set(self.entry_value)

    def clear(self):
        self.entry_value = ''
        self.equation.set(self.entry_value)

    def solve(self):
        result = eval(self.entry_value)
        self.equation.set(result)

root = Tk()
calculator = Calculator(root)
root.mainloop()- 1.
- 2.
- 3.
- 4.
- 5.
- 6.
- 7.
- 8.
- 9.
- 10.
- 11.
- 12.
- 13.
- 14.
- 15.
- 16.
- 17.
- 18.
- 19.
- 20.
- twenty one.
- twenty two.
- twenty three.
- twenty four.
- 25.
- 26.
- 27.
- 28.
- 29.
- 30.
- 31.
- 32.
- 33.
- 34.
- 35.
- 36.
- 37.
- 38.
- 39.
- 40.
- 41.
- 42.
- 43.
- 44.
- 45.
- 46.
Output:
7. Conclusion
In just five minutes, we successfully built a Python GUI calculator using the Tkinter library. This calculator can perform basic mathematical operations and provides a user-friendly interactive experience.
Building a GUI calculator is more than just a fun project, it also demonstrates the power and flexibility of Python. Hope it helps you and inspires you to further explore and develop more interesting GUI applications!