Work model of communication model of RabbitMQ

Work model of communication model of RabbitMQ
Hello everyone, I mean Beijun.
Today, Zhibeijun will lead you to learn RabbitMQ and understand the Work model, one of the five major communication models of RabbitMQ; there will be a series of tutorials about RabbitMQ in the future. Remember to pay attention if it is helpful to you~
review
In the previous article, I briefly introduced RabbitMQ, as well as installation and hello world.
Some friends left a message saying that they could not understand the method parameters. Here are a few basic method parameters explained first.
// 声明队列方法
channel.queueDeclare(QUEUE_NAME, false, false, false, null);
/**
 * param1:queue 队列的名字
 * param2:durable 是否持久化;比如现在发送到队列里面的消息,如果没有持久化,重启这个队列后数 据会丢失(false) true:重启之后数据依然在
 * param3:exclusive 是否排外(是否是当前连接的专属队列),排外的意思是:
 *            1:连接关闭之后 这个队列是否自动删除(false:不自动删除)
 *            2:是否允许其他通道来进行访问这个数据(false:不允许)
 * param4:autoDelete 是否自动删除
 *            就是当最后一个连接断开的时候,是否自动删除这个队列(false:不删除)
 * param5:arguments(map) 声明队列的时候,附带的一些参数
*/- 1.
- 2.
- 3.
- 4.
- 5.
- 6.
- 7.
- 8.
- 9.
- 10.
- 11.
- 12.
// 发送数据到队列
channel.basicPublish("", QUEUE_NAME, MessageProperties.PERSISTENT_TEXT_PLAIN, "第一个队列消息...".getBytes());
/**
 * param1:exchange  交换机  没有就设置为 "" 值就可以了
 * param2:routingKey 路由的key  现在没有设置key,直接使用队列的名字
 * param3:BasicProperties 发送数据到队列的时候,是否要带一些参数。
 *      MessageProperties.PERSISTENT_TEXT_PLAIN表示没有带任何参数
 * param4:body 向队列中发送的消息数据
*/- 1.
- 2.
- 3.
- 4.
- 5.
- 6.
- 7.
- 8.
- 9.
Work model
work模型称为工作队列或者竞争消费者模式,多个消费者消费的数据之和才是原来队列中的所有数据,适用于流量的削峰。

演示
写个简单的测试:
生产者
public class Producer {
    private static final String QUEUE_NAME = "queue_work_1";

    public static void main(String[] args) throws IOException, TimeoutException {
        Connection connection = ConnectionUtils.getConnection();
        Channel channel = connection.createChannel();
        channel.queueDeclare(QUEUE_NAME, false, false, false, null);
        for (int i = 0; i < 100; i++) {
            channel.basicPublish("", QUEUE_NAME, null, ("work模型:" + i).getBytes());
        }
        channel.close();
        connection.close();
    }

}- 1.
- 2.
- 3.
- 4.
- 5.
- 6.
- 7.
- 8.
- 9.
- 10.
- 11.
- 12.
- 13.
- 14.
- 15.
消费者
// 消费者1
public class Consumer {
    private static final String QUEUE_NAME = "queue_work_1";

    public static void main(String[] args) throws IOException, TimeoutException {
        Connection connection = ConnectionUtils.getConnection();
        Channel channel = connection.createChannel();
        channel.queueDeclare(QUEUE_NAME, false, false, false, null);
        // channel.basicQos(0, 1, false);
        DefaultConsumer defaultConsumer = new DefaultConsumer(channel) {
            @Override
            public void handleDelivery(String consumerTag, Envelope envelope, AMQP.BasicProperties properties, byte[] body) throws IOException {
                System.out.println(System.currentTimeMillis() + "消费者1接收到信息:" + new String(body));
                channel.basicAck(envelope.getDeliveryTag(), false);
            }
        };
        channel.basicConsume(QUEUE_NAME, false, defaultConsumer);
    }

}- 1.
- 2.
- 3.
- 4.
- 5.
- 6.
- 7.
- 8.
- 9.
- 10.
- 11.
- 12.
- 13.
- 14.
- 15.
- 16.
- 17.
- 18.
- 19.
- 20.
// 消费者2
public class Consumer2 {
    private static final String QUEUE_NAME = "queue_work_1";

    public static void main(String[] args) throws IOException, TimeoutException {
        Connection connection = ConnectionUtils.getConnection();
        Channel channel = connection.createChannel();
        channel.queueDeclare(QUEUE_NAME, false, false, false, null);
        // channel.basicQos(0, 1, false);
        DefaultConsumer defaultConsumer = new DefaultConsumer(channel) {
            @Override
            public void handleDelivery(String consumerTag, Envelope envelope, AMQP.BasicProperties properties, byte[] body) throws IOException {
                System.out.println(System.currentTimeMillis() + "消费者2接收到信息:" + new String(body));
                channel.basicAck(envelope.getDeliveryTag(), false);
                // 这里加了个延迟,表示处理业务时间
                try {
                    Thread.sleep(200);
                } catch (InterruptedException e) {
                    e.printStackTrace();
                }
            }
        };
        channel.basicConsume(QUEUE_NAME, false, defaultConsumer);
    }
}- 1.
- 2.
- 3.
- 4.
- 5.
- 6.
- 7.
- 8.
- 9.
- 10.
- 11.
- 12.
- 13.
- 14.
- 15.
- 16.
- 17.
- 18.
- 19.
- 20.
- 21.
- 22.
- 23.
- 24.
- 25.
结果


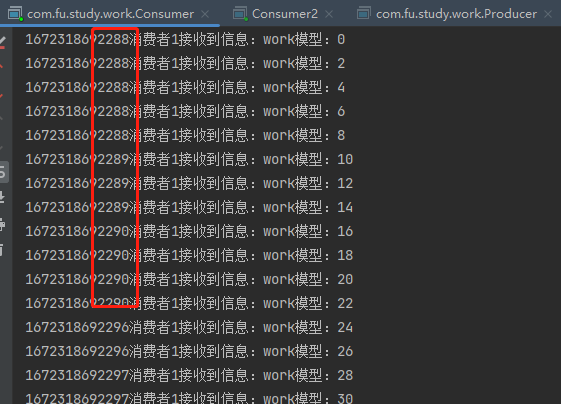
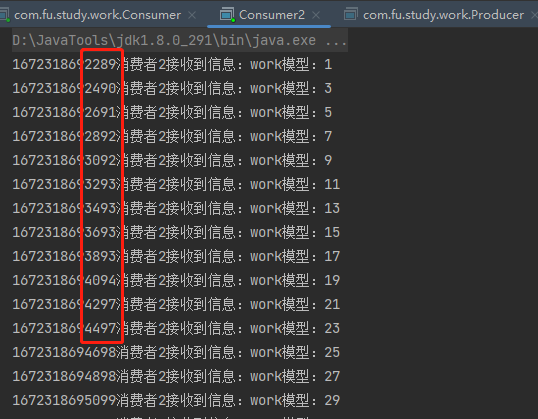
可以看出来:100条消息,消费者之间是平分的,消费者1 几乎是瞬间完成,消费者2 则是慢慢吞吞的运行完毕,消费者1大量时间处于空闲状态,消费者2则一直忙碌。这显然是不适用于实际开发中。
我们需要遵从一个原则,就是 能者多劳 ,消费越快的人,消费的越多;
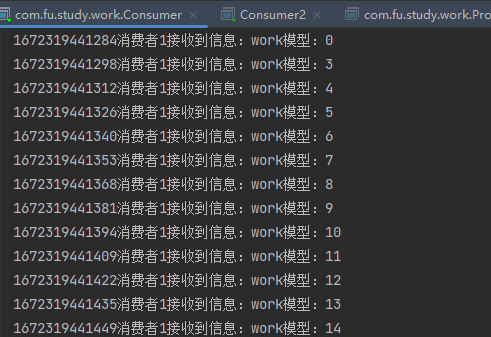
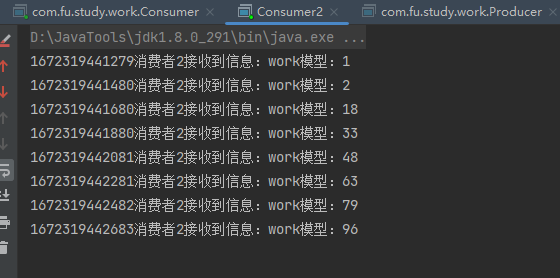
现在我们把消费者1和2的代码中 // channel.basicQos(0, 1, false); 这行代码取消注释,再次运行;


现在的结果就比较符合能者多劳,虽然你干的多,但是工资是一样的呀~
work模型的一个主要的方法是basicQos();这里也解释一下其参数:
// 设置限流机制
channel.basicQos(0, 1, false);
/**
 *  param1: prefetchSize,消息本身的大小 如果设置为0  那么表示对消息本身的大小不限制
 *  param2: prefetchCount,告诉rabbitmq不要一次性给消费者推送大于N个消息
 *  param3:global,是否将上面的设置应用于整个通道,false表示只应用于当前消费者
*/- 1.
- 2.
- 3.
- 4.
- 5.
- 6.
- 7.
小结
本文到这里就结束了,主要介绍了RabbitMQ通信模型中的work模型,适用于限流、削峰等应用场景。