Use Loki to collect network device logs

Use Loki to collect network device logs
preface
Loki, the open source project of the Grafana Labs team, is a horizontally scalable, highly available, multi-tenant log aggregation system designed to be very simple and easy to operate.
Inspired by Prometheus, the horizontally scalable, highly available, and multi-tenant log aggregation system uses the same service discovery mechanism as Prometheus, adding tags to the log stream instead of building a full-text index, and the logs received from Promtail and the applied Metrics metrics have the same set of tags, which not only provides better context switching between logs and metrics, but also avoids full-text indexing of logs.
In daily network O&M, if the logs of network devices can be collected and viewed centrally, it will be more convenient to deal with faults or daily inspections
If you do not have professional log collection hardware or software equipment, you can set up Loki to collect and use Grafana to view the collected logs
The main contents of this article are as follows:
- How to install and deploy loki
- How to configure syslog for network devices
- How to use rsyslog to collect logs to network devices
- How to configure Grafana and view logs
Environment preparation
One host, which can be a cloud host or a VM, can determine the size of the configuration according to the number of logs, and the configuration in this experiment is 4C8G
The OS is Debian 11, but other distributions such as CentOS are also suitable for the most part
The host will have Loki, RSYSlog, Promtail installed
*This document no longer describes how to install Grafana
Install and deploy Loki
Download the latest version https://github.com/grafana/loki/releases/[1] and download the loki-linux-amd64 .zip when installing in Linux
Extract the executable file to the destination directory
unzip -d /usr/local/bin/ loki-linux-amd64.zip- 1.
Create a user
useradd -r -s /sbin/nologin loki- 1.
Create a configuration file
mkdir -pv /etc/loki /data/loki

chown -R loki:loki /etc/loki- 1.
- 2.
- 3.
Edit Loki's configuration file
auth_enabled: false

server:
  http_listen_port: 3100
  grpc_listen_port: 9096

common:
  path_prefix: /data/loki
  storage:
    filesystem:
      chunks_directory: /data/loki/chunks
      rules_directory: /data/loki/rules
  replication_factor: 1
  ring:
    instance_addr: 10.20.20.20
    kvstore:
      store: inmemory

schema_config:
  configs:
    - from: 2020-10-24
      store: boltdb-shipper
      object_store: filesystem
      schema: v11
      index:
        prefix: index_
        period: 24h

ruler:
alertmanager_url: http://localhost:9093- 1.
- 2.
- 3.
- 4.
- 5.
- 6.
- 7.
- 8.
- 9.
- 10.
- 11.
- 12.
- 13.
- 14.
- 15.
- 16.
- 17.
- 18.
- 19.
- 20.
- 21.
- 22.
- 23.
- 24.
- 25.
- 26.
- 27.
- 28.
- 29.
- 30.
Please modify the above items
instance_addr, change to the IP address of the installation host
alertmanager_url: Modified to alertmanager's URL, this time does not use alertmanager, so write localhost
Edit the service configuration file vim /lib/systemd/system/loki.service for Systemd[2].
[Unit]
Description=Loki service
After=network.target

[Service]
Type=simple
User=loki
ExecStart=/usr/local/bin/loki-linux-amd64 -config.file /etc/loki/loki-my-config.yaml

[Install]
WantedBy=multi-user.target- 1.
- 2.
- 3.
- 4.
- 5.
- 6.
- 7.
- 8.
- 9.
- 10.
- 11.
Boot and set to boot auto-start
systemctl start loki; systemctl enable loki

systemctl status loki- 1.
- 2.
- 3.
Install and configure Promtail
Download the installation package from https://github.com/grafana/loki/releases[3].
Download the configuration file for the sample
wget https://raw.githubusercontent.com/grafana/loki/master/cmd/promtail/promtail-local-config.yaml- 1.
You can also use the following example configuration directly, noting that individual addresses need to be modified and have been commented
server:
  http_listen_port: 9080
  grpc_listen_port: 0

positions:
  filename: /etc/promtail/positions.yaml

clients:
# 将地址修改为实际的 loki Server 的地址
  - url: http://10.20.20.20:3100/loki/api/v1/push


scrape_configs:
- job_name: loki
  static_configs:
  - targets:
      - localhost
    labels:
      job: syslog
      env: prod
      location: whcq
      vendor: loki
      hostname: m-loki
      __path__: /var/log/network/m-loki-127.0.0.1.log

- job_name: syslog
  static_configs:
  - targets:
      - localhost
    labels:
      job: syslog
      env: prod
      location: whcq   # 设备的机房或者所在的位置
      vendor: huawei   # 品牌
      hostname: Test-S6720-254  # 主机名
      __path__: /var/log/network/Test-S6720-254-10.20.99.254.log  # 日志的路径

- job_name: syslog
  static_configs:
  - targets:
      - localhost
    labels:
      job: syslog
      env: prod
      location: shbd
      vendor: cisco
      hostname: Test-C3560G
      __path__: /var/log/network/192.168.99.254-192.168.99.254.log
- 1.
- 2.
- 3.
- 4.
- 5.
- 6.
- 7.
- 8.
- 9.
- 10.
- 11.
- 12.
- 13.
- 14.
- 15.
- 16.
- 17.
- 18.
- 19.
- 20.
- 21.
- 22.
- 23.
- 24.
- 25.
- 26.
- 27.
- 28.
- 29.
- 30.
- 31.
- 32.
- 33.
- 34.
- 35.
- 36.
- 37.
- 38.
- 39.
- 40.
- 41.
- 42.
- 43.
- 44.
- 45.
- 46.
- 47.
- 48.
调整promtail执行文件和配置文件的路径
mv promtail-linux-amd64 /usr/local/bin/

mkdir -pv /etc/promtail; mv promtail-local-config.yaml config-promtail.yml- 1.
- 2.
- 3.
创建用户并修改文件的权限
useradd -r promtail

chown promtail:promtail /tmp/positions.yaml- 1.
- 2.
- 3.
编辑 Promtail.servicevim /lib/systemd/system/promtail.service
[Unit]
Description=Promtail service
After=network.target

[Service]
Type=simple
User=promtail
ExecStart=/usr/local/bin/promtail -config.file /etc/promtail/config-promtail.yml

[Install]
WantedBy=multi-user.target - 1.
- 2.
- 3.
- 4.
- 5.
- 6.
- 7.
- 8.
- 9.
- 10.
- 11.
启动服务
systemctl start promtail

systemctl enable promtail - 1.
- 2.
- 3.
使用rsyslog收集到网络设备的日志
- 搭建并配置rsyslog
配置文件如下vim /etc/rsyslog.conf
# provides UDP syslog reception
module(load="imudp")
input(type="imudp" port="514")

# provides TCP syslog reception
module(load="imtcp")
input(type="imtcp" port="514")


$template IpTemplate,"/var/log/network/%HOSTNAME%-%FROMHOST-IP%.log"
*.*  ?IpTemplate
& ~- 1.
- 2.
- 3.
- 4.
- 5.
- 6.
- 7.
- 8.
- 9.
- 10.
- 11.
- 12.
- 13.
%HOSTNAME%-%FROMHOST-IP%.log是日志文件的名字,表示主机名+发送源主机的IP
重启服务
systemctl restart rsyslog- 1.
配置交换机发送日志到Loki
- Cisco交换机
# 设置发送日志的源端口
logging source-interface Vlan99

# 设置目标主机
logging 10.20.20.20- 1.
- 2.
- 3.
- 4.
- 5.
- 华为交换机
# 根据实际情况修改源接口,或者不配置
info-center loghost source Vlanif999

# 设置 syslog 的目标主机
info-center loghost 10.20.20.20

# 默认情况下是Info级别,所以此命令可以不执行
info-center source default channel loghost log level informational
- 1.
- 2.
- 3.
- 4.
- 5.
- 6.
- 7.
- 8.
- 配置Grafana
导入ID为13639的Dashboard
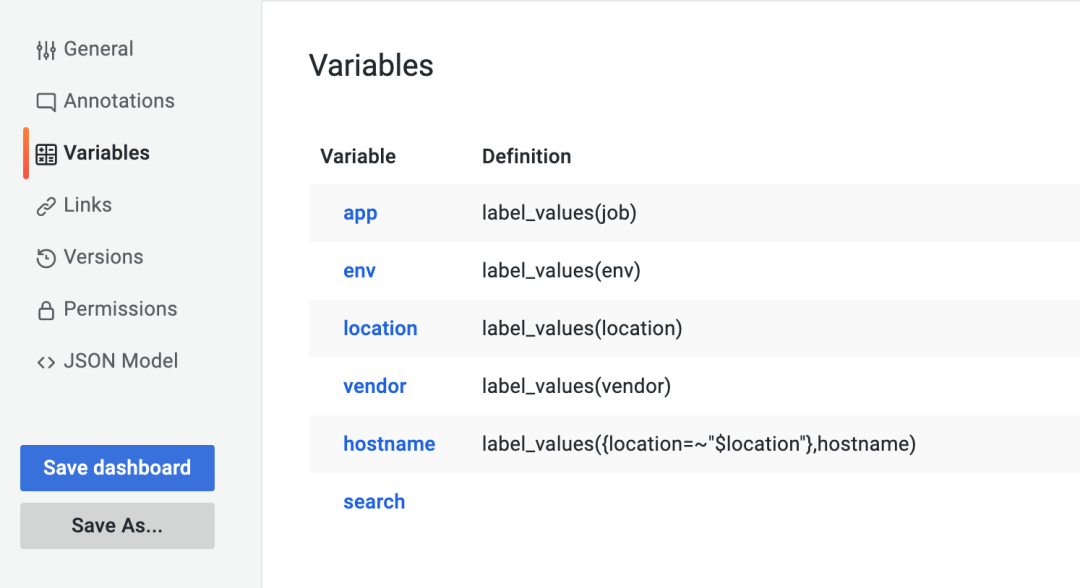
To configure Variables, the recommended configuration is as follows

Review the logs
